> ## Documentation Index
> Fetch the complete documentation index at: https://www.conductor.com/docs/llms.txt
> Use this file to discover all available pages before exploring further.
# Integrate Akamai with Conductor Intelligence
> Send log file data from Akamai to Conductor Intelligence's Pages report.
Note that the instructions in this article describe the process for integrating with Conductor Intelligence. You can also integrate Akamai for Conductor Monitoring's [Log File Analysis](/docs/monitoring/setting-up-the-akamai-integration/) feature.
Integrating [Akamai DataStream](https://techdocs.akamai.com/datastream2/docs) with Conductor Intelligence consists of two phases:
* Enabling log files and creating an [AWS S3 bucket](https://aws.amazon.com/s3/) in Conductor Intelligence.
* Configuring Akamai DataStream in the Akamai UI, and associating the DataStream with the corresponding property.
## Enabling log files and creating an AWS S3 bucket in Conductor Intelligence
In Conductor Intelligence:
1. Go to the [Pages & Crawling](https://app.conductor.com/u/pages-and-crawling) settings activity (**Settings** > **Pages & Crawling**).
2. From the list of configured subdomains, identify the subdomain with the pages for which you want to see log file data.
3. In the **Log Source** column for that subdomain, click **Connect**.
4. In the Akamai section, from the **Connect a log source** window, click **Connect**.
5. In the **Connect Akamai DataStream** window:
1. If you have configured your Akamai DataStream for your root domain, select whether you want to apply this integration to all relevant subdomains. This allows you to integrate Akamai once for all applicable subdomains rather than for each subdomain individually. If your Akamai DataStream is configured at the subdomain level, leave this check box clear and configure individual log file integrations for each subdomain.
2. Click **Create Bucket**.
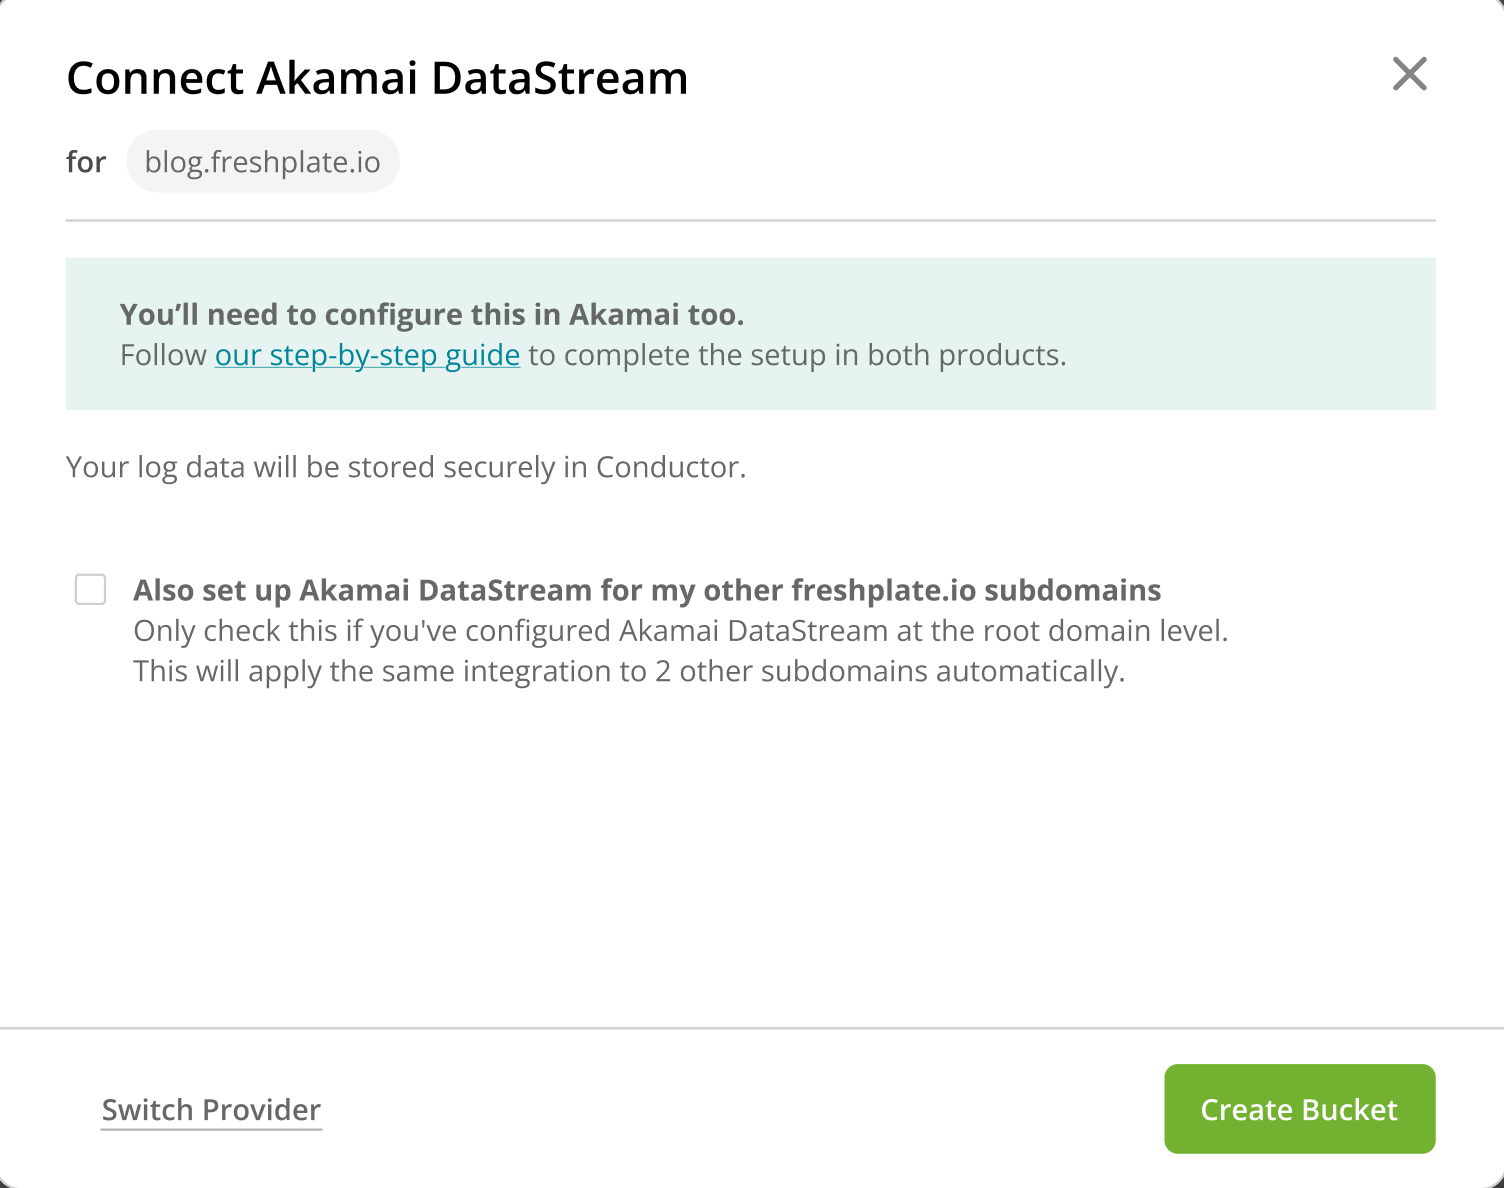 Conductor Intelligence will generate the following details you'll need to associate the AWS S3 bucket with Akamai DataStream in the next section:
* **Bucket**
* **Access Key ID**
* **Secret Access Key**
Conductor Intelligence will generate the following details you'll need to associate the AWS S3 bucket with Akamai DataStream in the next section:
* **Bucket**
* **Access Key ID**
* **Secret Access Key**
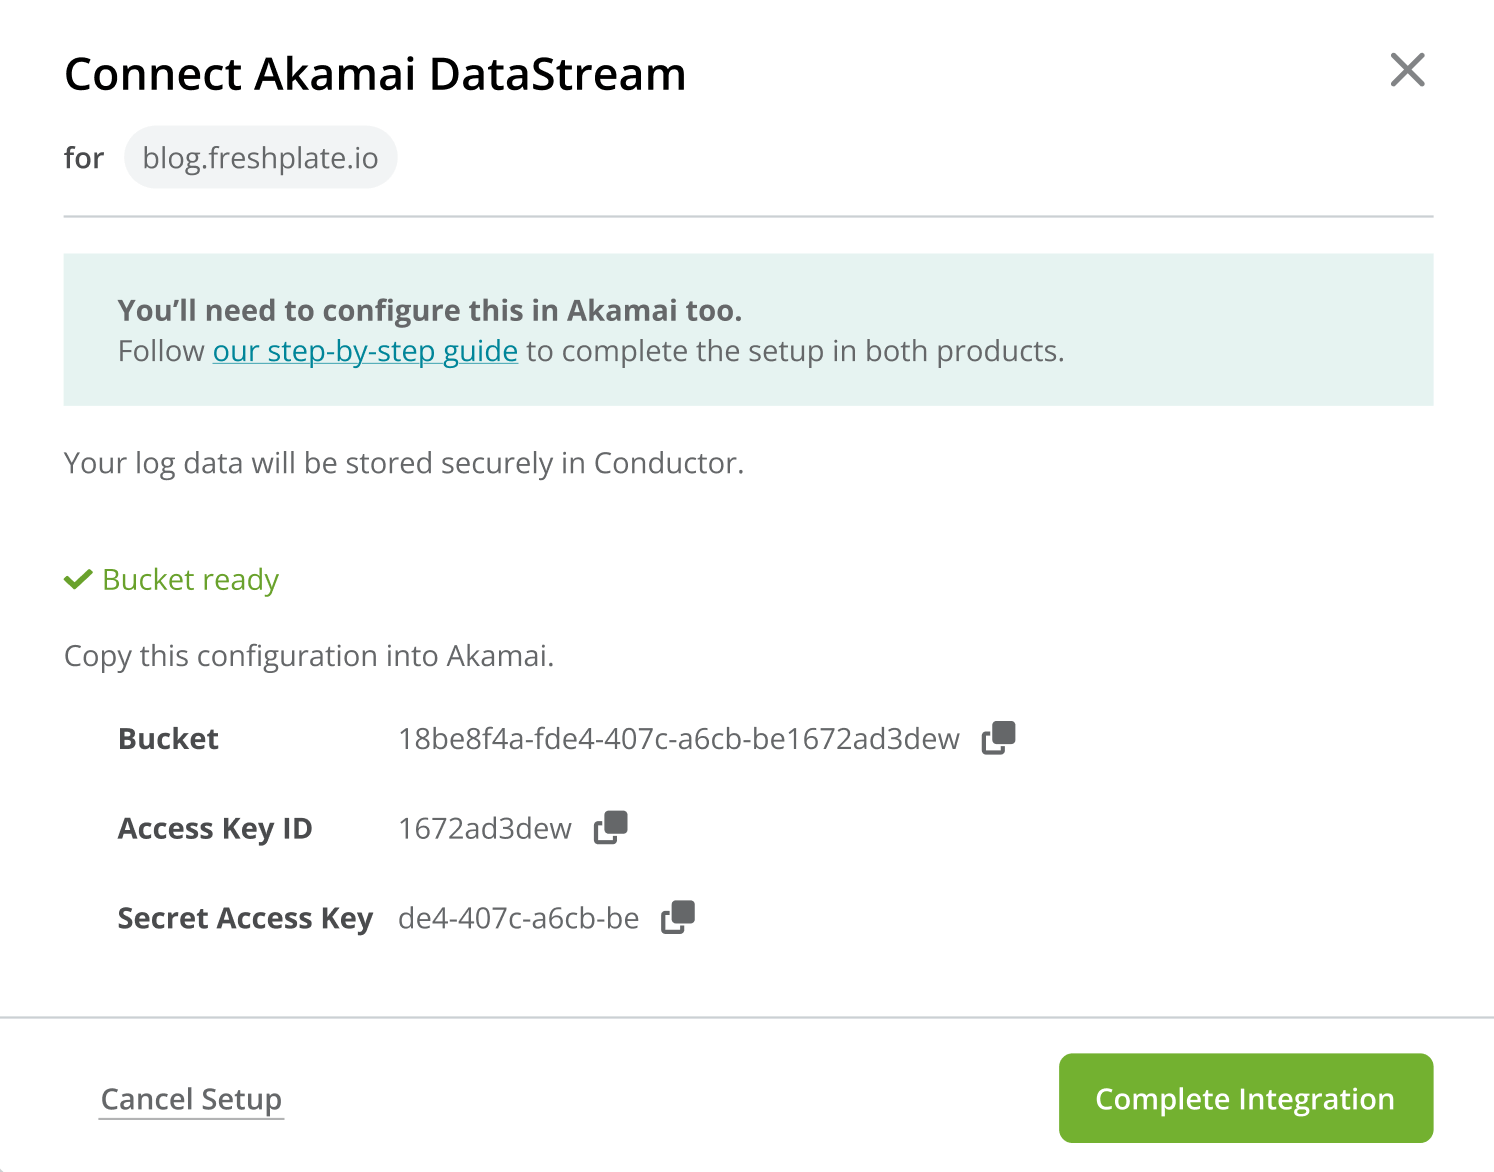 6. Click **Complete Integration**.
## Configuring Akamai DataStream
Akamai DataStream needs to be manually configured in the Akamai UI for every website. The configuration of Akamai DataStream consists of two steps:
* Creating a new Akamai DataStream.
* Associating the DataStream with the corresponding property (domain).
### Creating a new Akamai DataStream
Follow these steps to create a new Akamai DataStream:
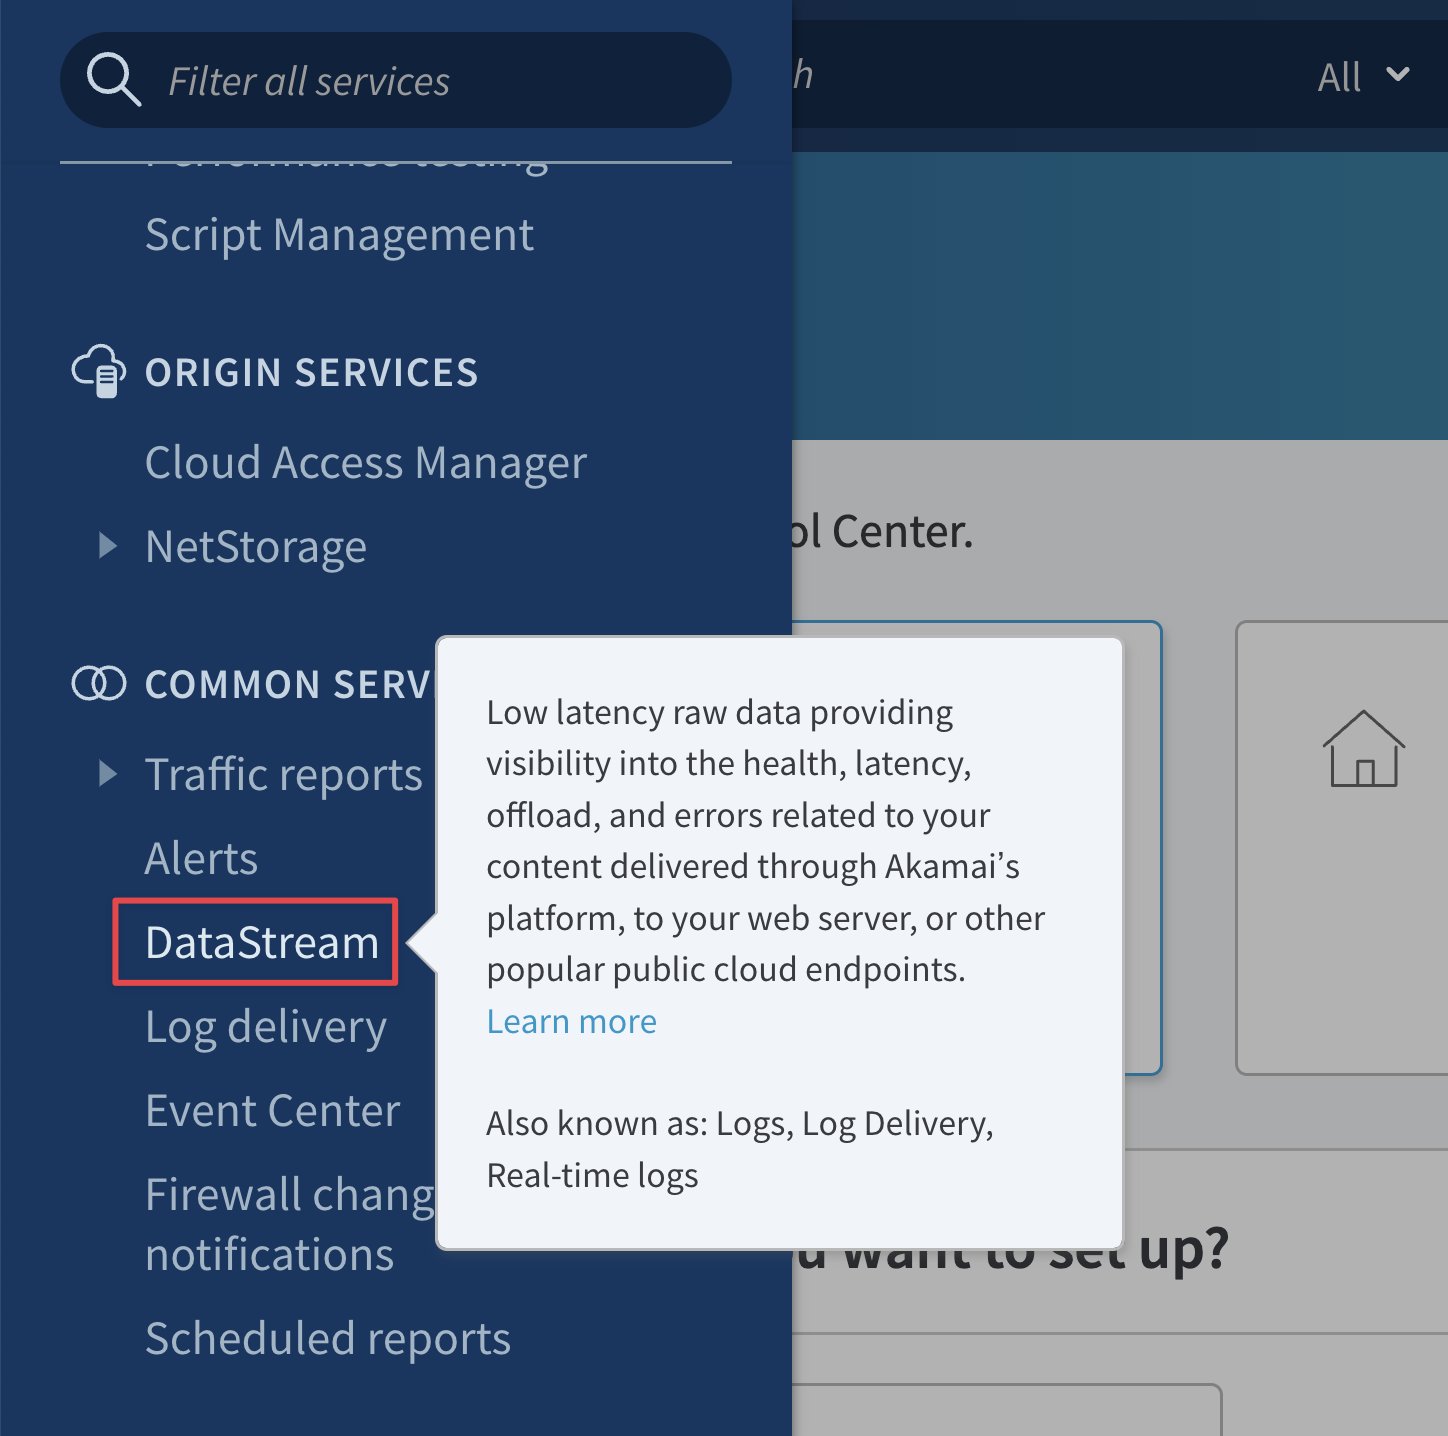
1. Log in to your [Akamai Control Center](https://control.akamai.com/apps/home-page/#/home) and click on **DataStream** in the navigation bar:
6. Click **Complete Integration**.
## Configuring Akamai DataStream
Akamai DataStream needs to be manually configured in the Akamai UI for every website. The configuration of Akamai DataStream consists of two steps:
* Creating a new Akamai DataStream.
* Associating the DataStream with the corresponding property (domain).
### Creating a new Akamai DataStream
Follow these steps to create a new Akamai DataStream:
1. Log in to your [Akamai Control Center](https://control.akamai.com/apps/home-page/#/home) and click on **DataStream** in the navigation bar:
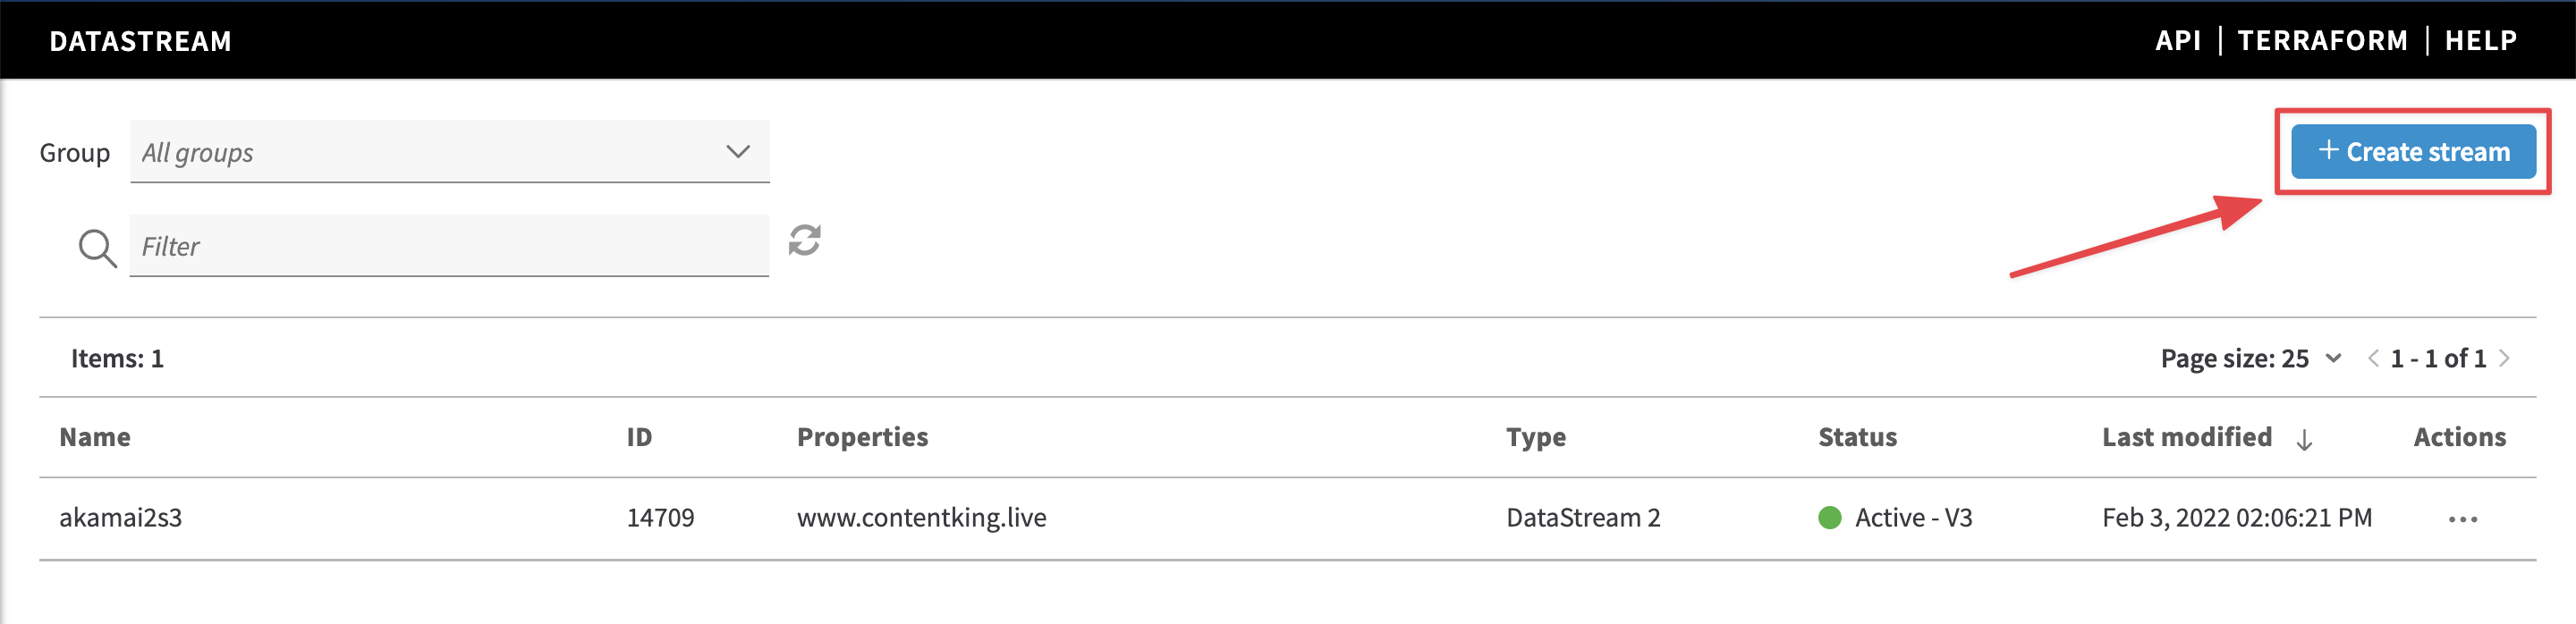
 2. On the **DataStream** screen, click **Create stream**:
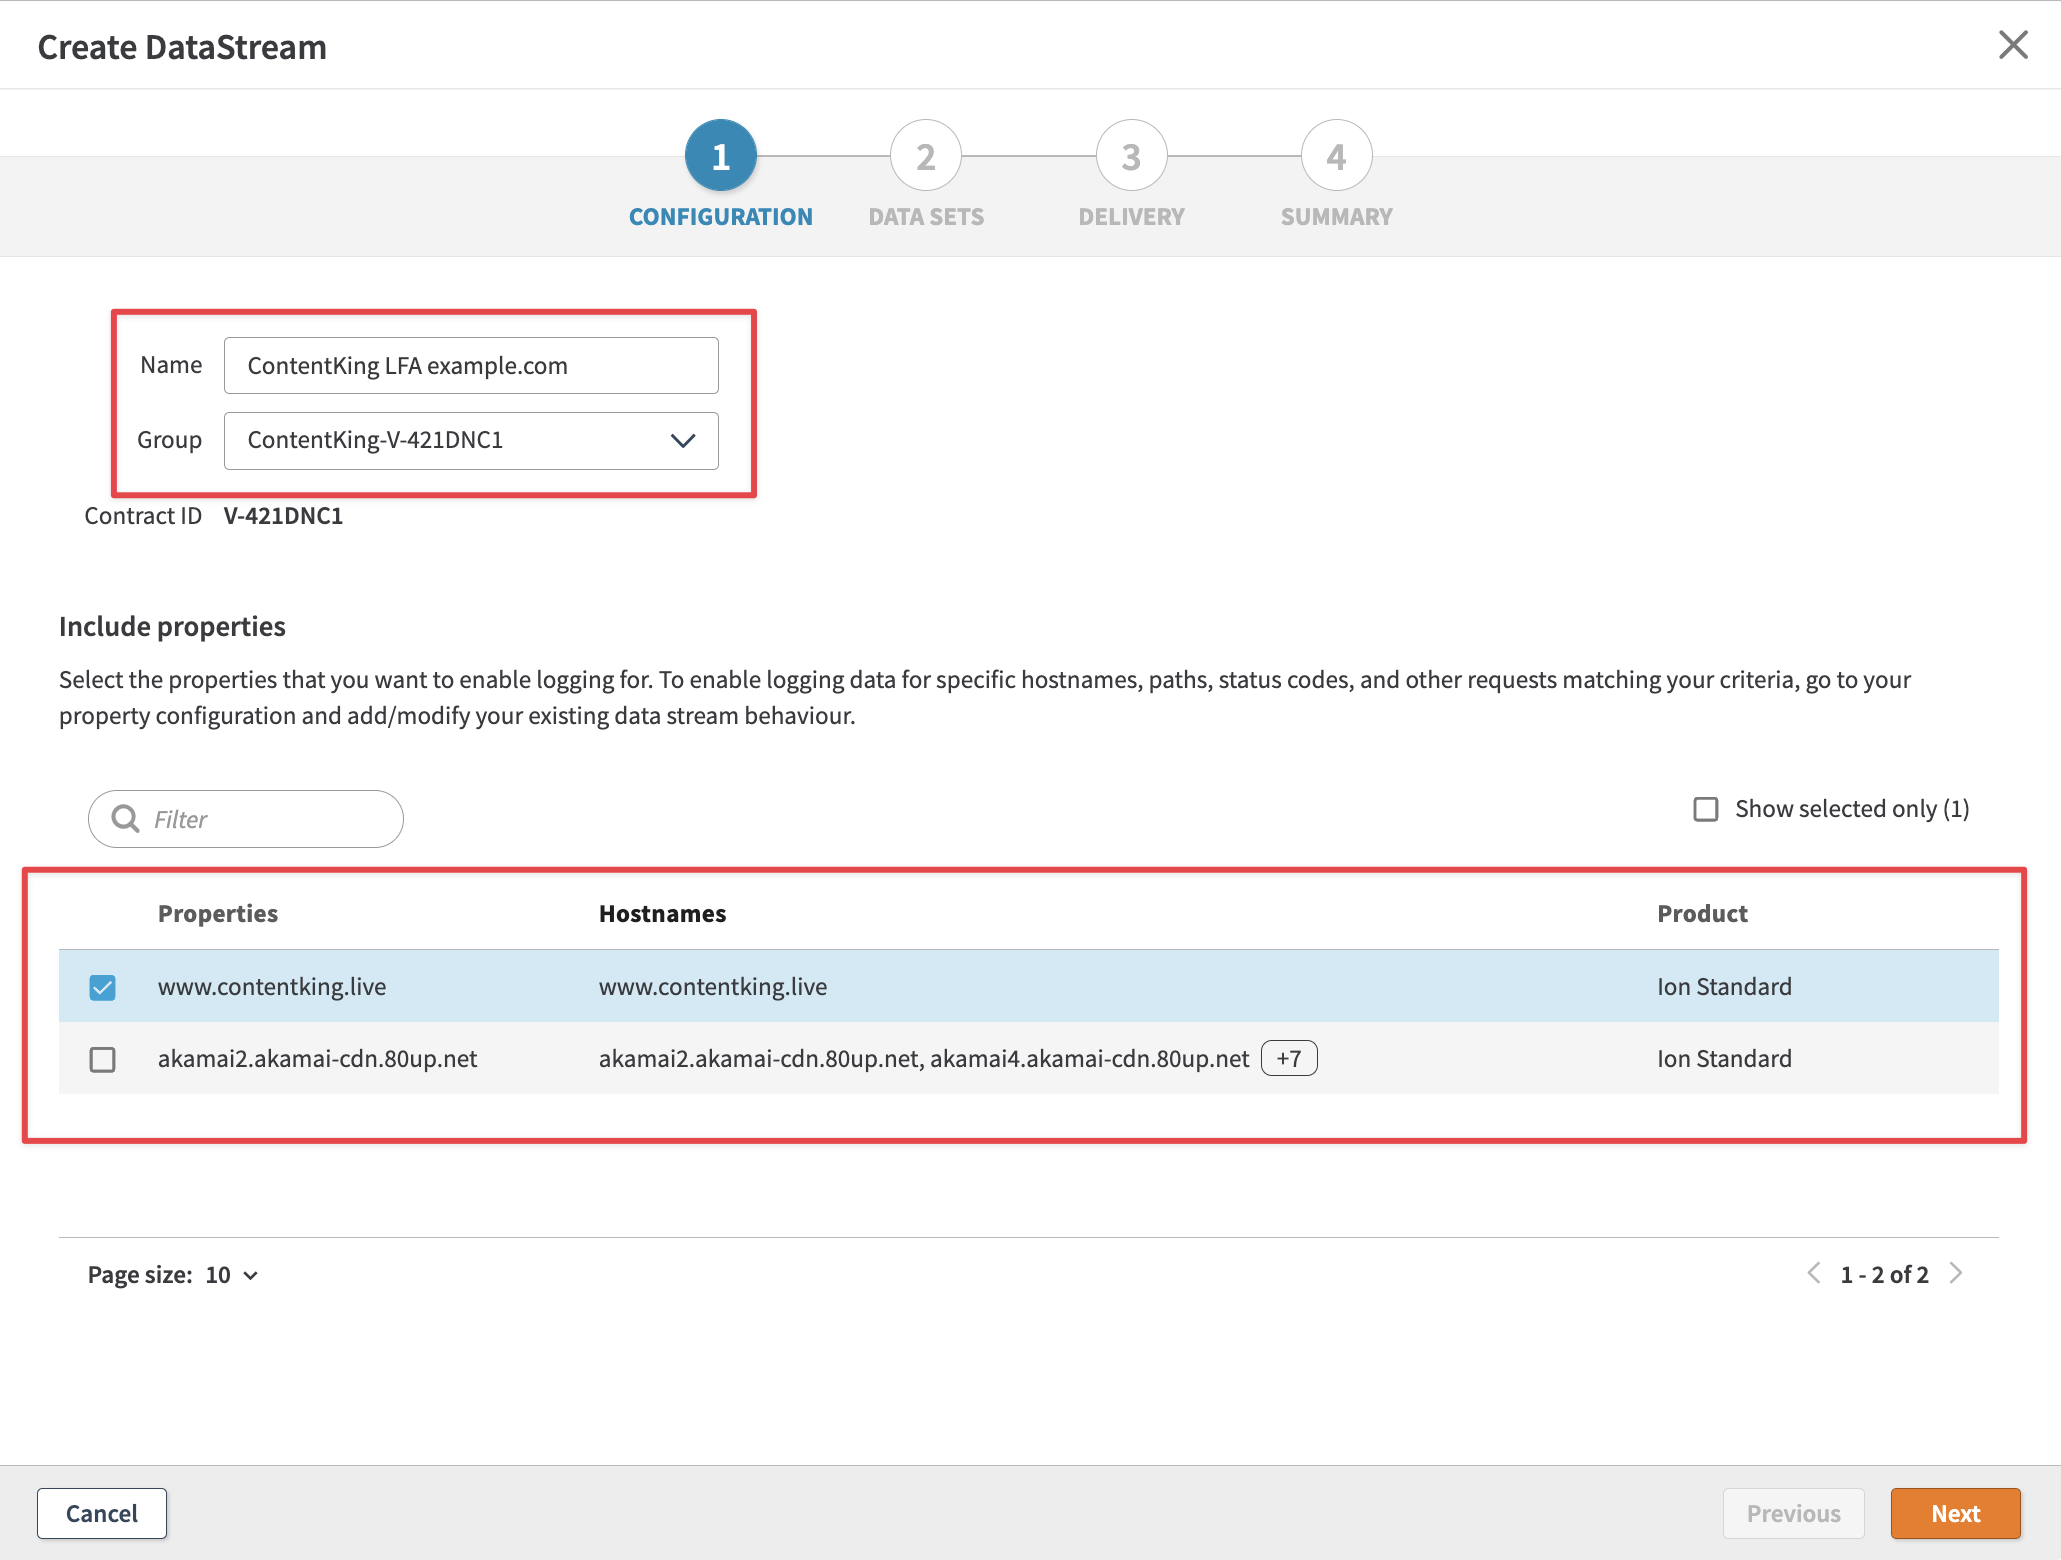
 3. Configure the DataStream: specify the stream's name (e.g. "Conductor Intelligence example.com") and pick the website for which you want to configure the Akamai DataStream in the **Properties** list:
 4. Configure the Data Sets:\
**Important:** ***The log format needs to be JSON***.\
Choose the following *required* data sets to be sent to the AWS S3 bucket. All the fields listed below need to be selected for log file data to work properly. You can also add other data sets, but the ones listed below are required.
* Log information
* Request ID
* Request time
* Message exchange data
* Client IP
* HTTP status code
* Protocol type
* Request host
* Request method
* Request path
* Request port
* Response-Content-Type
* User-Agent
* SSL version
* Query string
Conductor requires streaming only *non-PII* (non-personally identifiable information) data to its AWS S3 bucket.
To do that, you can filter away non-search engine traffic based on the User Agent string when setting up the DataStream directly in the Akamai UI.
This is covered in the section [Filter away non-search engine traffic](#filter-away-non-search-engine-traffic) below.
5. Choose **Amazon S3** as the destination where the data will be streamed:
4. Configure the Data Sets:\
**Important:** ***The log format needs to be JSON***.\
Choose the following *required* data sets to be sent to the AWS S3 bucket. All the fields listed below need to be selected for log file data to work properly. You can also add other data sets, but the ones listed below are required.
* Log information
* Request ID
* Request time
* Message exchange data
* Client IP
* HTTP status code
* Protocol type
* Request host
* Request method
* Request path
* Request port
* Response-Content-Type
* User-Agent
* SSL version
* Query string
Conductor requires streaming only *non-PII* (non-personally identifiable information) data to its AWS S3 bucket.
To do that, you can filter away non-search engine traffic based on the User Agent string when setting up the DataStream directly in the Akamai UI.
This is covered in the section [Filter away non-search engine traffic](#filter-away-non-search-engine-traffic) below.
5. Choose **Amazon S3** as the destination where the data will be streamed:
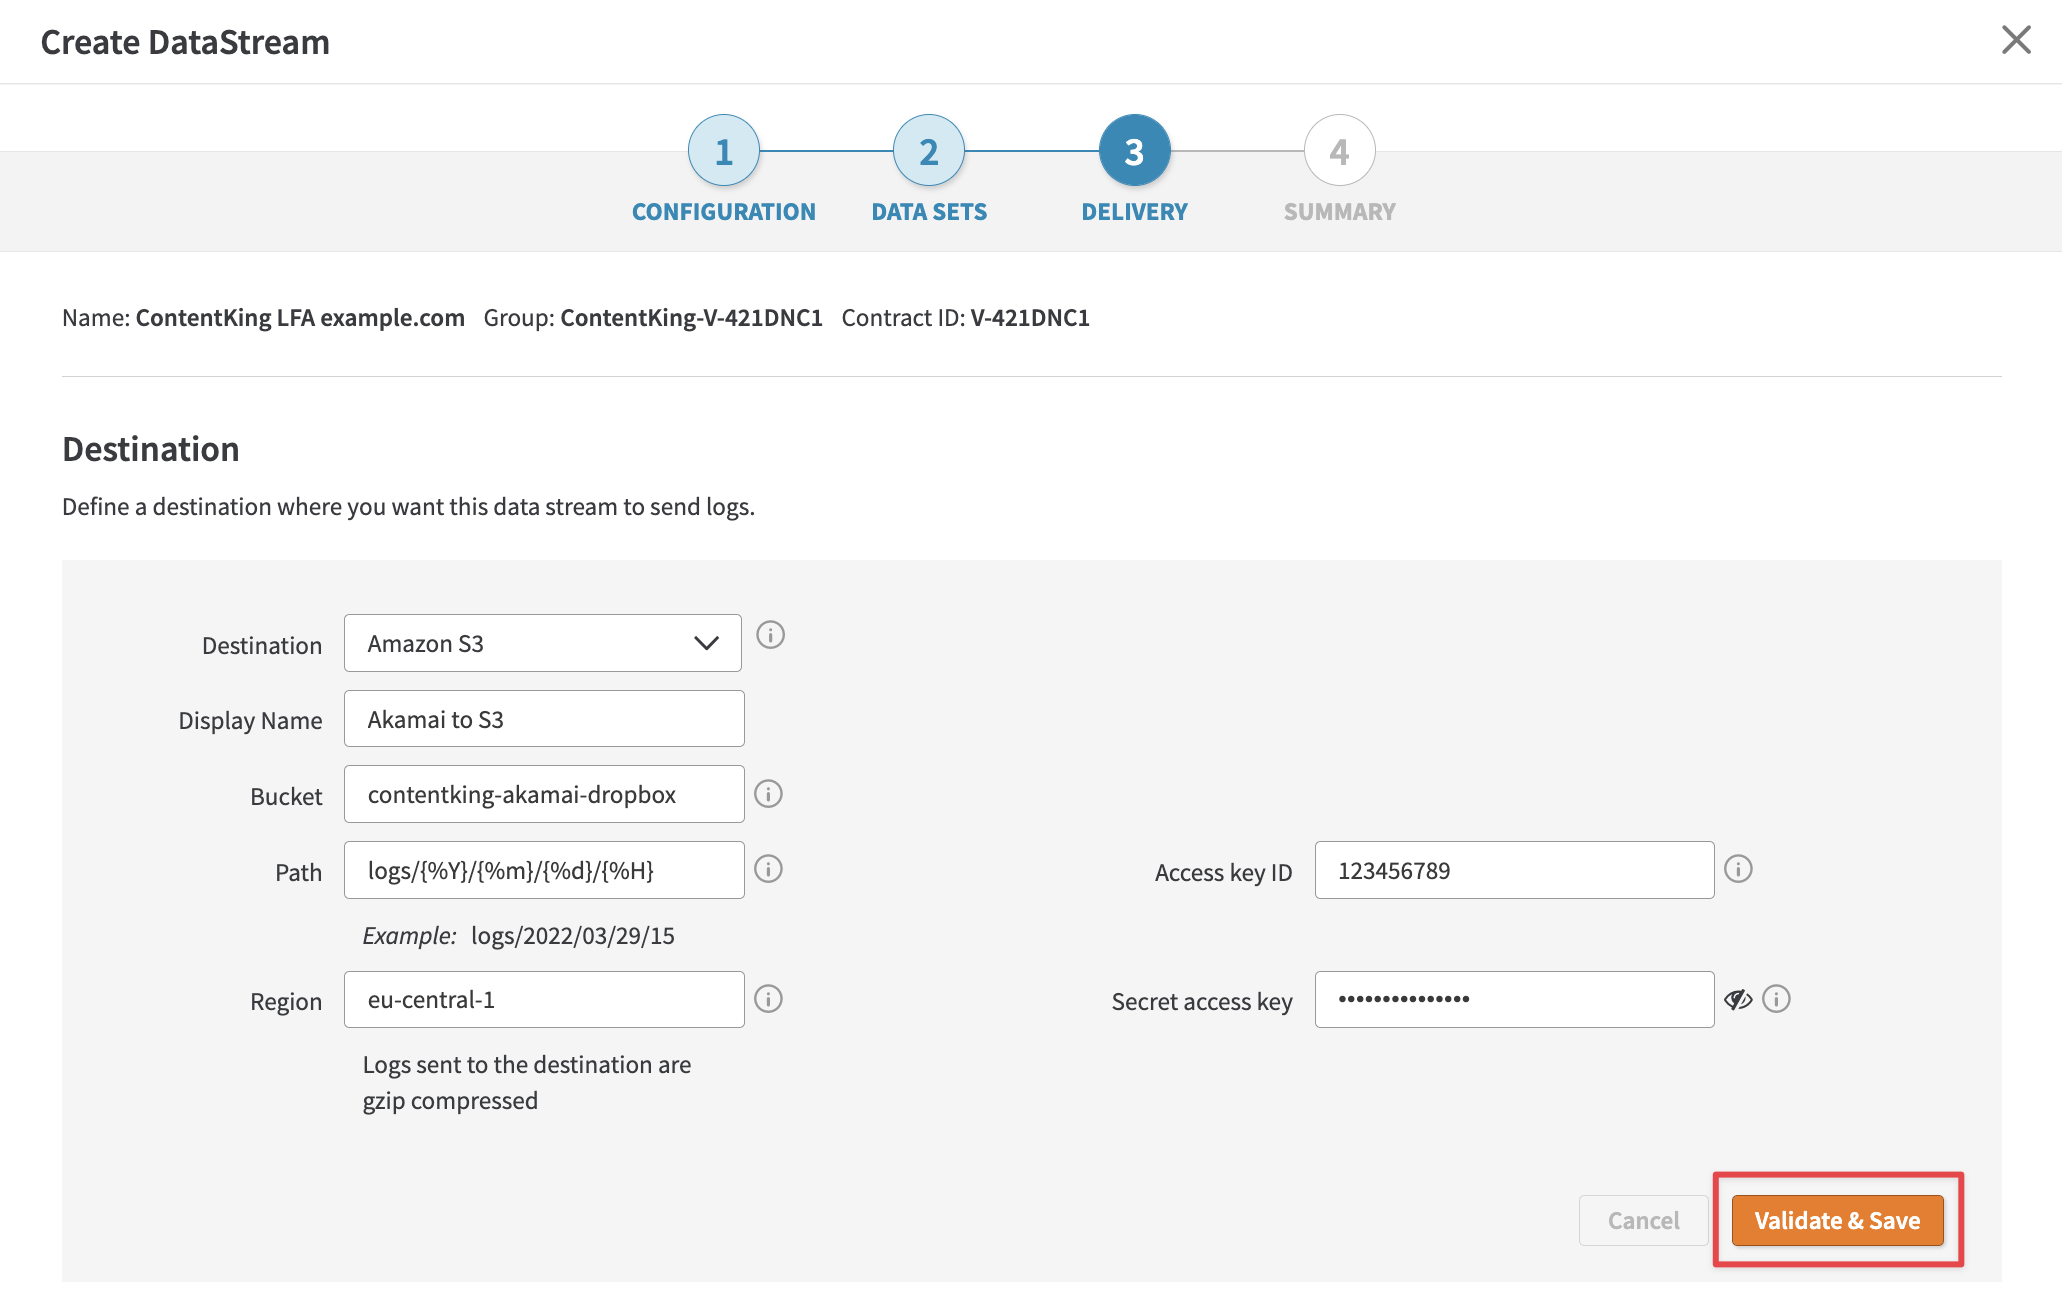 * Fill in the **Display name** (e.g. *conductor-intelligence-s3-example*).
* Enter the **Bucket name** from the credentials you saved from Conductor Intelligence in the **Bucket** field.
* **Path** (default suggested by Akamai): `logs/{%Y}/{%m}/{%d}/{%H}`
* Enter the **Region** from the credentials generated in Conductor Intelligence.
* Enter the **Access key ID** and **Secret access key** from the credentials generated in Conductor Intelligence.
* Once done, click **Validate & Save**.
6. Finish the setup and click **Save stream**:
* Fill in the **Display name** (e.g. *conductor-intelligence-s3-example*).
* Enter the **Bucket name** from the credentials you saved from Conductor Intelligence in the **Bucket** field.
* **Path** (default suggested by Akamai): `logs/{%Y}/{%m}/{%d}/{%H}`
* Enter the **Region** from the credentials generated in Conductor Intelligence.
* Enter the **Access key ID** and **Secret access key** from the credentials generated in Conductor Intelligence.
* Once done, click **Validate & Save**.
6. Finish the setup and click **Save stream**:
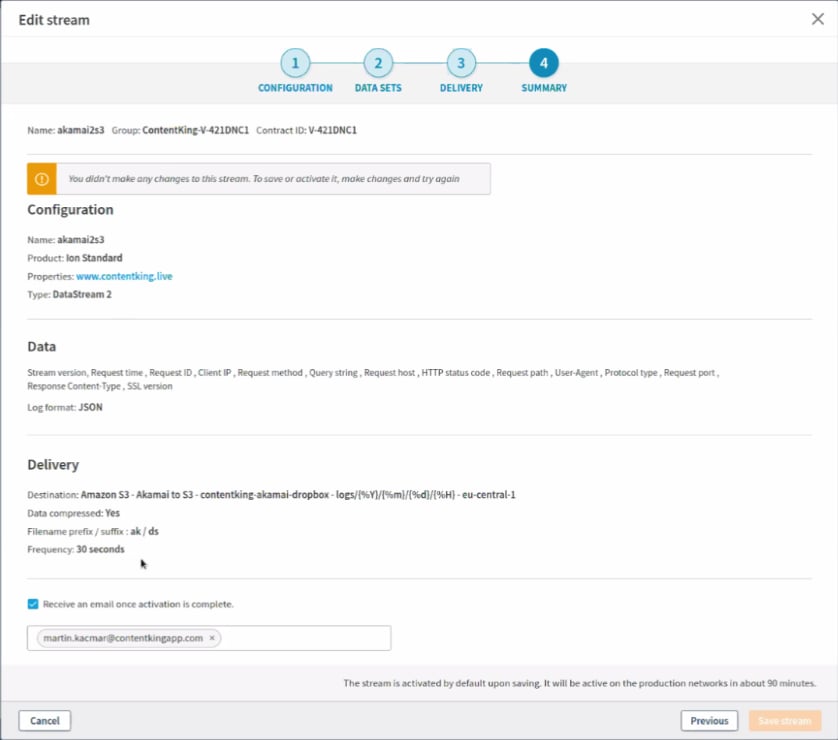 After configuring the DataStream, it might take several hours until Akamai sets everything up. Please [let us know](/docs/platform/getting-help-with-conductor-products/) if it takes more than 24 hours.
### Associate the created DataStream with the corresponding property
After creating the new DataStream, you need to associate it with the corresponding property in your Akamai account.
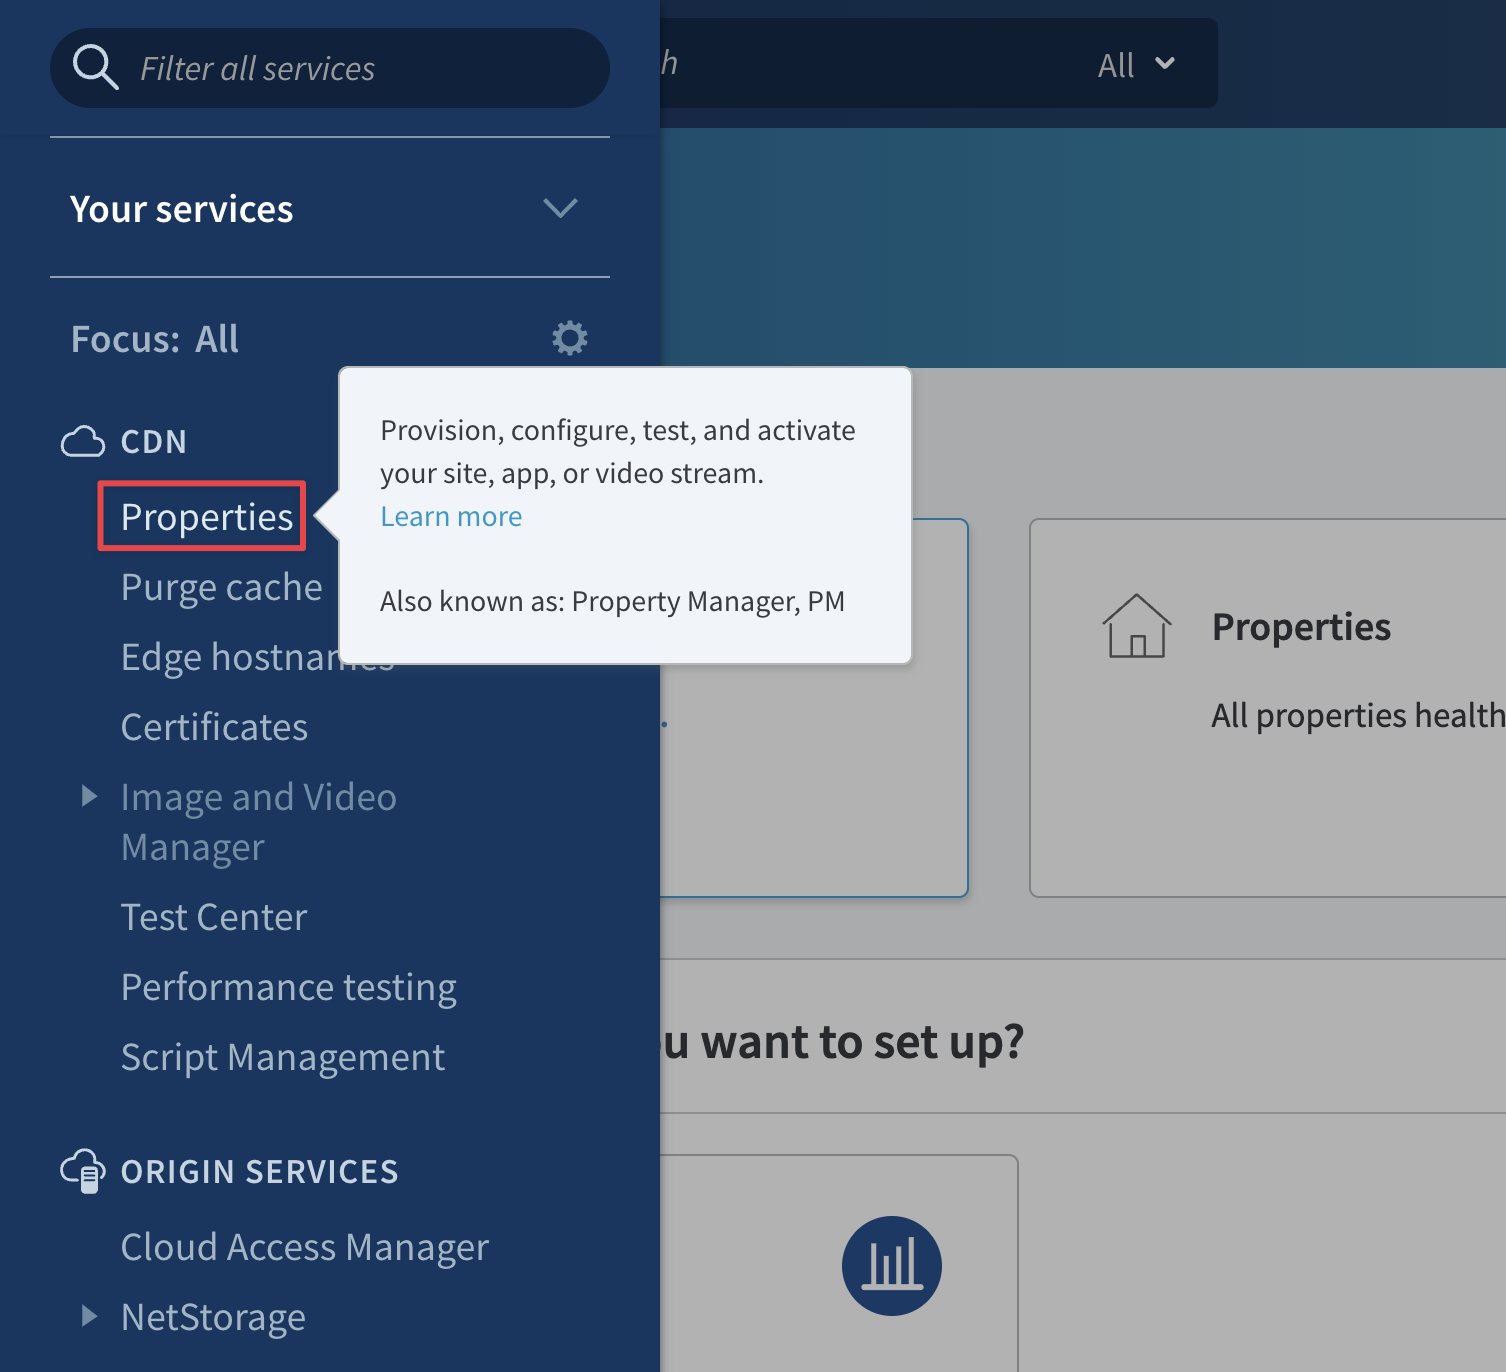
1. Log in to your [Akamai Control Center](https://control.akamai.com/apps/home-page/#/home) and click on **Properties** in the navigation bar:
After configuring the DataStream, it might take several hours until Akamai sets everything up. Please [let us know](/docs/platform/getting-help-with-conductor-products/) if it takes more than 24 hours.
### Associate the created DataStream with the corresponding property
After creating the new DataStream, you need to associate it with the corresponding property in your Akamai account.
1. Log in to your [Akamai Control Center](https://control.akamai.com/apps/home-page/#/home) and click on **Properties** in the navigation bar:
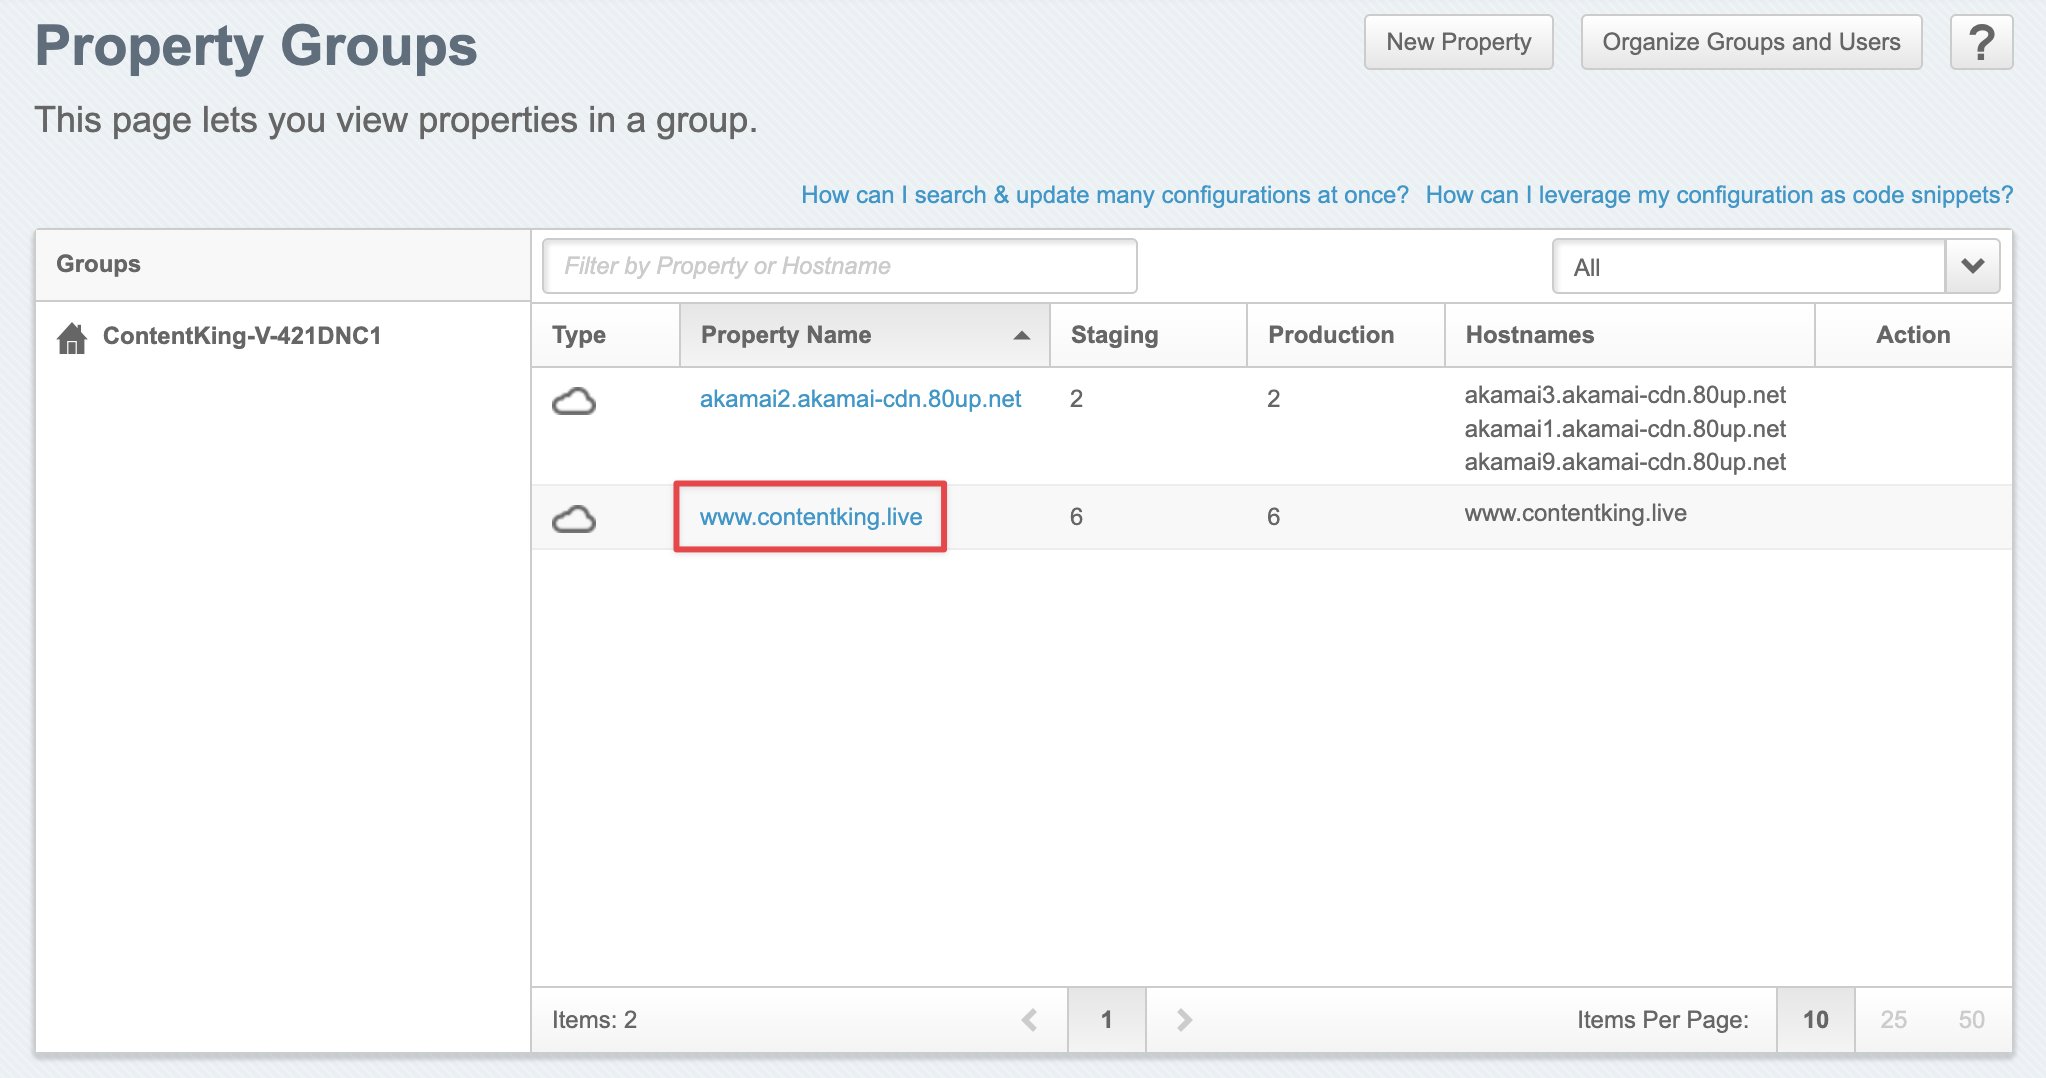
 2. Click the property which you want to associate with the created DataStream:
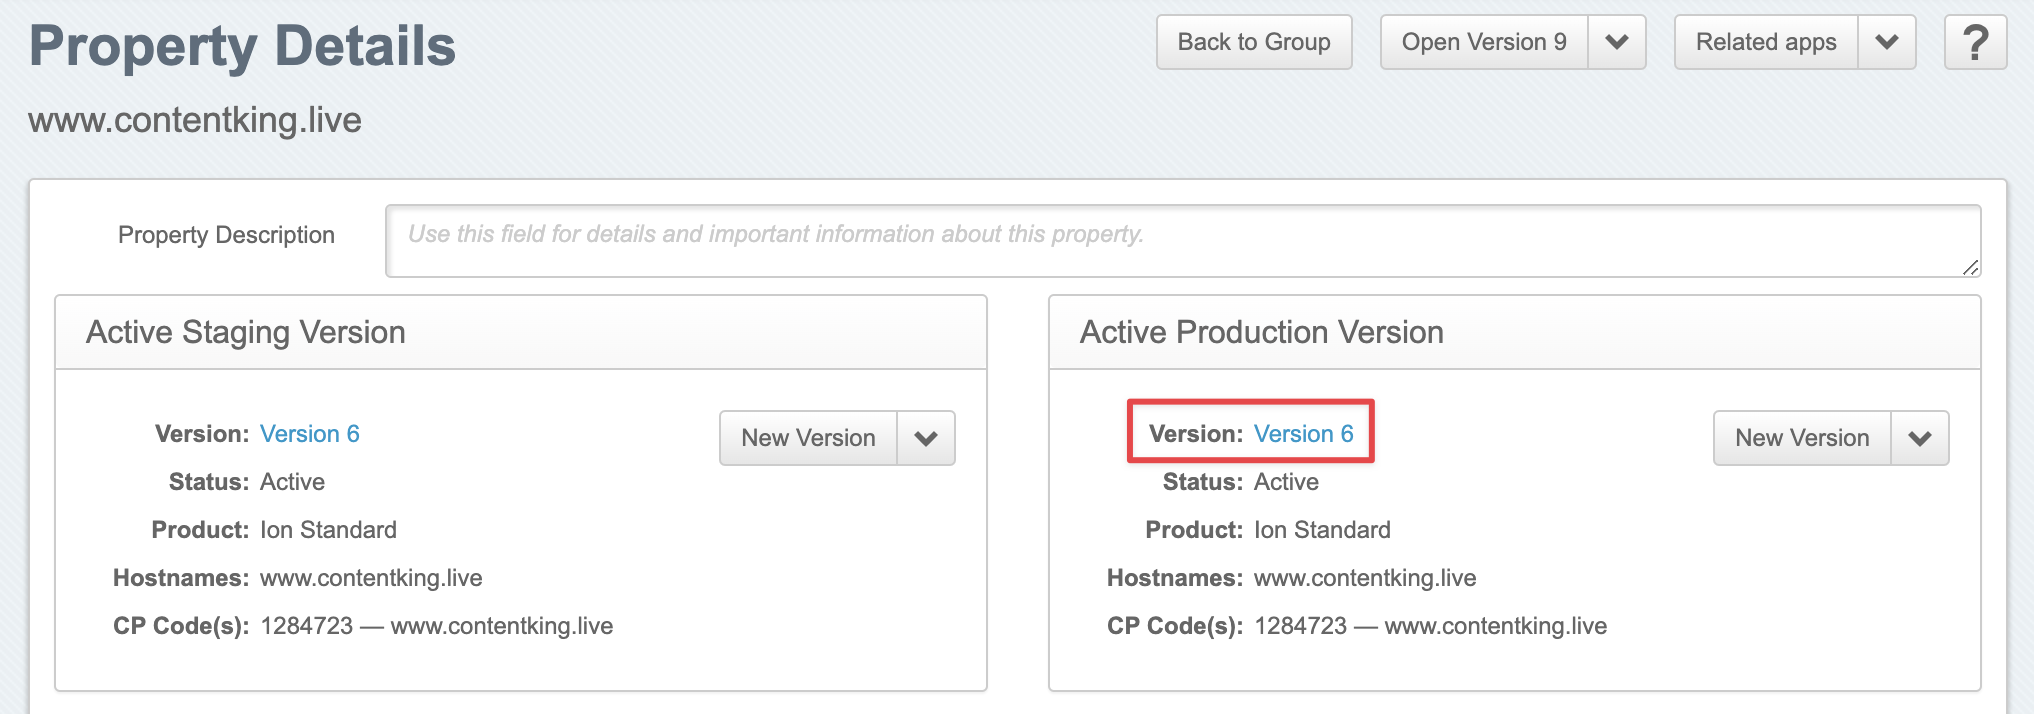
 3. Click the **Property Version** for the website you are sending log file data for (this can be either the Staging Version or the Production Version):
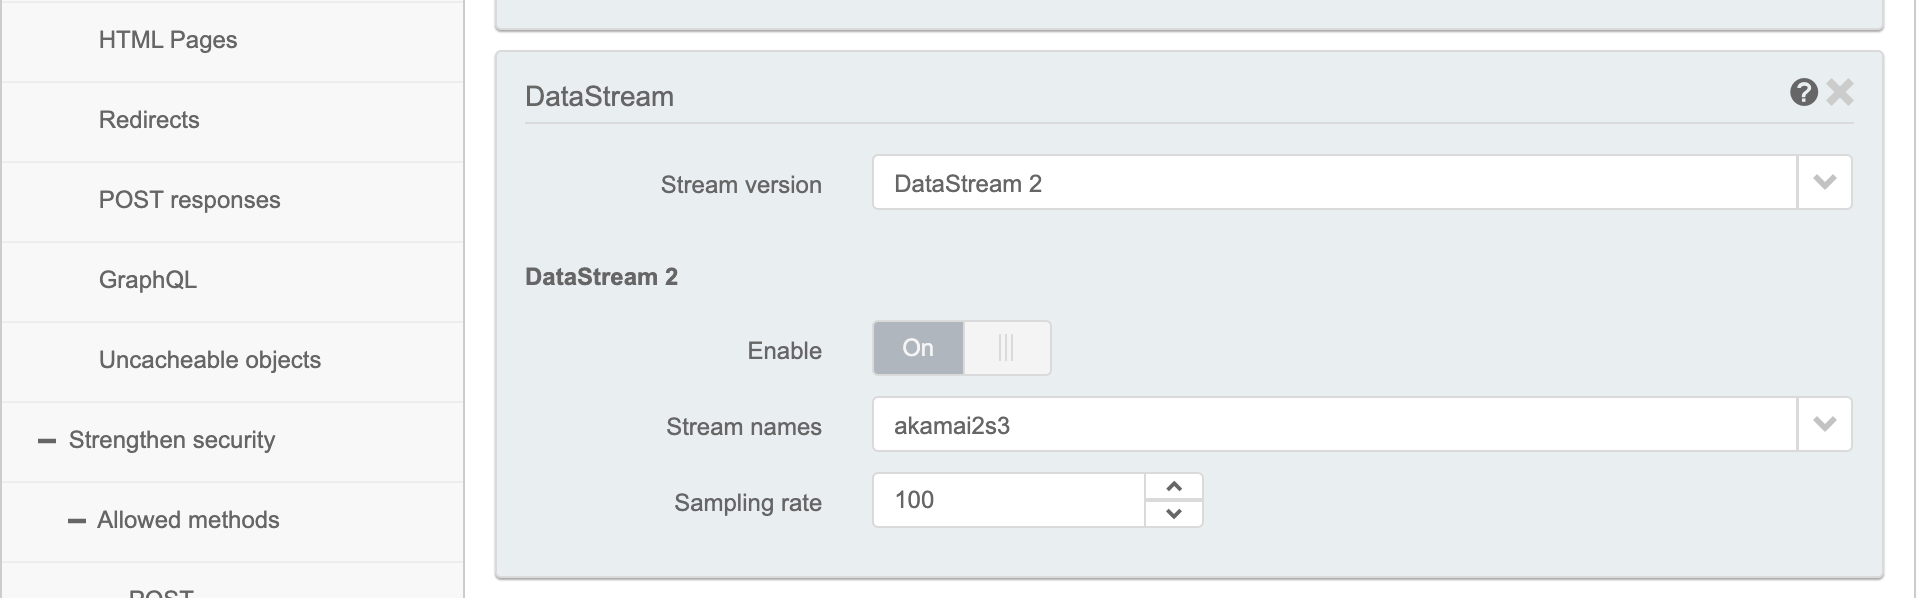
 4. Scroll to the **DataStream** section in **Property Configuration Settings**. If the **DataStream** section is missing, follow the steps below to add it. If not, skip to step 5.
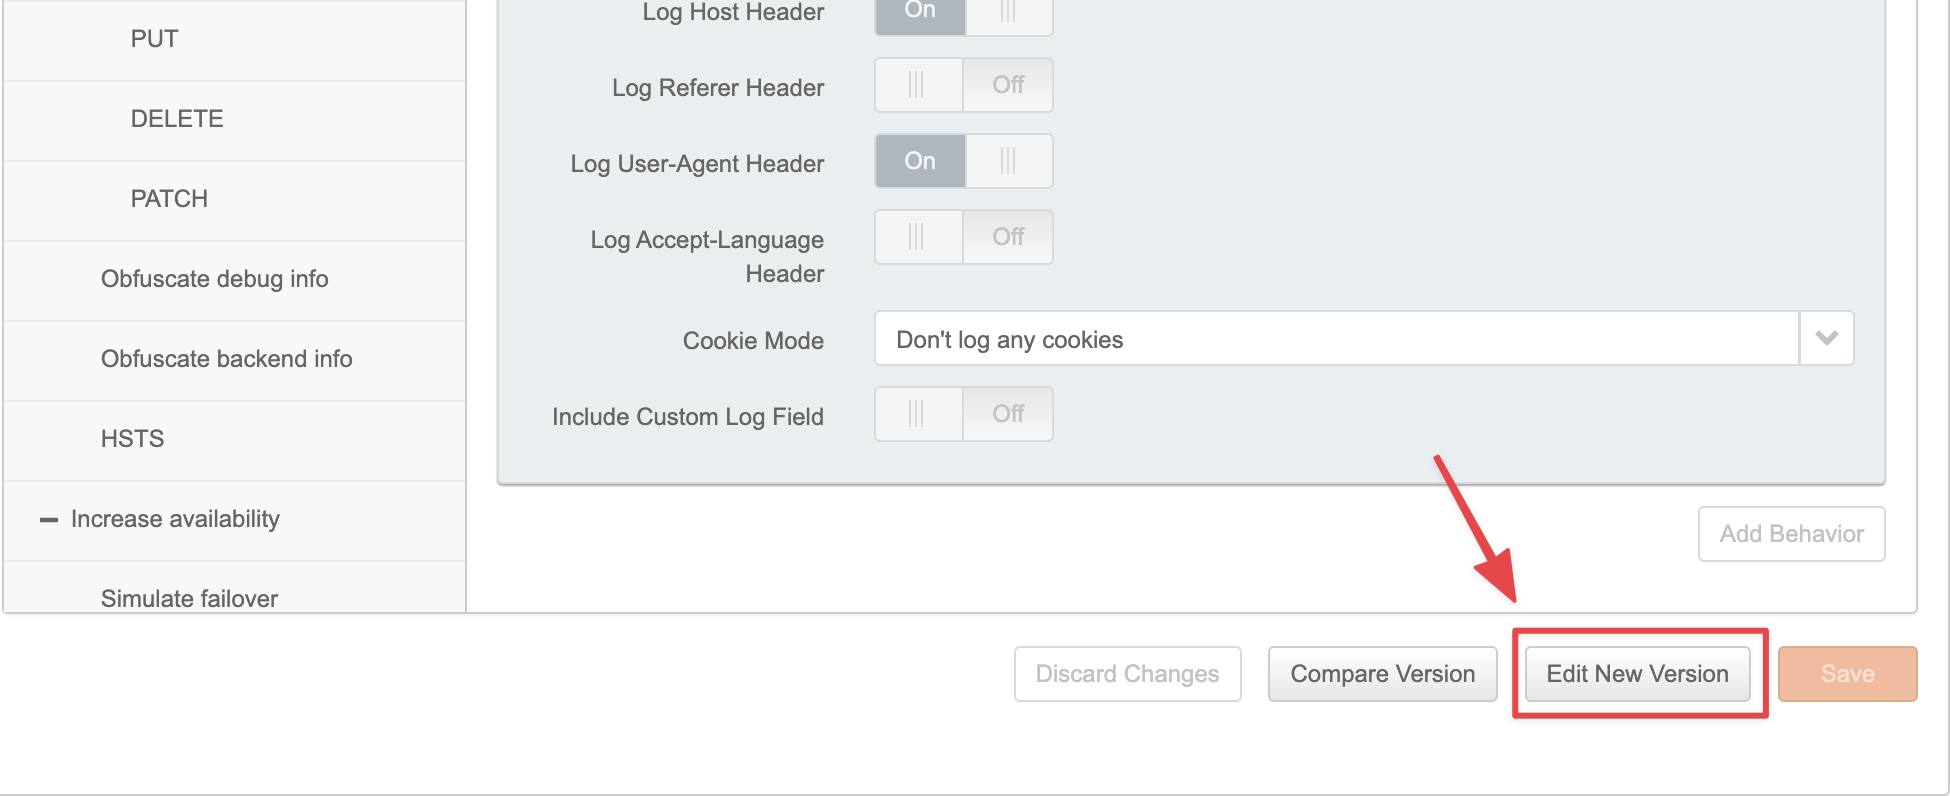
 1. Scroll all the way down, and click **Edit new version**.
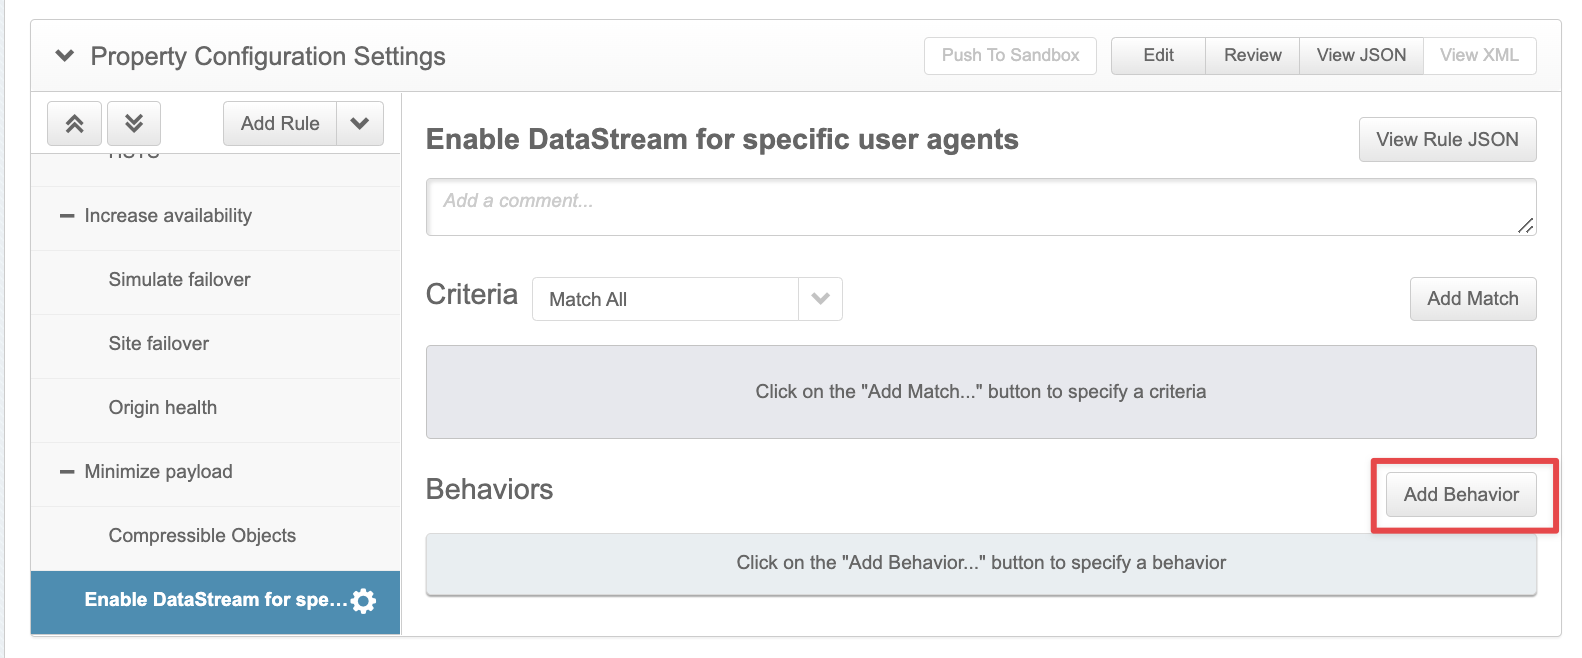
 2. Scroll down to **Property Configuration Settings**, and click **Add Behavior**.
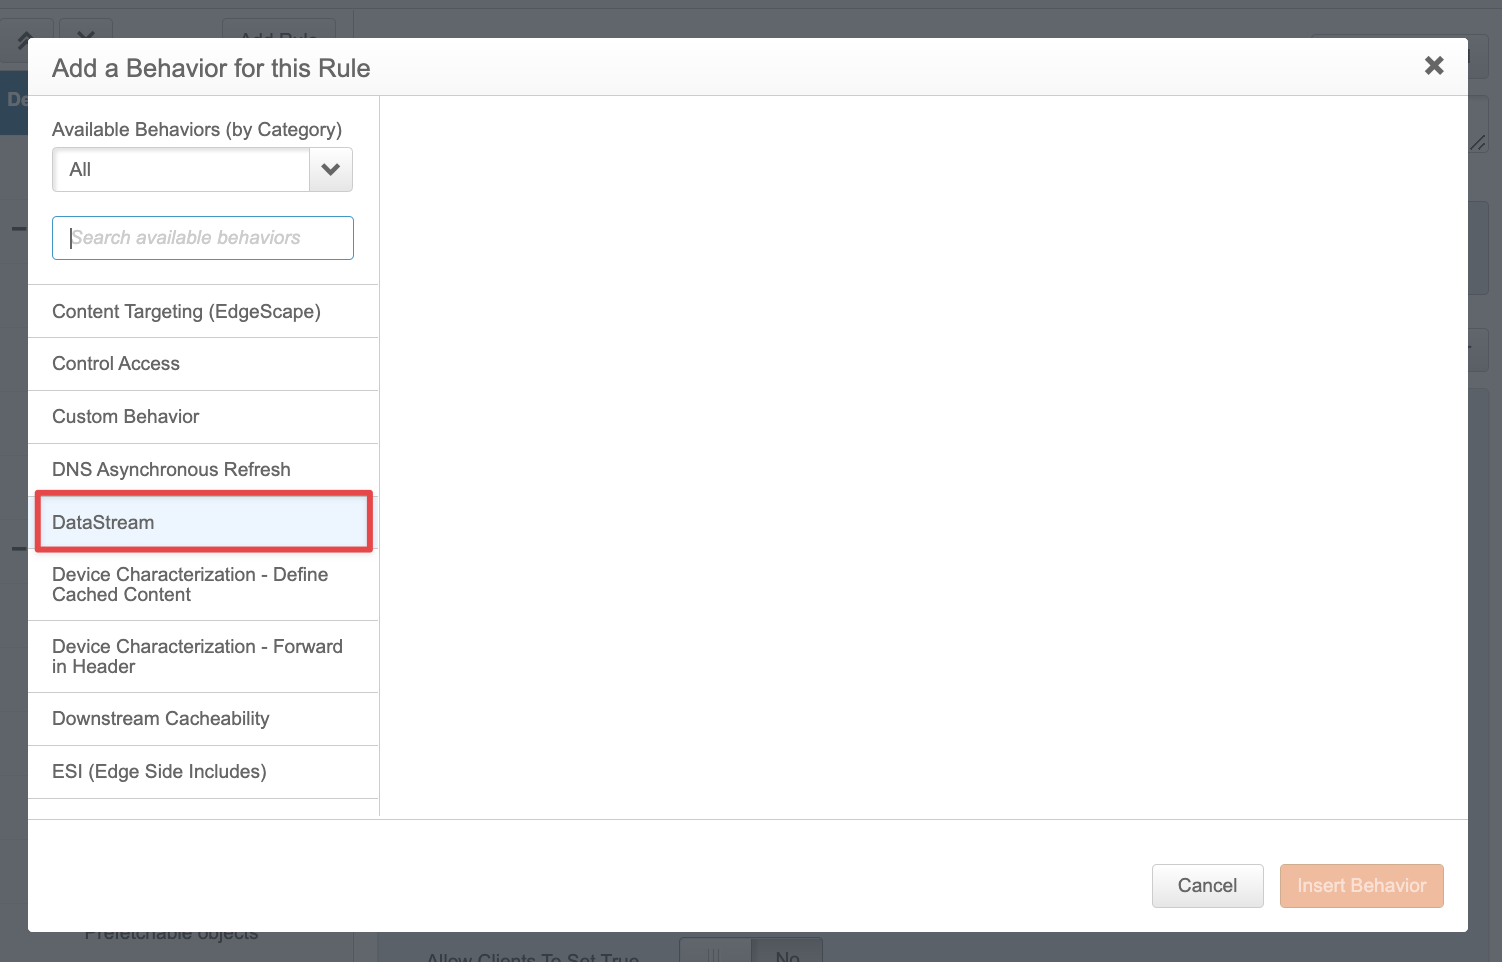
 3. Search for **DataStream** in the modal that appears and select it.
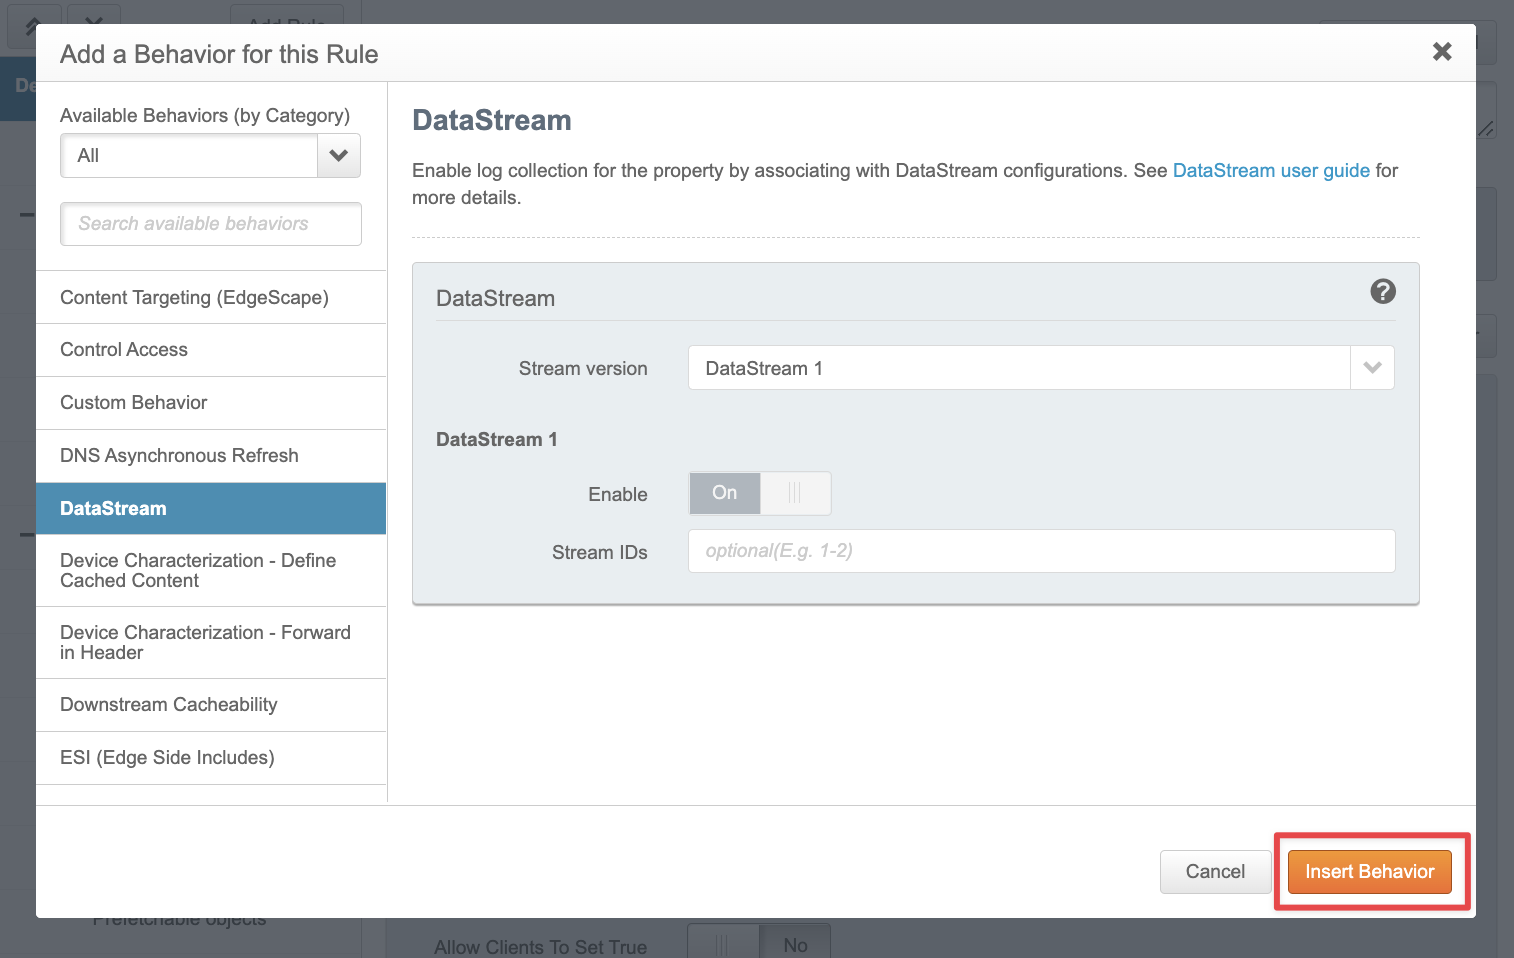
 4. Click **Insert Behavior**.
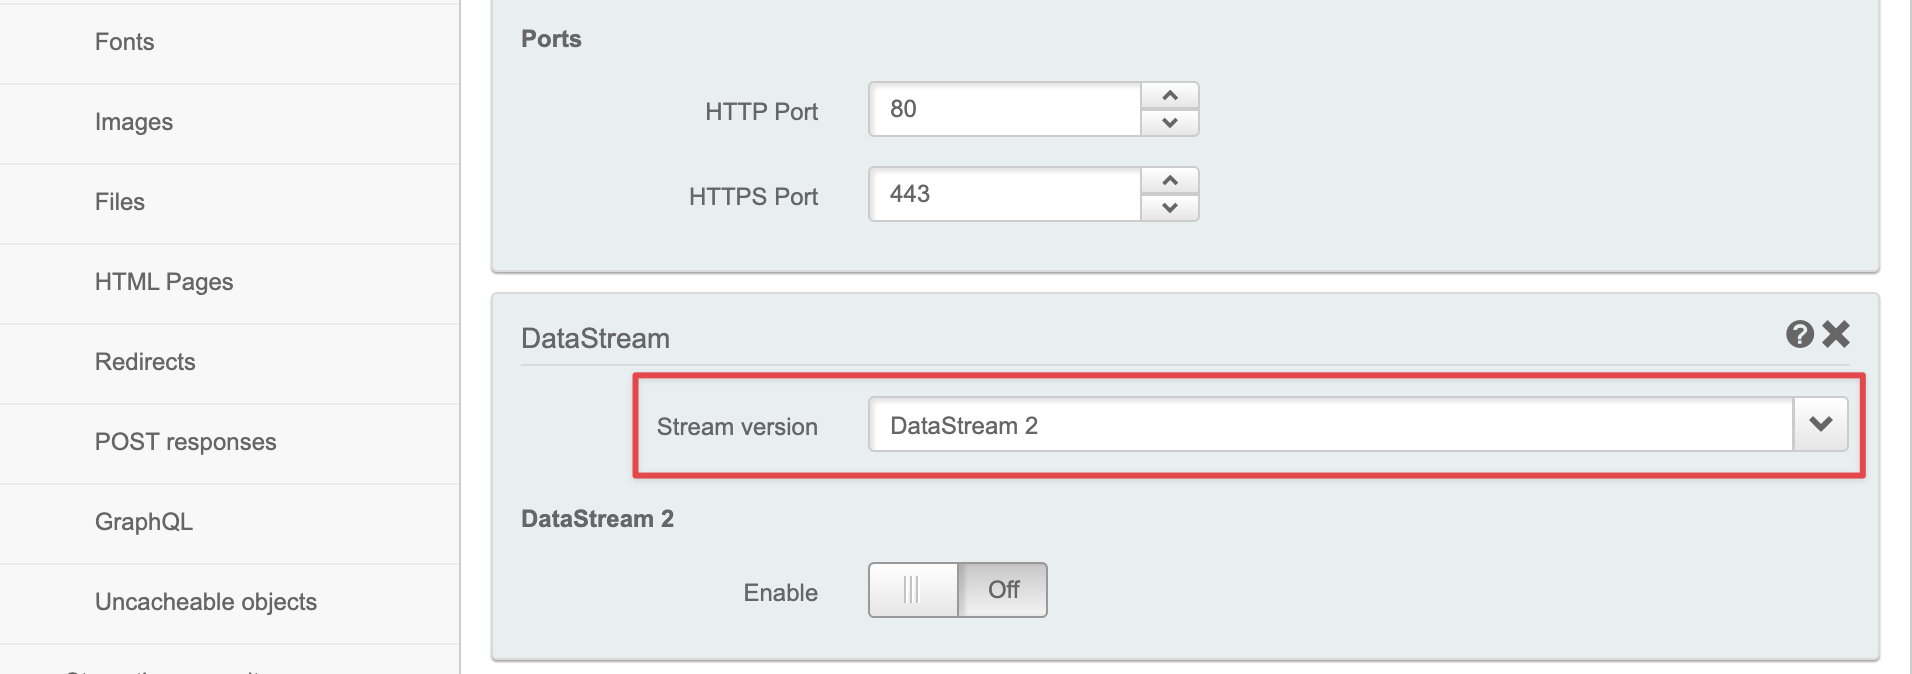
 5. In the **DataStream** box in the **Behaviors** list, choose **DataStream2** as the Stream version.
 6. In the **DataStream2** section, enable the toggle to **On**, choose the Stream name of the new DataStream you created, and then click the **Save** button:
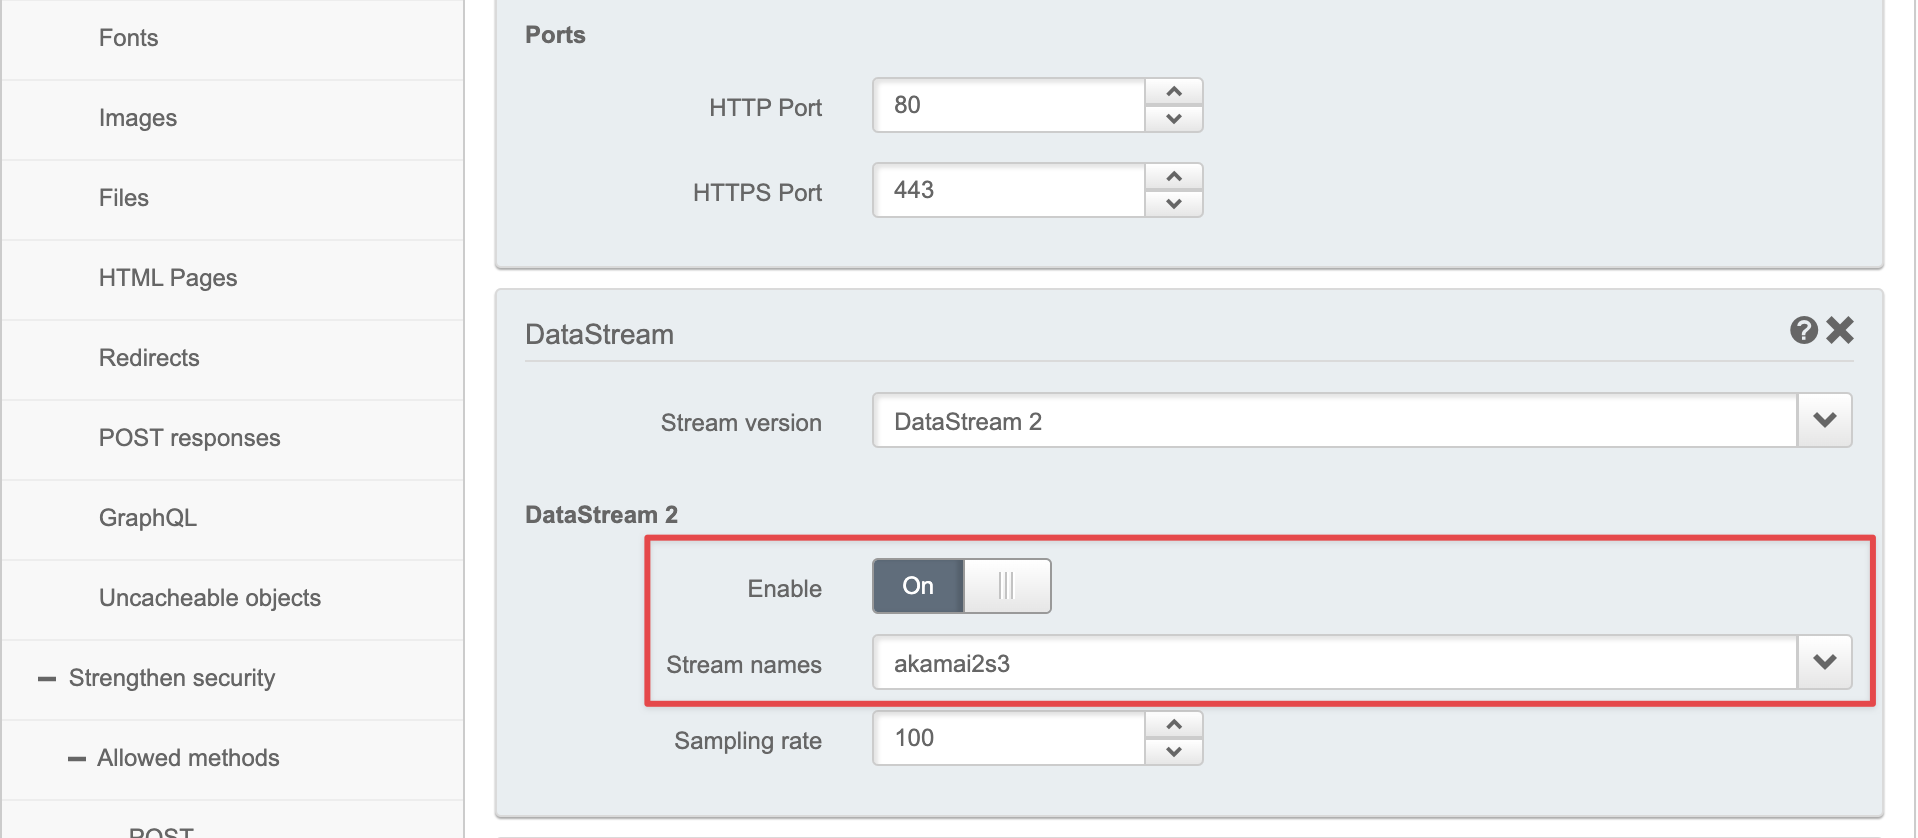 Once this is done, ALL the traffic on your website will be streamed to Conductor Intelligence's AWS S3 bucket. However, Conductor Intelligence will process only search engine visits, and filter out all other traffic, including all PII data.
Follow the next steps to learn how to filter away non-search engine traffic directly in the Akamai DataStream that you've created in the previous steps.
These steps are **required**!
### Ensure logging of the User Agent header
1. Go to **Property Configuration Settings** following steps 1 through 3 in the section [Associate the created DataStream with the corresponding property](#associate-the-created-datastream-with-the-corresponding-property).
2. Scroll down to the **Log Request Details** section in **Property Configuration Settings**:
Once this is done, ALL the traffic on your website will be streamed to Conductor Intelligence's AWS S3 bucket. However, Conductor Intelligence will process only search engine visits, and filter out all other traffic, including all PII data.
Follow the next steps to learn how to filter away non-search engine traffic directly in the Akamai DataStream that you've created in the previous steps.
These steps are **required**!
### Ensure logging of the User Agent header
1. Go to **Property Configuration Settings** following steps 1 through 3 in the section [Associate the created DataStream with the corresponding property](#associate-the-created-datastream-with-the-corresponding-property).
2. Scroll down to the **Log Request Details** section in **Property Configuration Settings**:
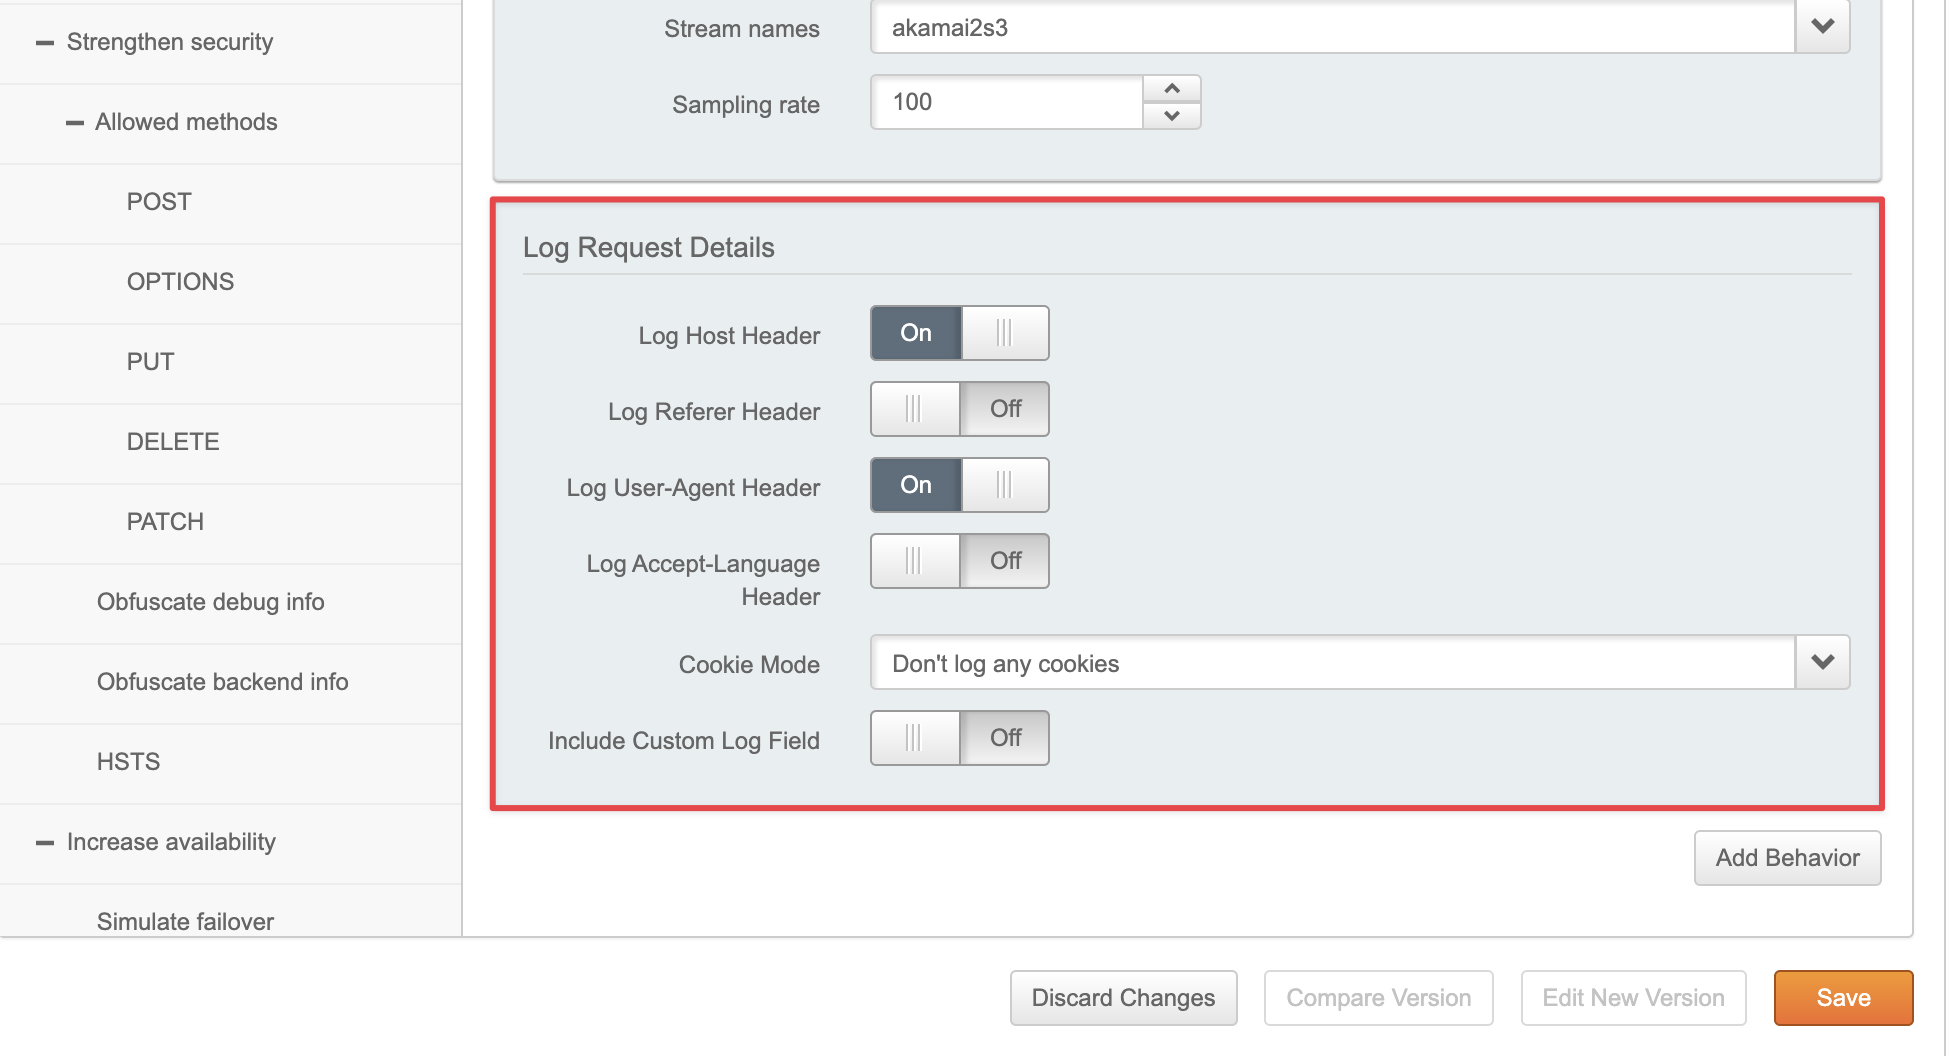 In case the **Log Request Details** section is not there, follow the same steps as within step 4 in the section [Associate the created DataStream with the corresponding property](#associate-the-created-datastream-with-the-corresponding-property) to add it.
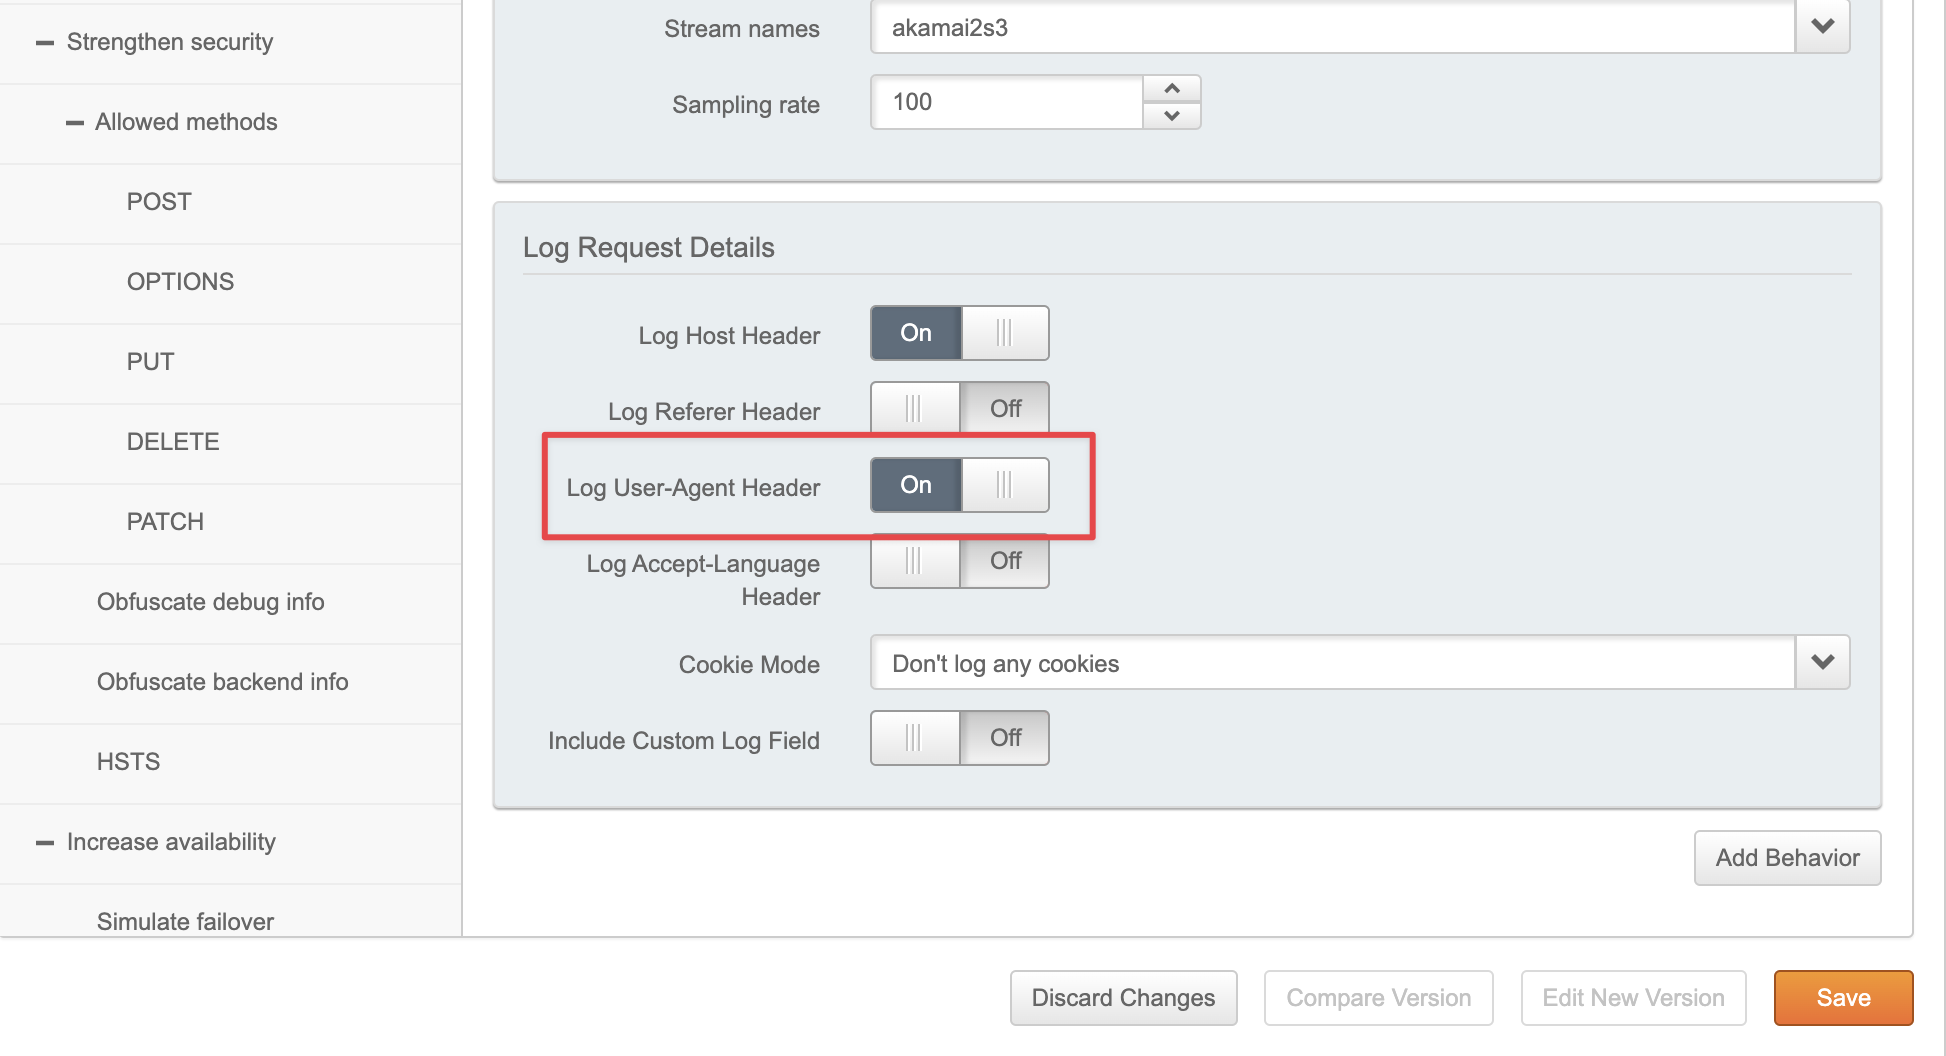
3. Enable the "Log User-Agent header" and click the **Save** button:
In case the **Log Request Details** section is not there, follow the same steps as within step 4 in the section [Associate the created DataStream with the corresponding property](#associate-the-created-datastream-with-the-corresponding-property) to add it.
3. Enable the "Log User-Agent header" and click the **Save** button:
 ## Filter away non-search engine traffic
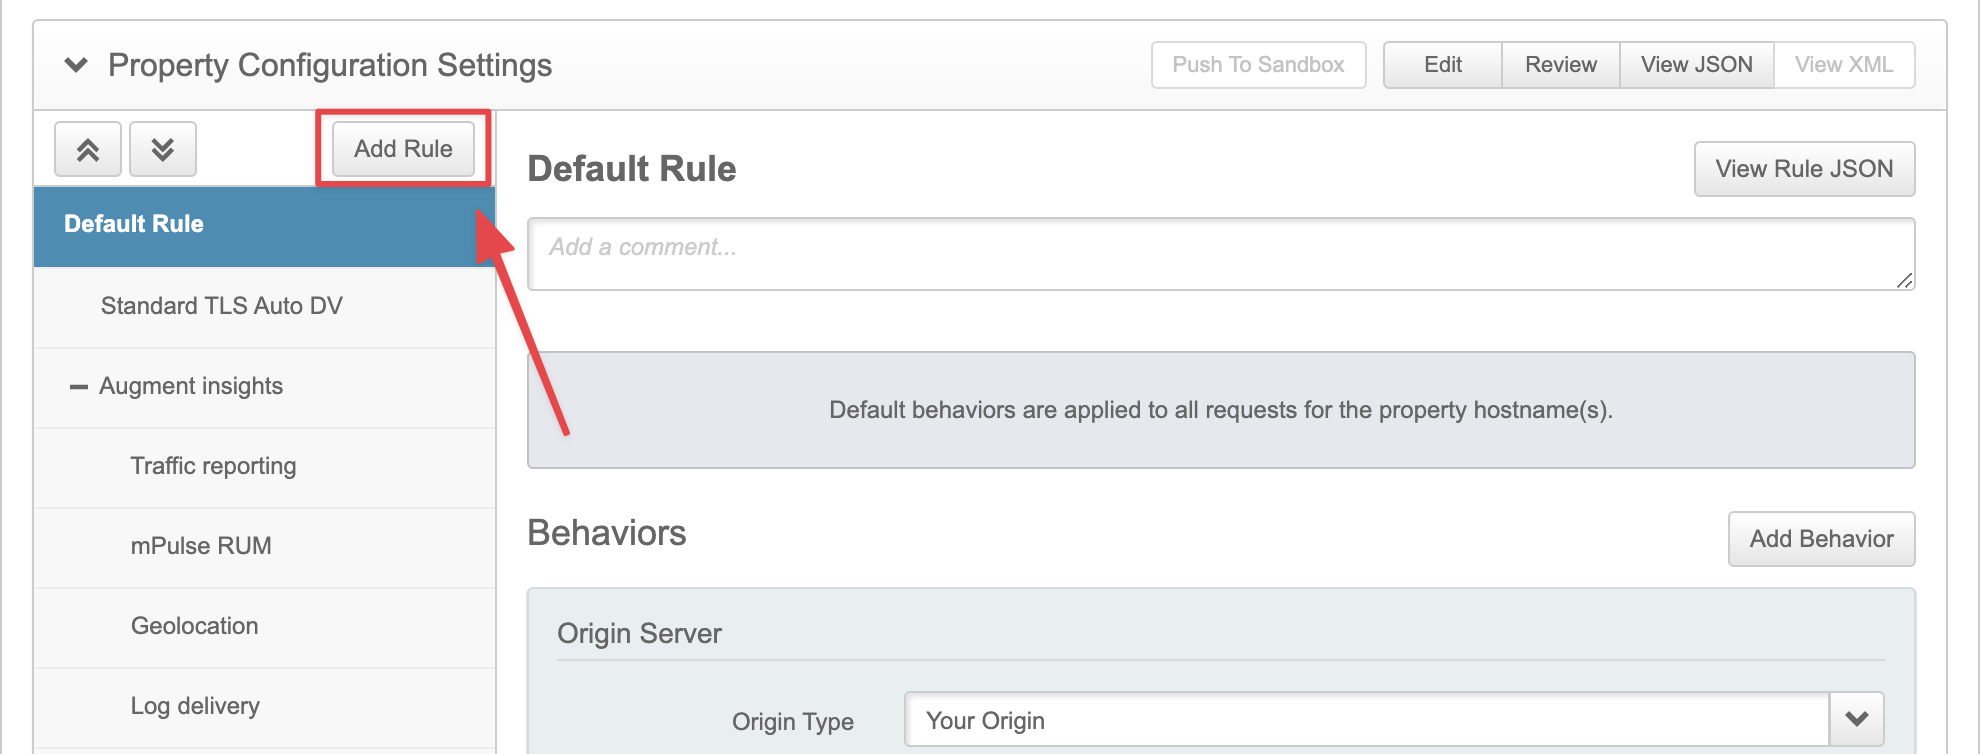
1. Go to **Property Configuration Settings** following steps 1 through 3 in the section [Associate the created DataStream with the corresponding property](#associate-the-created-datastream-with-the-corresponding-property), and click **Add Rule**:
## Filter away non-search engine traffic
1. Go to **Property Configuration Settings** following steps 1 through 3 in the section [Associate the created DataStream with the corresponding property](#associate-the-created-datastream-with-the-corresponding-property), and click **Add Rule**:
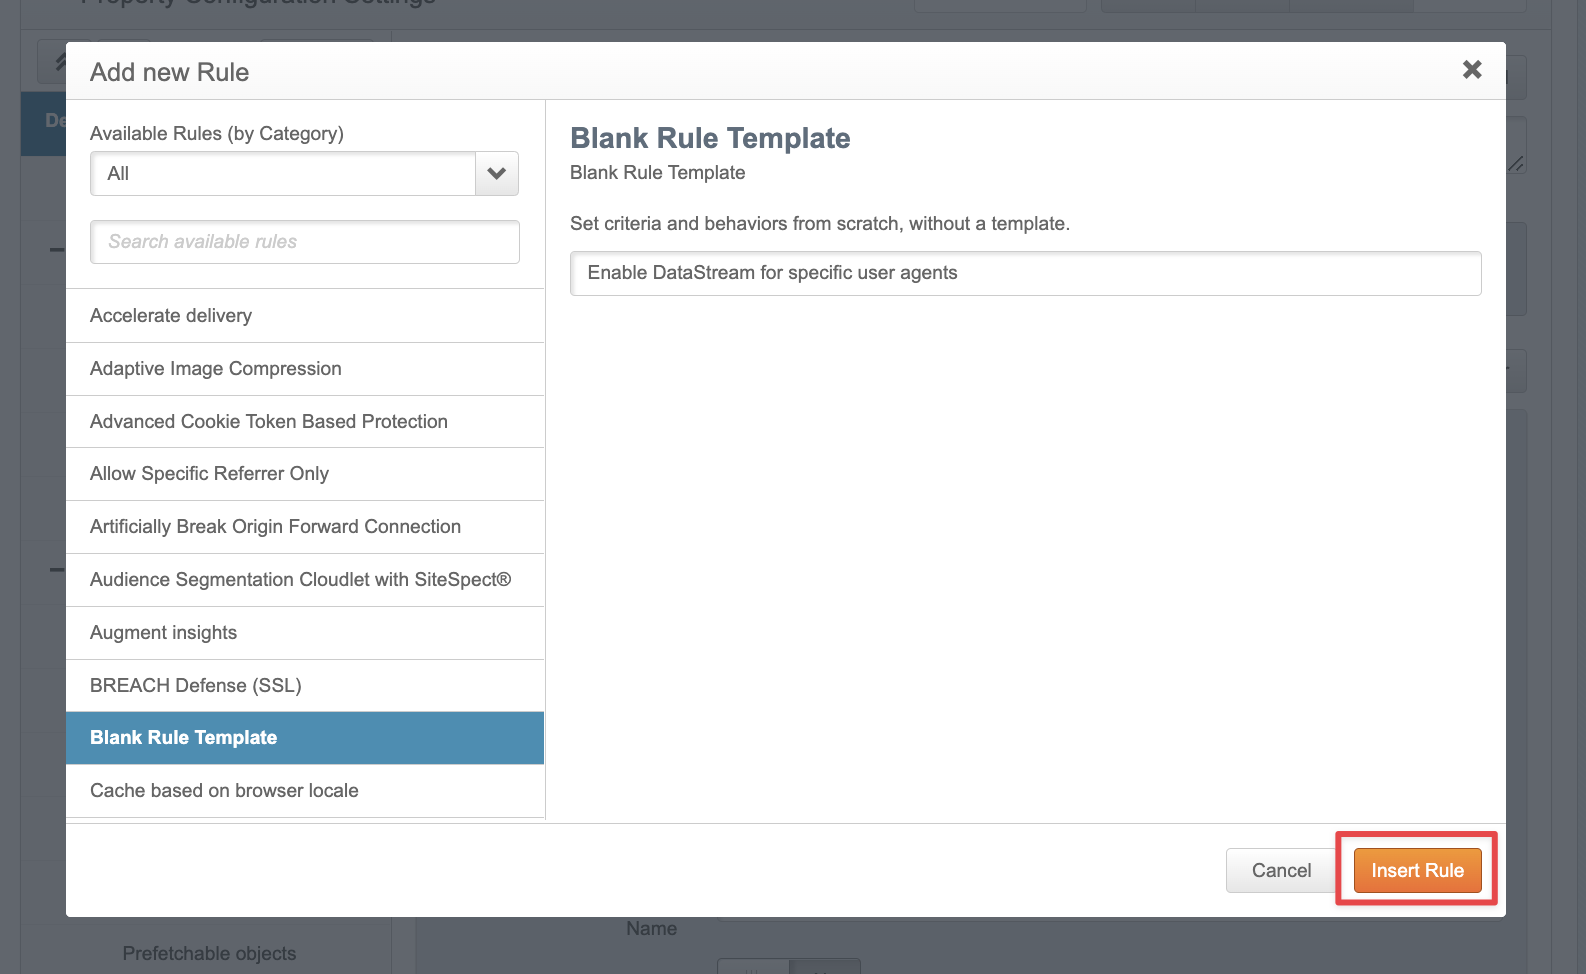
 2. Insert the rule for specific User Agents: choose a **Blank rule template**, then give it a name (e.g. *"Enable DataStream for specific user agents"*), and click **Insert rule**:
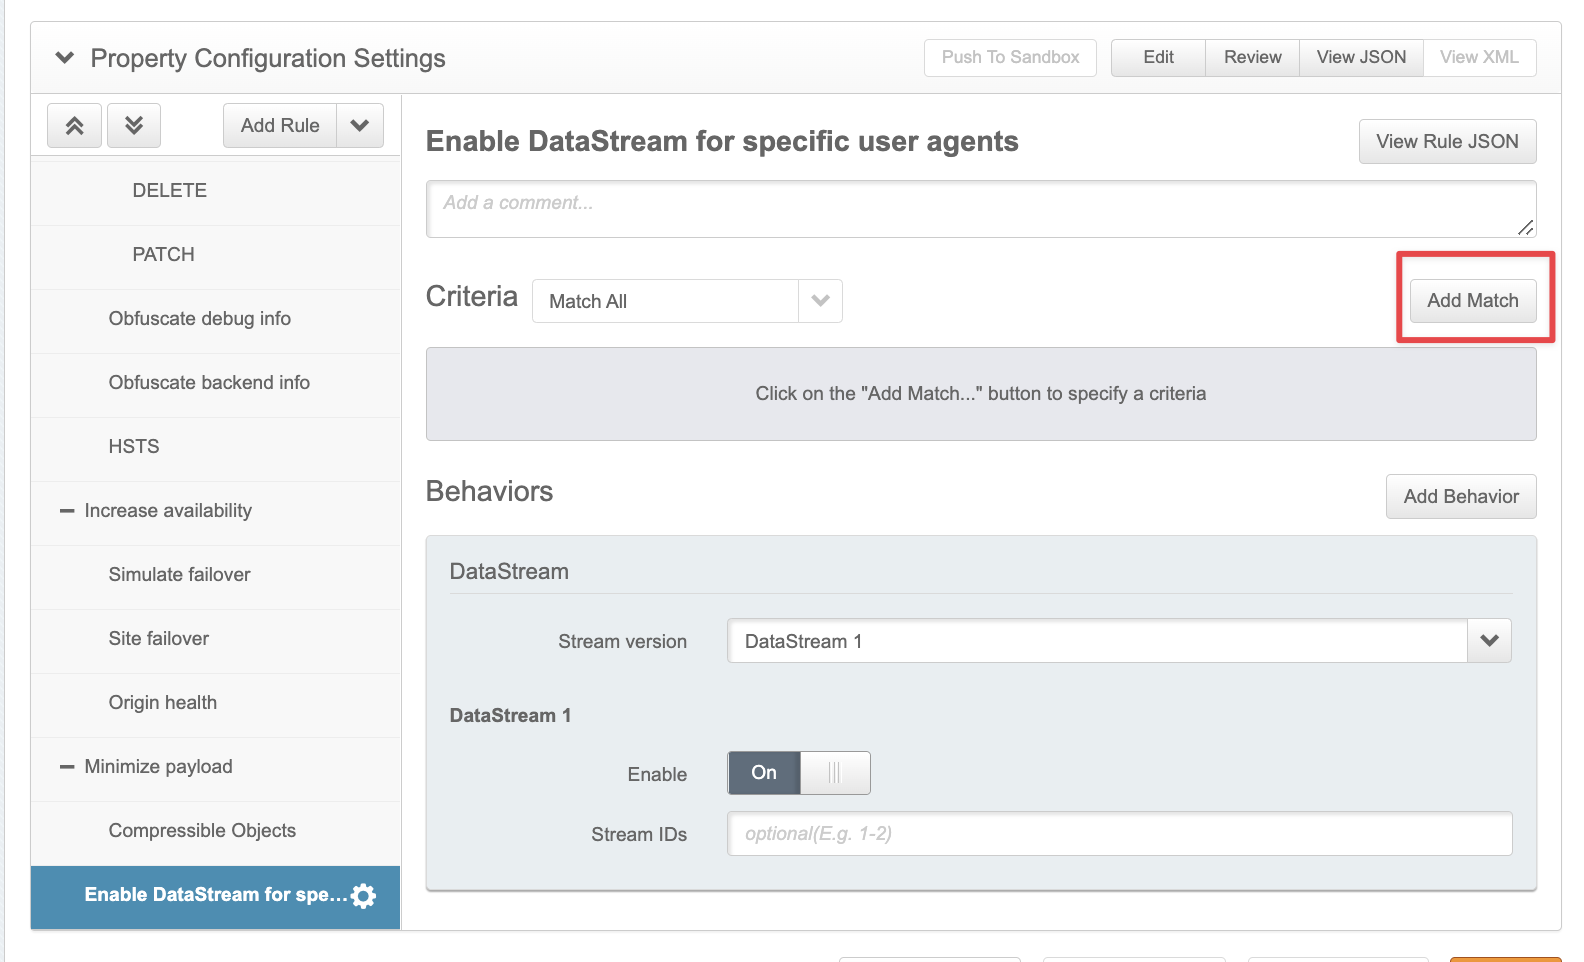
 3. Click **Add Behavior** and add the **DataStream** behavior following steps 4.3 and 4.4 in [Associate the created DataStream with the corresponding property](#associate-the-created-datastream-with-the-corresponding-property):
4. Click **Add Match** and set up the criteria for the User Agent to match:
3. Click **Add Behavior** and add the **DataStream** behavior following steps 4.3 and 4.4 in [Associate the created DataStream with the corresponding property](#associate-the-created-datastream-with-the-corresponding-property):
4. Click **Add Match** and set up the criteria for the User Agent to match:
 Example:
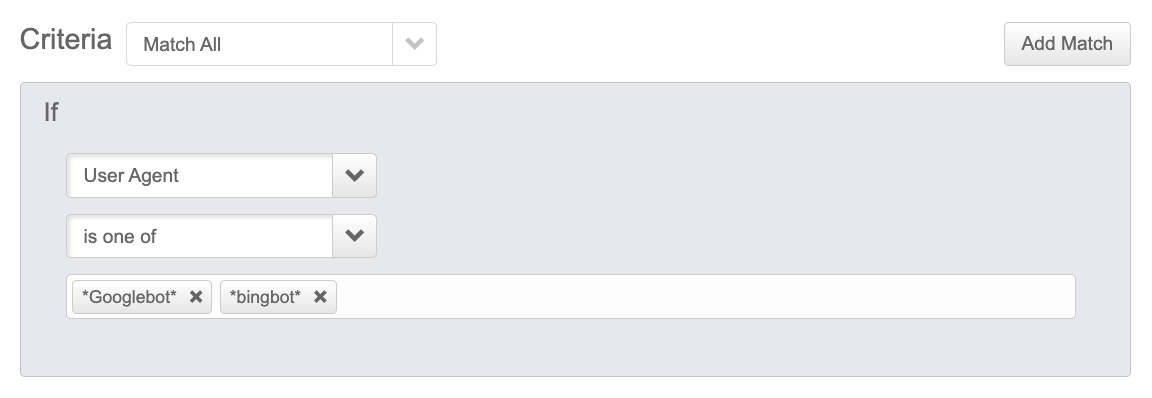 User agent is one of:
* *Googlebot*
* *bingbot*
* *PerplexityBot*
* *Perplexity-User*
* *OAI-SearchBot*
* *ChatGPT-User*
* *GPTBot*
**(Note:** These strings are case sensitive. Confirm you have the precise upper- and lower-case letters.**)**
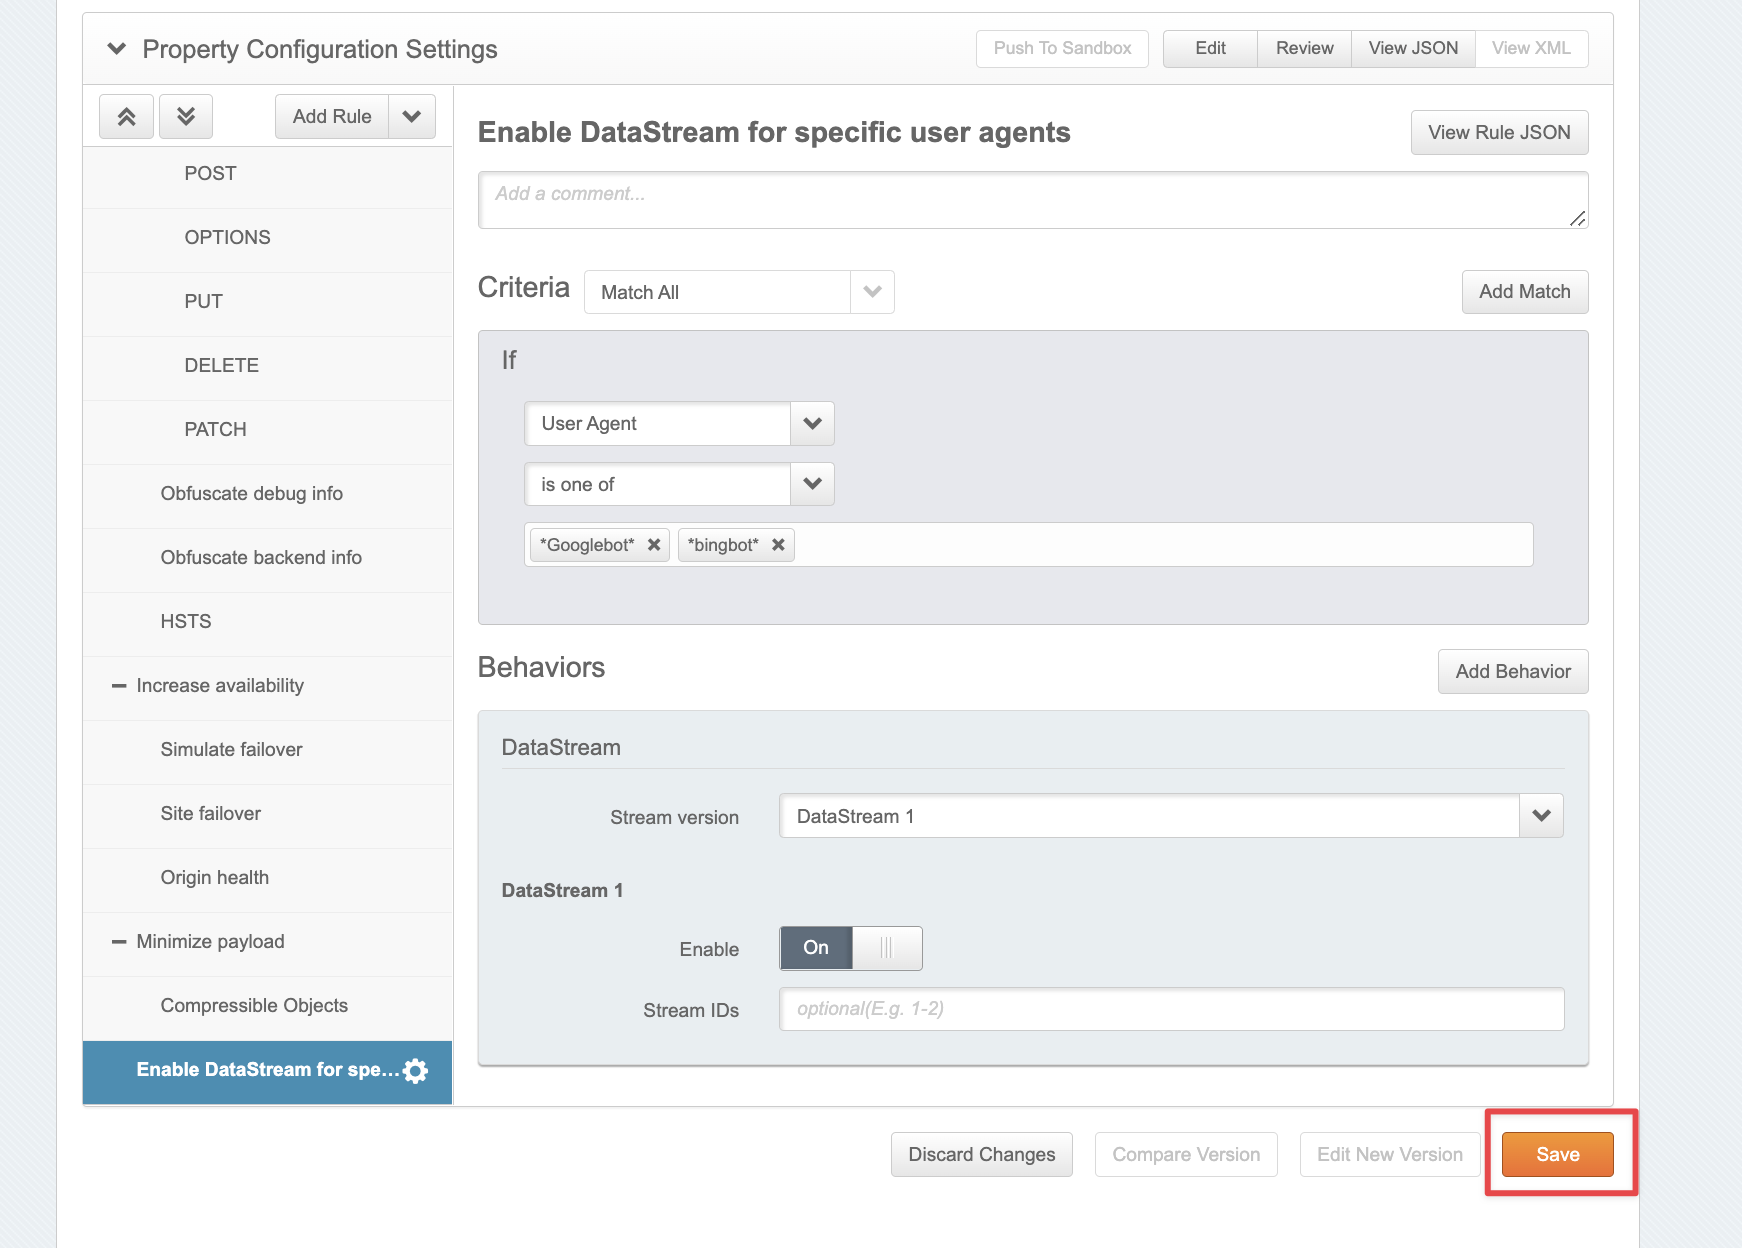
5. Finally, click **Save**:
User agent is one of:
* *Googlebot*
* *bingbot*
* *PerplexityBot*
* *Perplexity-User*
* *OAI-SearchBot*
* *ChatGPT-User*
* *GPTBot*
**(Note:** These strings are case sensitive. Confirm you have the precise upper- and lower-case letters.**)**
5. Finally, click **Save**:
 ## Disabling Log File Data in Conductor Intelligence's Pages Reports
1. In **Pages & Crawling**, hover over the subdomain for which you want to remove Akamai and click **Edit** in the **Log Source** column.
2. In the bottom-right of the **Connect Akamai** form, click **Remove**.
3. Click **Remove Log Source** to confirm.
Conductor Intelligence cannot access your Akamai account, so you also need to remove the DataStream manually in the Akamai UI.
## Disabling Log File Data in Conductor Intelligence's Pages Reports
1. In **Pages & Crawling**, hover over the subdomain for which you want to remove Akamai and click **Edit** in the **Log Source** column.
2. In the bottom-right of the **Connect Akamai** form, click **Remove**.
3. Click **Remove Log Source** to confirm.
Conductor Intelligence cannot access your Akamai account, so you also need to remove the DataStream manually in the Akamai UI.