> ## Documentation Index
> Fetch the complete documentation index at: https://www.conductor.com/docs/llms.txt
> Use this file to discover all available pages before exploring further.
# Integrate Fastly with Conductor Intelligence
> Send log file data from Fastly to Conductor Intelligence's Pages report.
Note that the instructions in this article describe the process for integrating with Conductor Intelligence. You can also integrate Fastly for Conductor Monitoring's [Log File Analysis](/docs/monitoring/setting-up-the-fastly-integration/) feature.
Integrating [Fastly Real-Time Log Streaming](https://docs.fastly.com/en/guides/about-fastlys-realtime-log-streaming-features) with Conductor Intelligence consists of two phases:
* Enabling log files and creating an [AWS S3 bucket](https://aws.amazon.com/s3/) in Conductor Intelligence.
* Configuring Fastly Real-Time Log Streaming in the Fastly UI.
## Enabling log files and creating an AWS S3 bucket in Conductor Intelligence
In Conductor Intelligence:
1. Go to the [Pages & Crawling](https://app.conductor.com/u/pages-and-crawling) settings activity (**Settings** > **Pages & Crawling**).
2. From the list of configured subdomains, identify the subdomain with the pages for which you want to see log file data.
3. In the **Log Source** column for that subdomain, click **Connect**.
4. In the Fastly section, from the **Connect a log source** window, click **Connect**.
5. Enter your **Fastly Customer ID**. You can find this in your **Fastly Control Panel** or with a `GET` request to Fastly's API `/current_customer` endpoint.
6. In the **Connect Fastly** window, click **Create Bucket**.
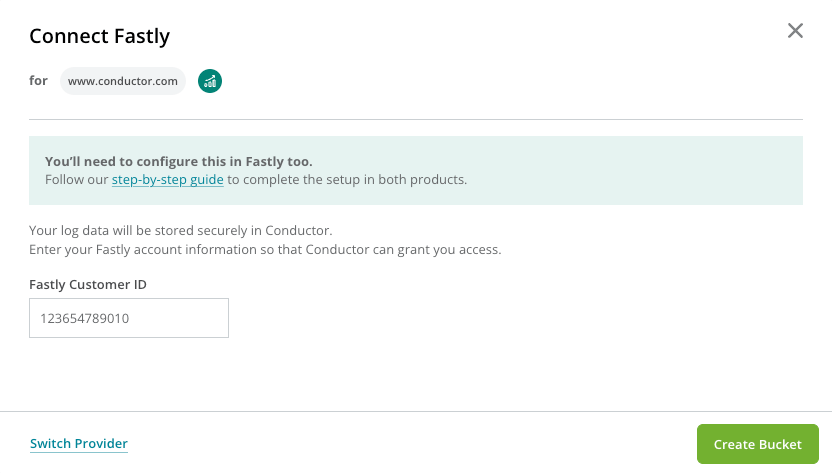 Conductor Intelligence will generate the following AWS credentials and the AWS S3 bucket you will need below to associate the AWS S3 bucket with Fastly Real-Time Log Streaming in the next section:
* **Bucket**
* **Region**
* **IAM role**
Conductor Intelligence will generate the following AWS credentials and the AWS S3 bucket you will need below to associate the AWS S3 bucket with Fastly Real-Time Log Streaming in the next section:
* **Bucket**
* **Region**
* **IAM role**
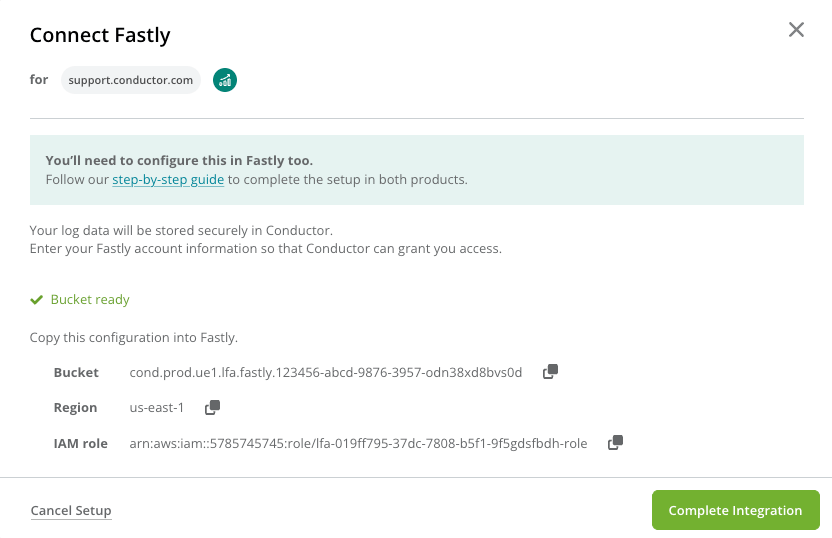 7. Click **Complete Integration**.
## Configuring Fastly Real-Time Log Streaming
Fastly Real-Time Log Streaming needs to be manually configured in the Fastly UI for every website.
The configuration of Fastly Real-Time Log Streaming consists of these steps:
1. Log in to your [Fastly account](https://manage.fastly.com/services/all) and click on the website (service) for which you want to send log file data to Conductor Intelligence.
7. Click **Complete Integration**.
## Configuring Fastly Real-Time Log Streaming
Fastly Real-Time Log Streaming needs to be manually configured in the Fastly UI for every website.
The configuration of Fastly Real-Time Log Streaming consists of these steps:
1. Log in to your [Fastly account](https://manage.fastly.com/services/all) and click on the website (service) for which you want to send log file data to Conductor Intelligence.
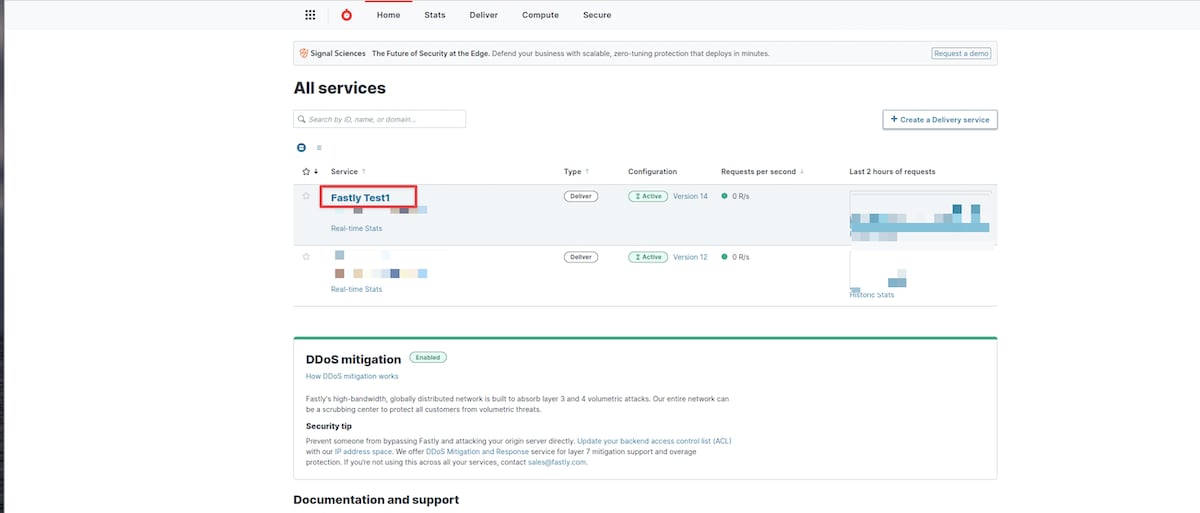 2. In the service summary screen, click **Edit configuration**.
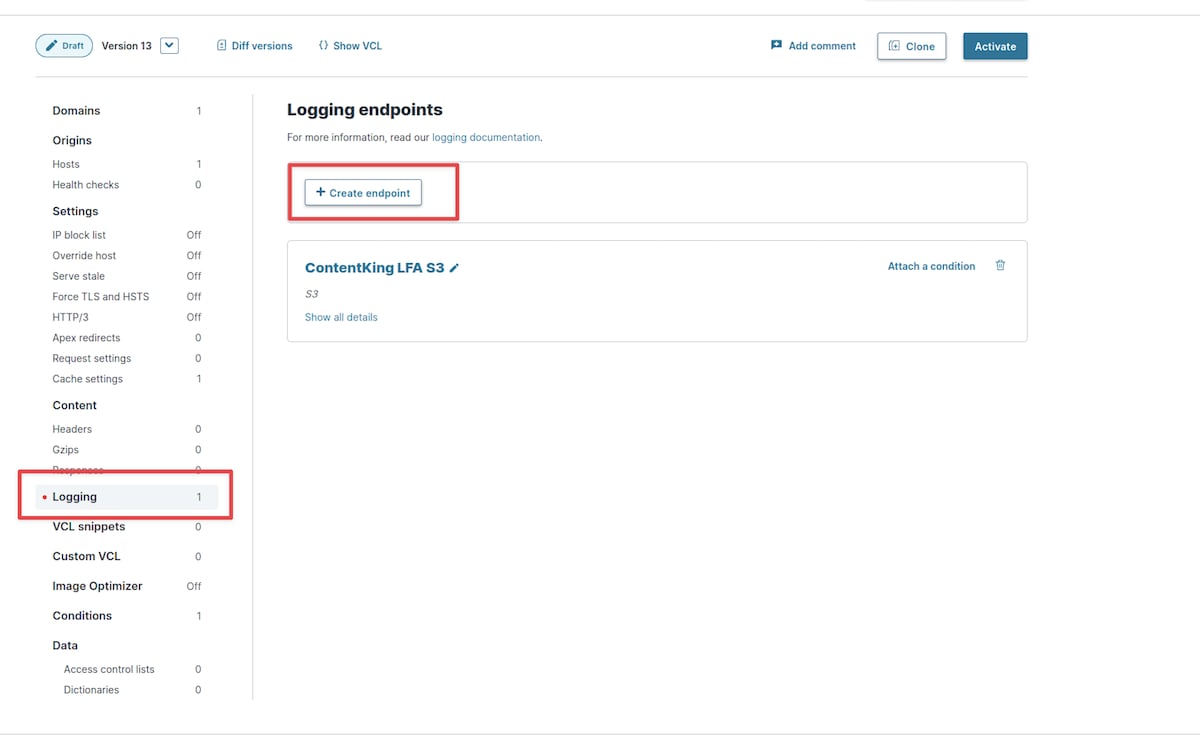
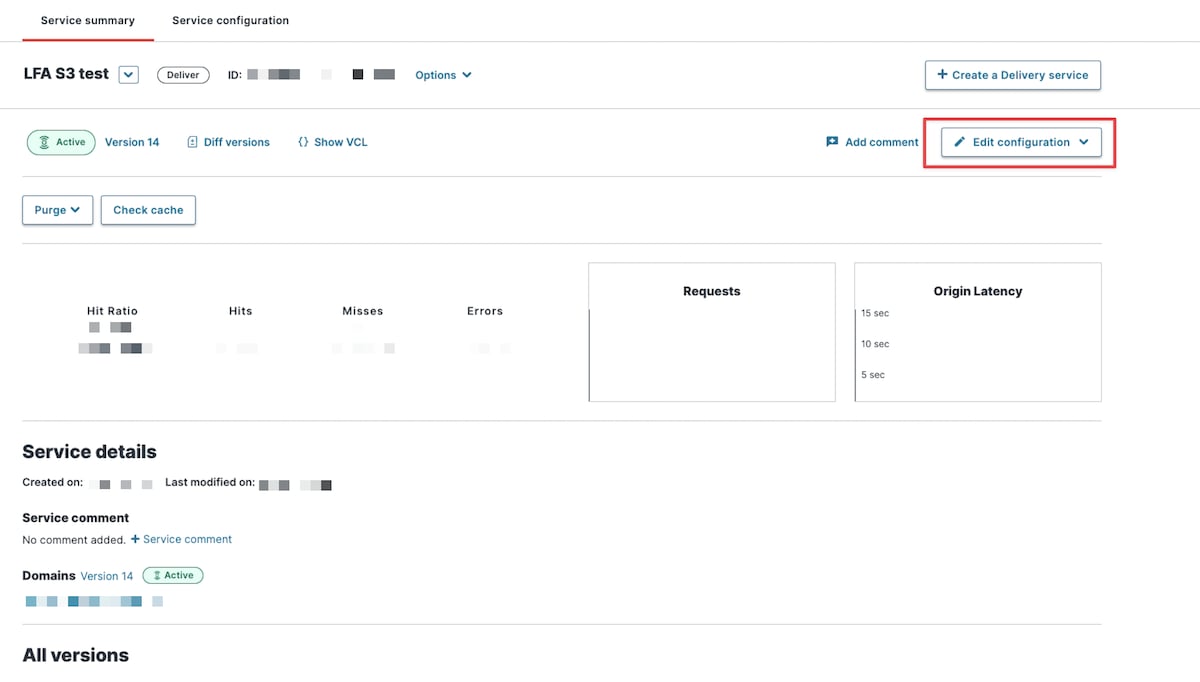 3. In the left-hand navigation bar, click **Logging**, and then click **Create endpoint**.
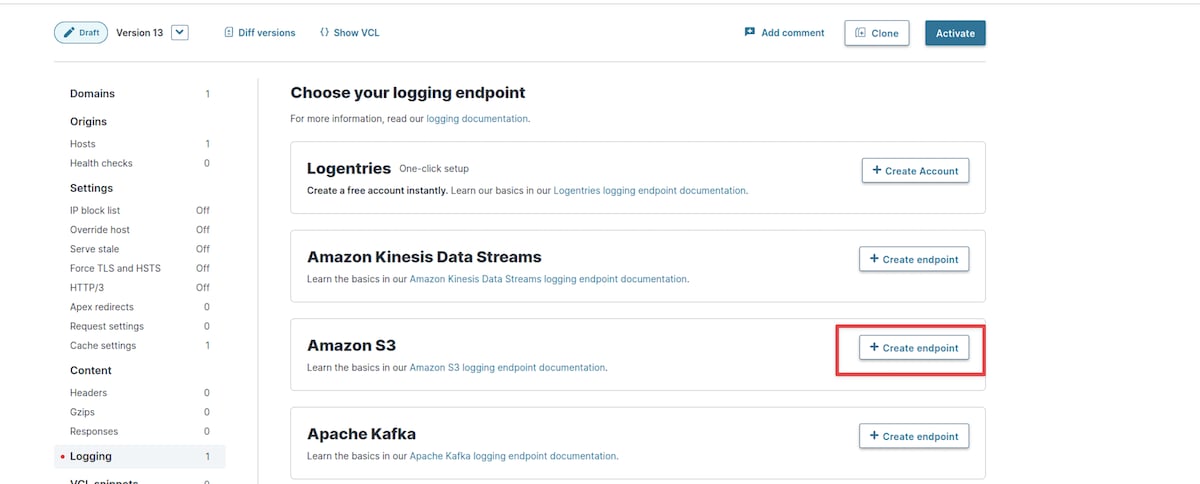
 4. In the **Amazon S3** section click **Create endpoint**.
 5. In the **S3 endpoint details** screen add the following settings:
**
5. In the **S3 endpoint details** screen add the following settings:
** 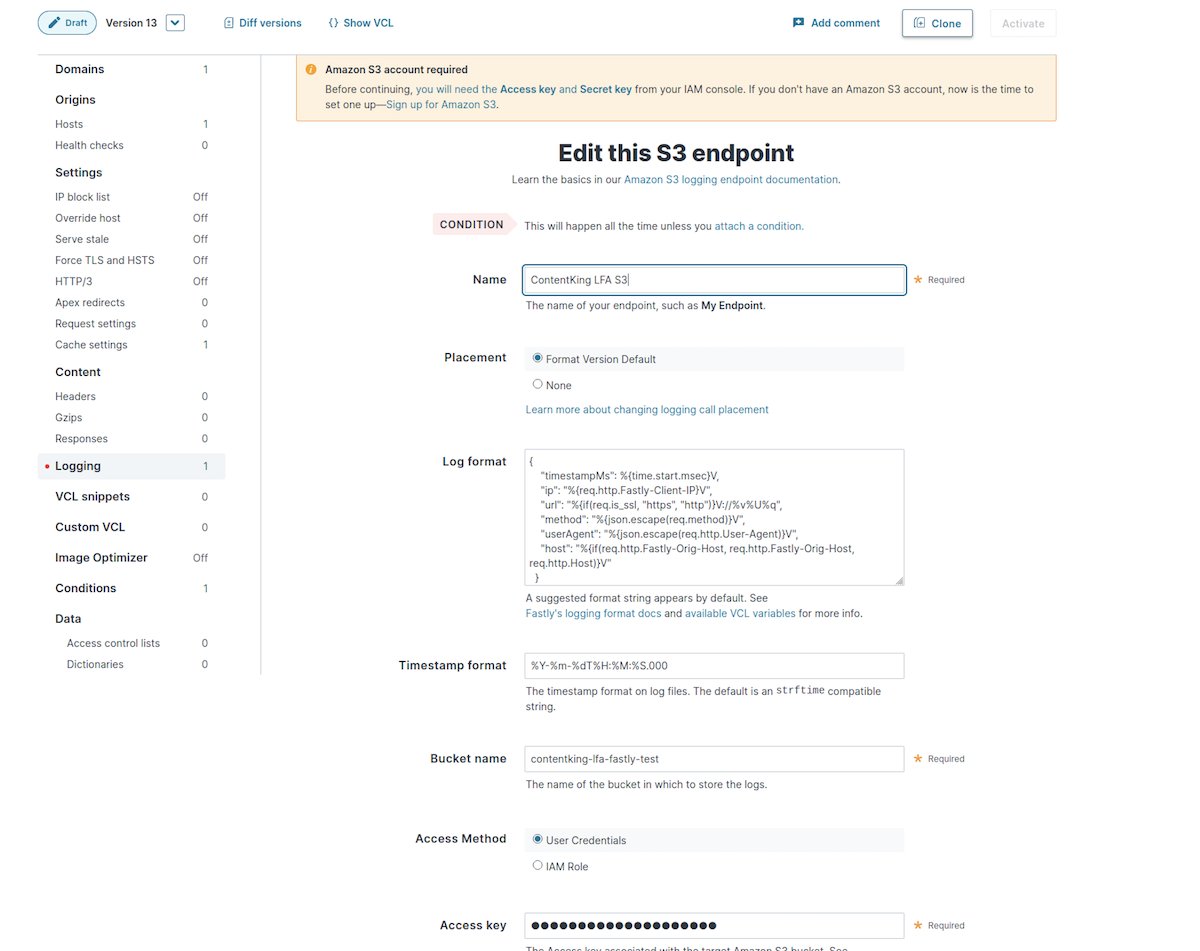 **
* **Name**: enter any name that would help easily identify the endpoint, e.g, "Conductor Intelligence S3"
* **Placement**: Format Version Default (this is the default, no change needed)
* **Log format**: Paste the following format
```
{
"timestampMs": %{time.start.msec}V,
"ip": "%{req.http.Fastly-Client-IP}V",
"url": "%{if(req.is_ssl, "https", "http")}V://%v%U%q",
"method": "%{json.escape(req.method)}V",
"userAgent": "%{json.escape(req.http.User-Agent)}V",
"host": "%{if(req.http.Fastly-Orig-Host, req.http.Fastly-Orig-Host, req.http.Host)}V"
}
```
* **Timestamp format**: `%Y-%m-%dT%H:%M:%S.000` (this is the default one, no change needed)
* **Bucket name**: enter the bucket name from the credentials you saved from Conductor Intelligence that was generated in the steps above.
* **Access Method**: User Credentials
* **Access key**: enter the Access key from the credentials in Conductor Intelligence generated in the steps above.
* **Secret key**: enter the Secret key from the credentials in Conductor Intelligence generated in the steps above.
* **Period**: 60 seconds.
6. Click **Advanced options** and edit more properties:
**
* **Name**: enter any name that would help easily identify the endpoint, e.g, "Conductor Intelligence S3"
* **Placement**: Format Version Default (this is the default, no change needed)
* **Log format**: Paste the following format
```
{
"timestampMs": %{time.start.msec}V,
"ip": "%{req.http.Fastly-Client-IP}V",
"url": "%{if(req.is_ssl, "https", "http")}V://%v%U%q",
"method": "%{json.escape(req.method)}V",
"userAgent": "%{json.escape(req.http.User-Agent)}V",
"host": "%{if(req.http.Fastly-Orig-Host, req.http.Fastly-Orig-Host, req.http.Host)}V"
}
```
* **Timestamp format**: `%Y-%m-%dT%H:%M:%S.000` (this is the default one, no change needed)
* **Bucket name**: enter the bucket name from the credentials you saved from Conductor Intelligence that was generated in the steps above.
* **Access Method**: User Credentials
* **Access key**: enter the Access key from the credentials in Conductor Intelligence generated in the steps above.
* **Secret key**: enter the Secret key from the credentials in Conductor Intelligence generated in the steps above.
* **Period**: 60 seconds.
6. Click **Advanced options** and edit more properties:
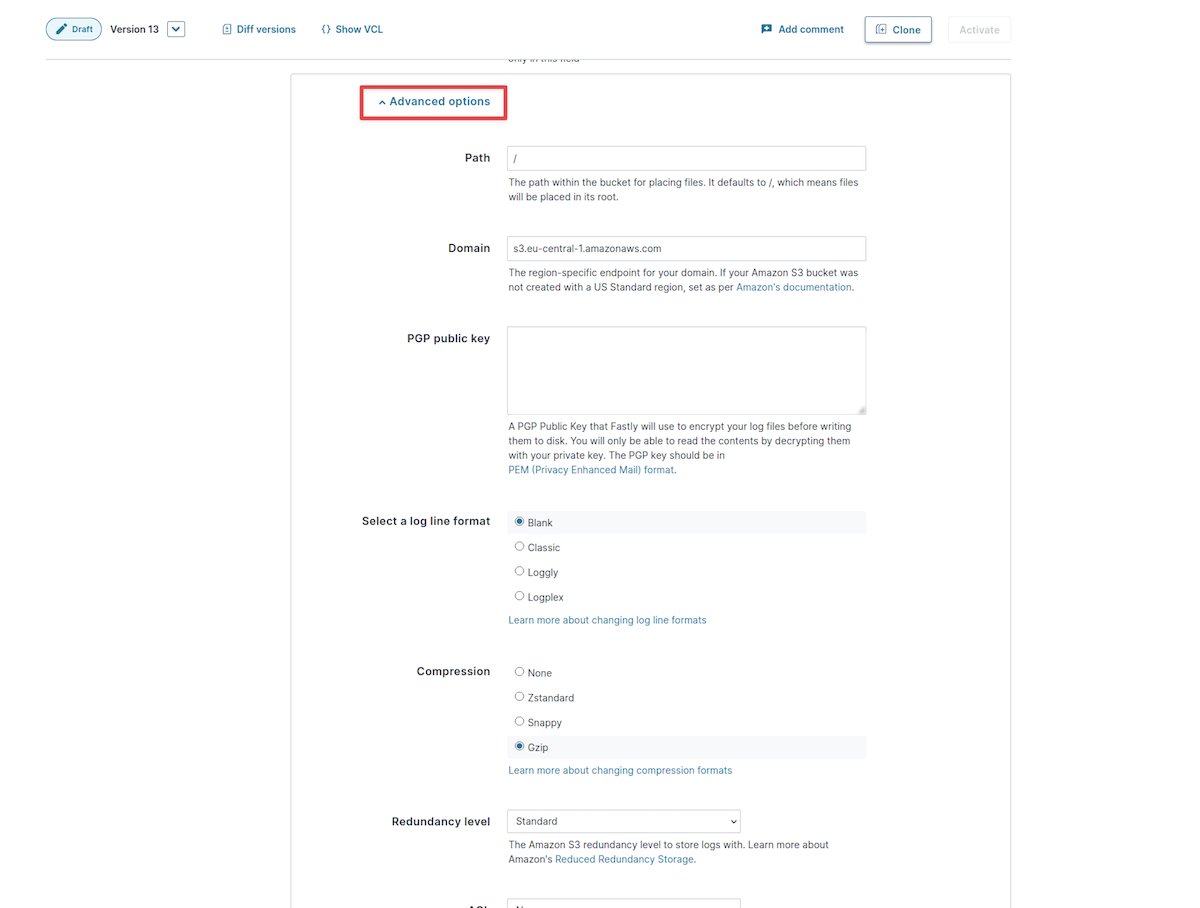 * **Path**: / (this is default, no need to change this)
* **Domain**: enter the Domain from the credentials in Conductor Intelligence generated in the steps above.
* **PGP public key**: keep this empty (this is default, no need to change this)
* **Select a log line format**: Blank (this is default, no need to change this)
* **Compression**: Gzip
* The rest of the settings: keep the default ones
7. Click **Update**.
## Filter away non-search engine traffic
### Setting up the response condition
To configure a response condition, so only search engine traffic is sent to the S3 bucket, follow the steps below.
Although Conductor Intelligence filters out all non-search engine traffic, Conductor also requires setting up the condition to filter out all non-search engine traffic directly in your Fastly account so no other data is streamed to the S3 bucket.
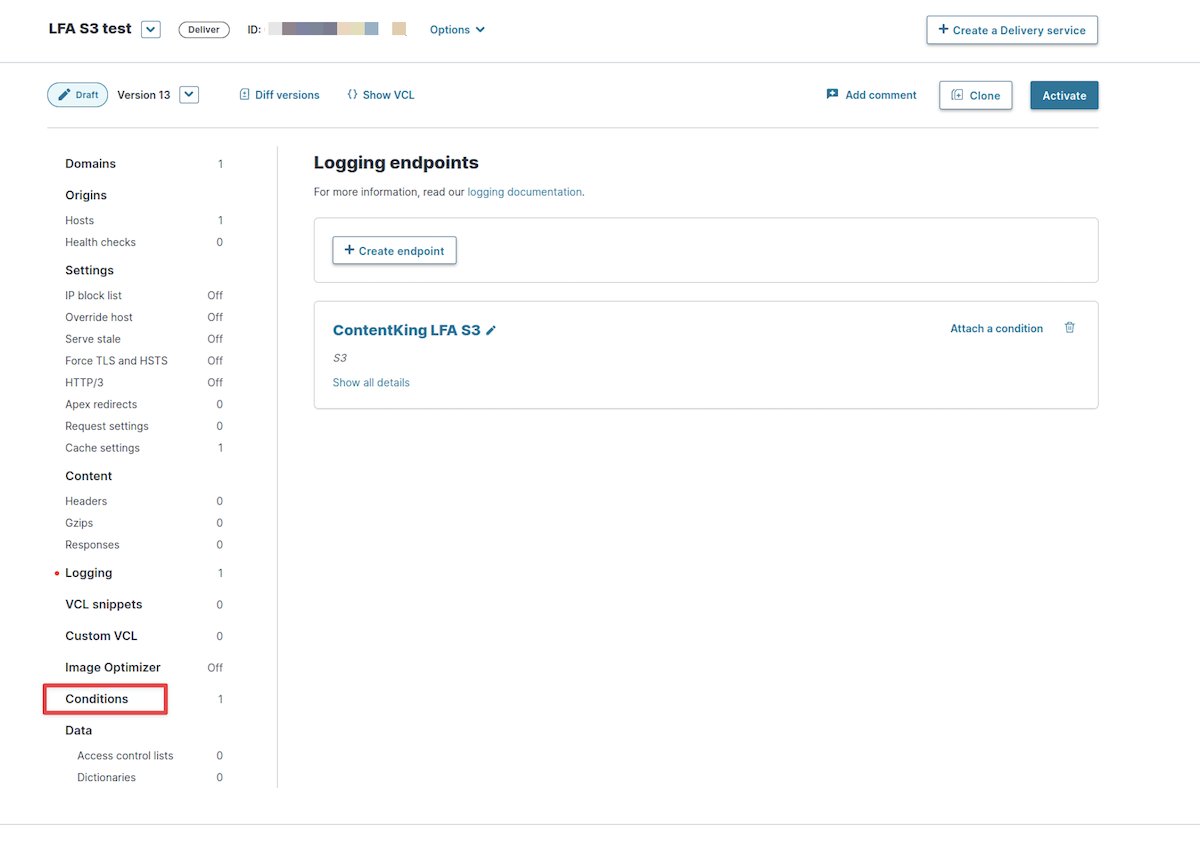
1. In the left-hand navigation bar, select **Conditions**:
* **Path**: / (this is default, no need to change this)
* **Domain**: enter the Domain from the credentials in Conductor Intelligence generated in the steps above.
* **PGP public key**: keep this empty (this is default, no need to change this)
* **Select a log line format**: Blank (this is default, no need to change this)
* **Compression**: Gzip
* The rest of the settings: keep the default ones
7. Click **Update**.
## Filter away non-search engine traffic
### Setting up the response condition
To configure a response condition, so only search engine traffic is sent to the S3 bucket, follow the steps below.
Although Conductor Intelligence filters out all non-search engine traffic, Conductor also requires setting up the condition to filter out all non-search engine traffic directly in your Fastly account so no other data is streamed to the S3 bucket.
1. In the left-hand navigation bar, select **Conditions**:
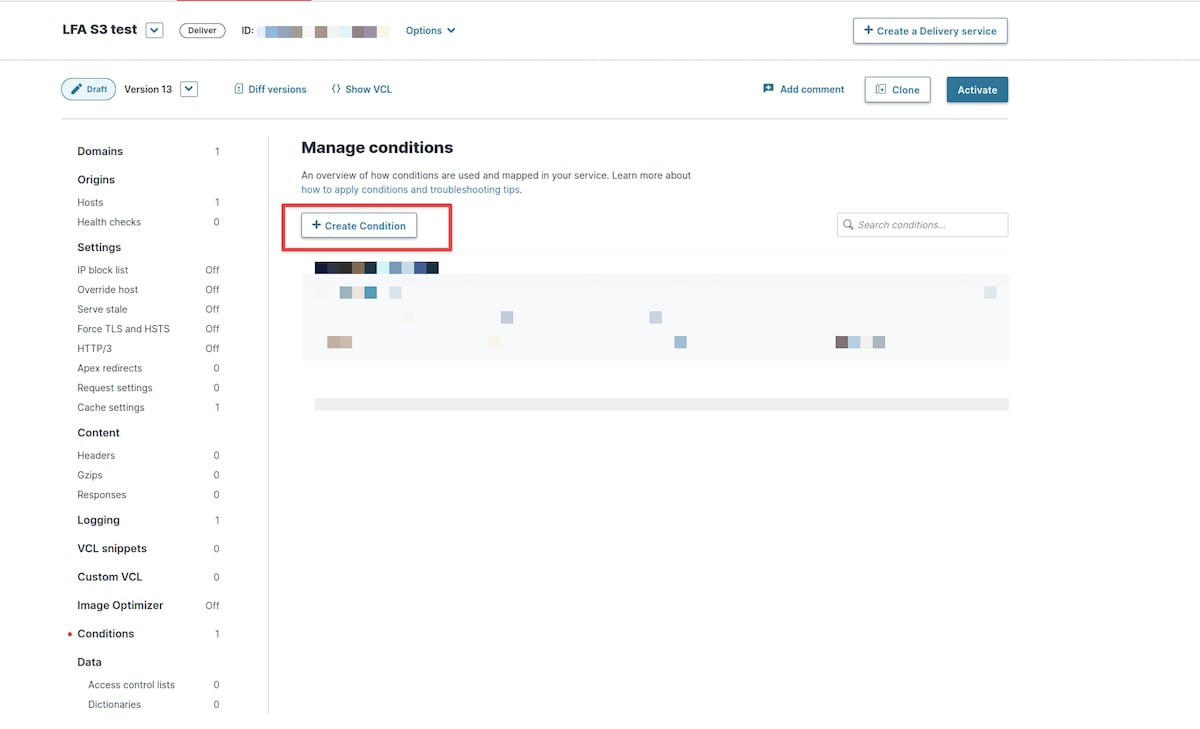
 2. In the **Condition** screen, click **Create condition**:
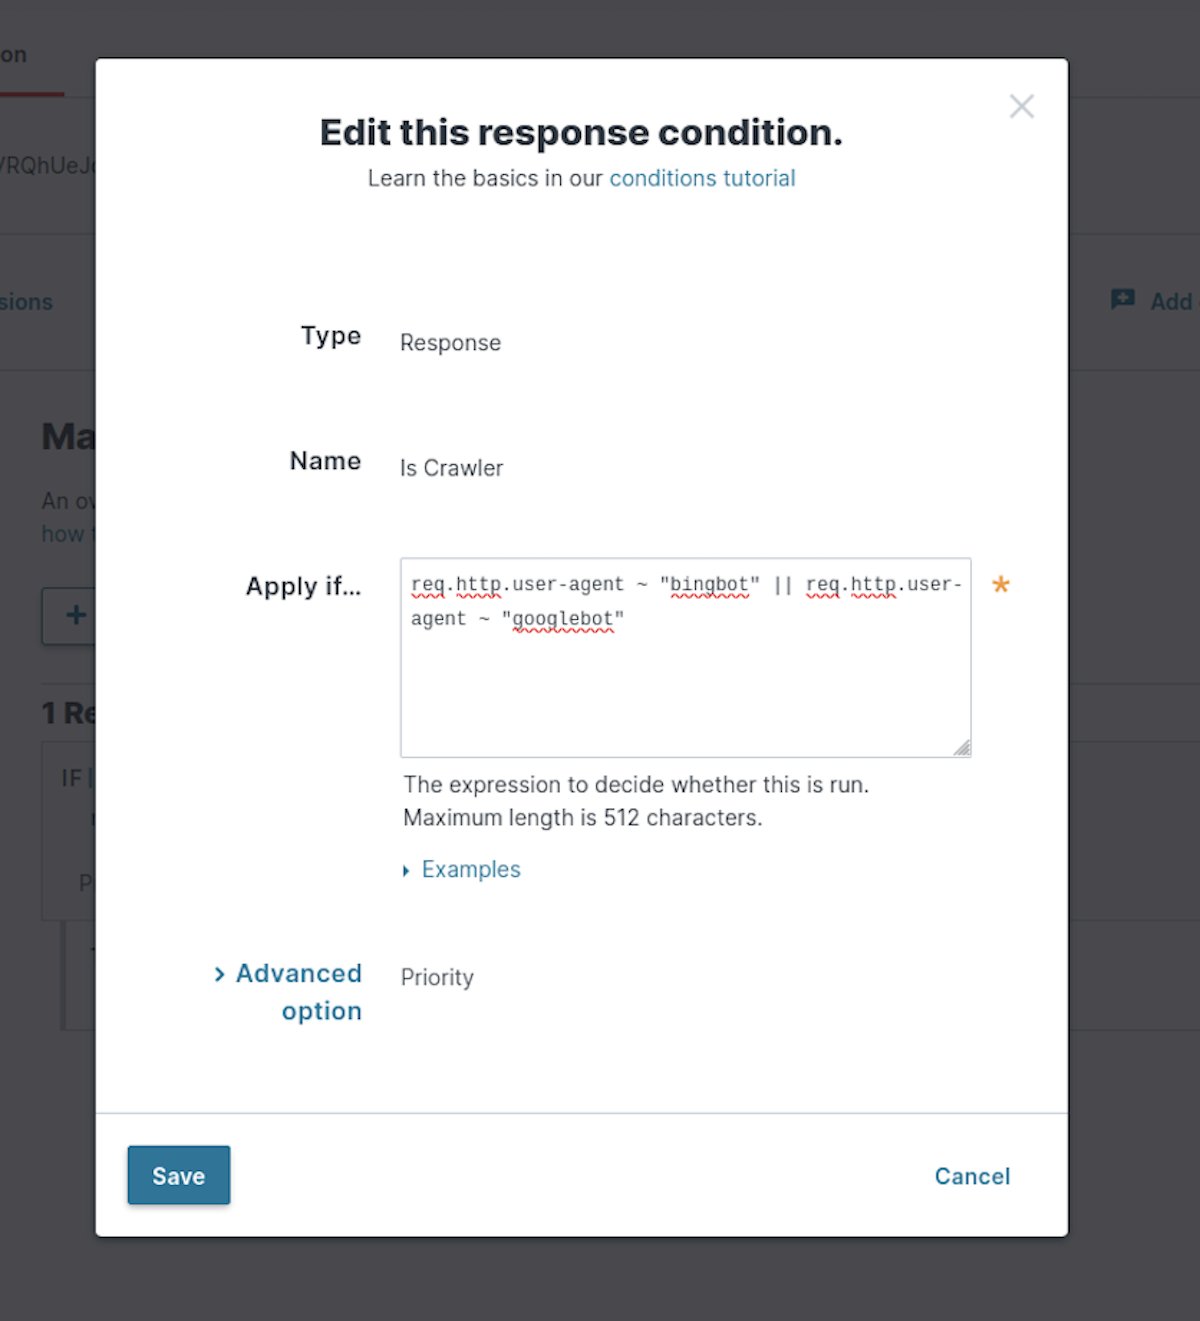
 3. In the **Condition details** screen, fill in the following condition:
* **Type**: Response
* **Name**: any name, e.g. "Is Crawler"
* **Apply if**... Paste the exact condition below:
`req.http.user-agent ~ "bingbot" || req.http.user-agent ~ "Googlebot" || req.http.user-agent ~ "OAI-SearchBot" || req.http.user-agent ~ "ChatGPT-User" || req.http.user-agent ~ "GPTBot" || req.http.user-agent ~ "PerplexityBot" || req.http.user-agent ~ "Perplexity-User"`
* **(Note:** These strings are case sensitive. Confirm you have the precise upper- and lower-case letters.**)**
4. Click **Save**.
3. In the **Condition details** screen, fill in the following condition:
* **Type**: Response
* **Name**: any name, e.g. "Is Crawler"
* **Apply if**... Paste the exact condition below:
`req.http.user-agent ~ "bingbot" || req.http.user-agent ~ "Googlebot" || req.http.user-agent ~ "OAI-SearchBot" || req.http.user-agent ~ "ChatGPT-User" || req.http.user-agent ~ "GPTBot" || req.http.user-agent ~ "PerplexityBot" || req.http.user-agent ~ "Perplexity-User"`
* **(Note:** These strings are case sensitive. Confirm you have the precise upper- and lower-case letters.**)**
4. Click **Save**.
 ### Attaching the condition to the needed endpoint
To attach the condition to the created endpoint follow these steps:
1. Open the Logging endpoints screen by clicking on **Logging** in the left-hand navigation bar, and clicking **Attach condition** for the endpoint you've just created.
### Attaching the condition to the needed endpoint
To attach the condition to the created endpoint follow these steps:
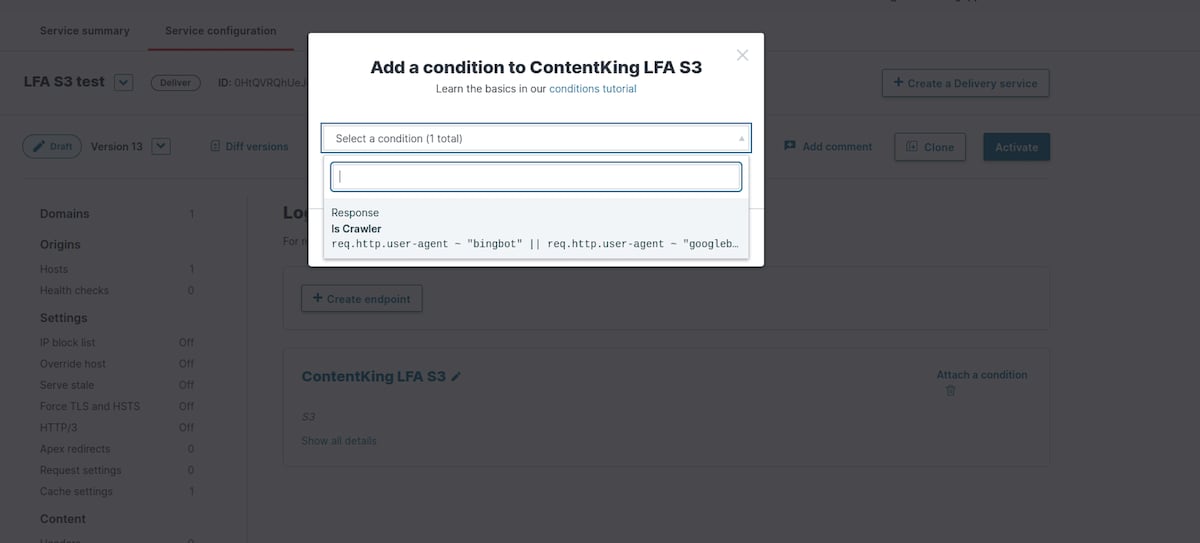
1. Open the Logging endpoints screen by clicking on **Logging** in the left-hand navigation bar, and clicking **Attach condition** for the endpoint you've just created.
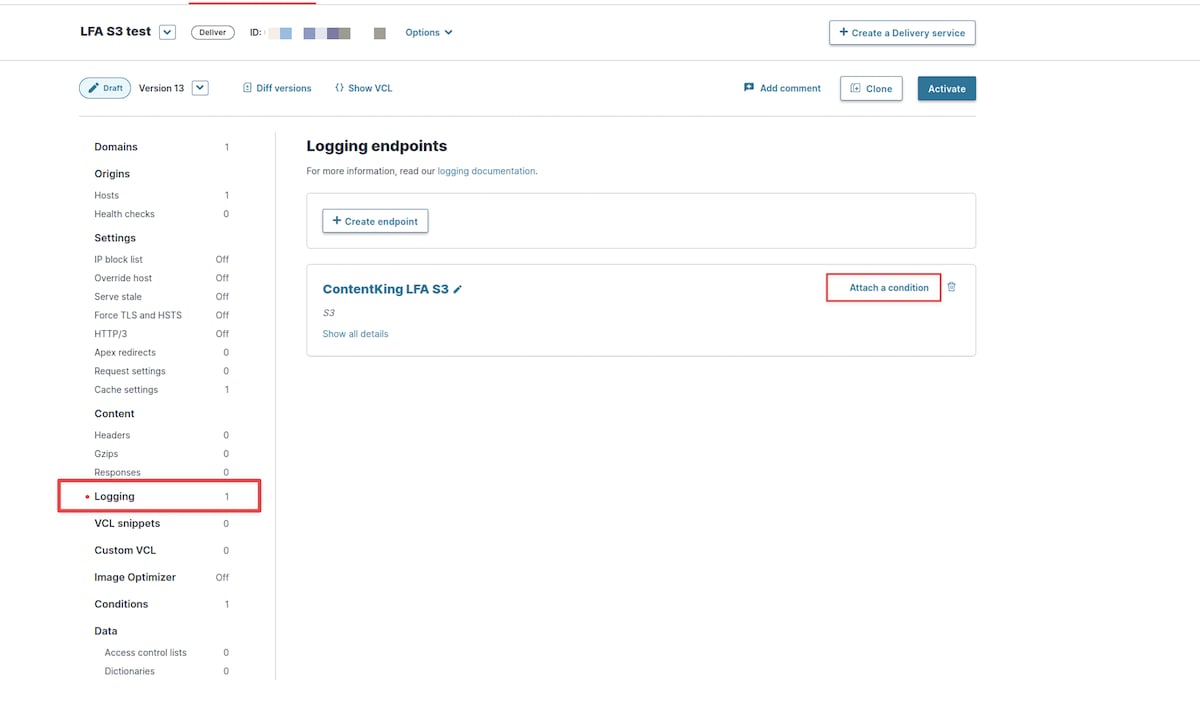 2. In the **Add a condition** screen, select the condition you've just set up:
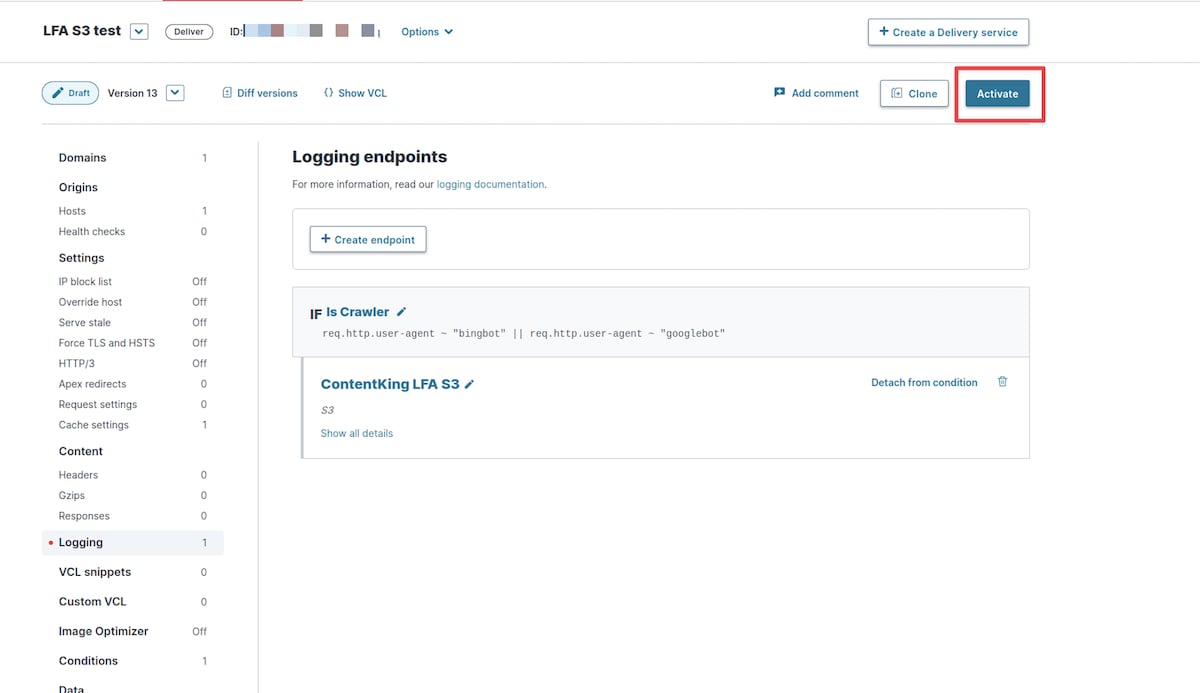 3. To save all changes, just click **Activate**.
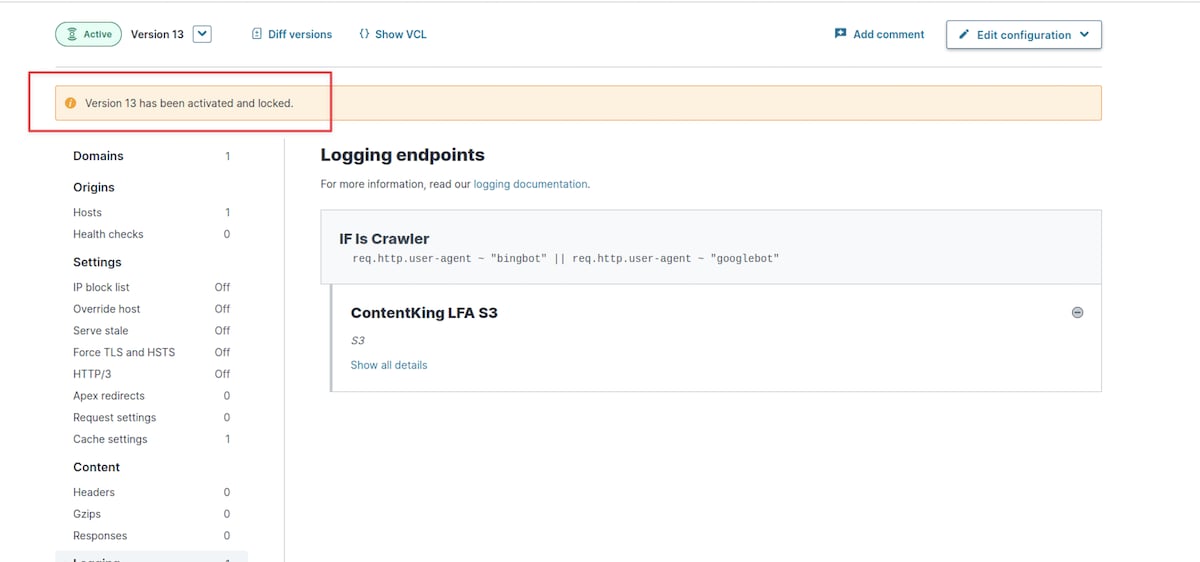
 If everything has been configured correctly, you should see a success message.
 ## Disabling Log File Data in Conductor Intelligence's Pages Reports
1. In **Pages & Crawling**, hover over the subdomain for which you want to remove Fastly and click **Edit** in the **Log Source** column.
2. In the bottom-right of the **Connect Fastly** form, click **Remove**.
3. Click **Remove Log Source** to confirm.
Conductor Intelligence cannot access your Fastly account, so you also need to remove the logging endpoint manually in the Fastly UI.
## Disabling Log File Data in Conductor Intelligence's Pages Reports
1. In **Pages & Crawling**, hover over the subdomain for which you want to remove Fastly and click **Edit** in the **Log Source** column.
2. In the bottom-right of the **Connect Fastly** form, click **Remove**.
3. Click **Remove Log Source** to confirm.
Conductor Intelligence cannot access your Fastly account, so you also need to remove the logging endpoint manually in the Fastly UI.