
If you have issues with the tool you want to connect, contact Conductor—we can work with you to get you connected.
Authenticating custom connections
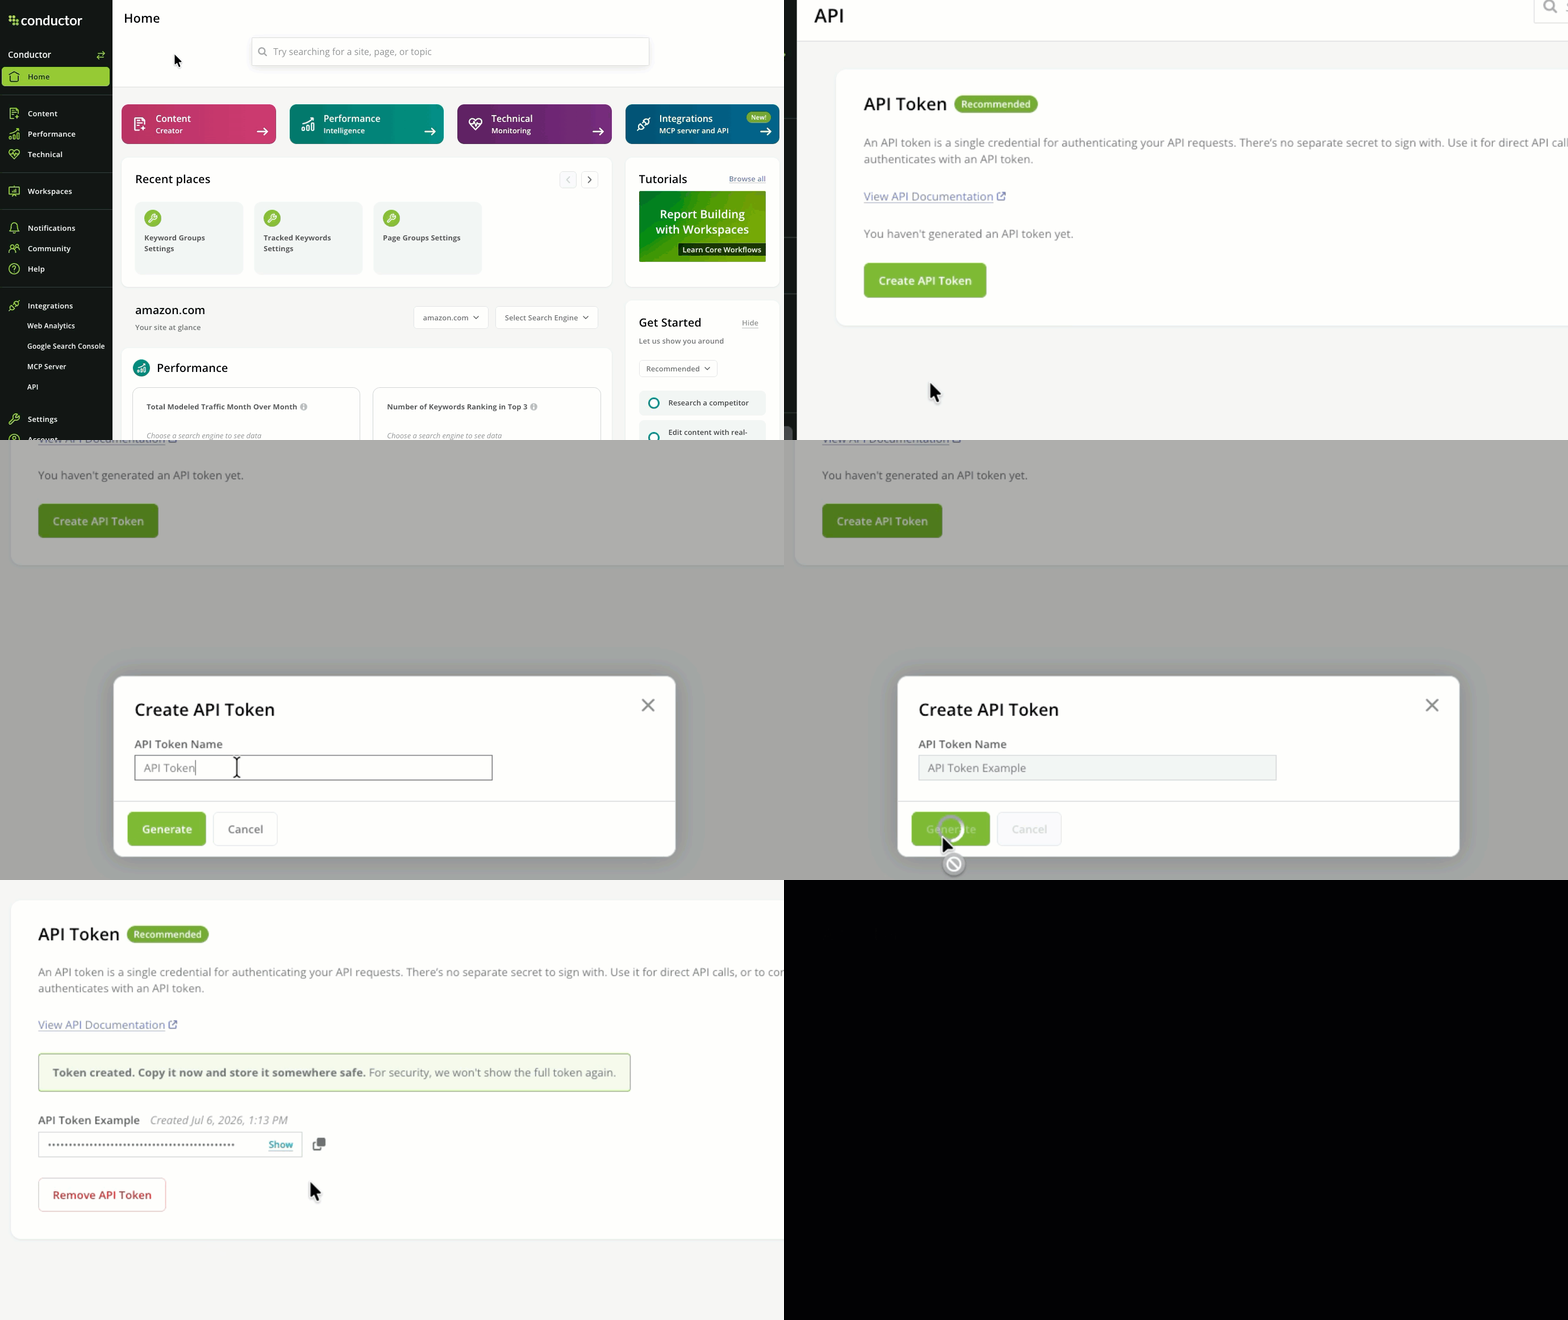
Conductor supports OAuth, Bearer, or Header authentication.- OAuth
- Bearer token auth
- Header auth
Conductor supports OAuth connections to ChatGPT, Claude, and Perplexity. For these platforms, simply use your Conductor platform credentials to sign in.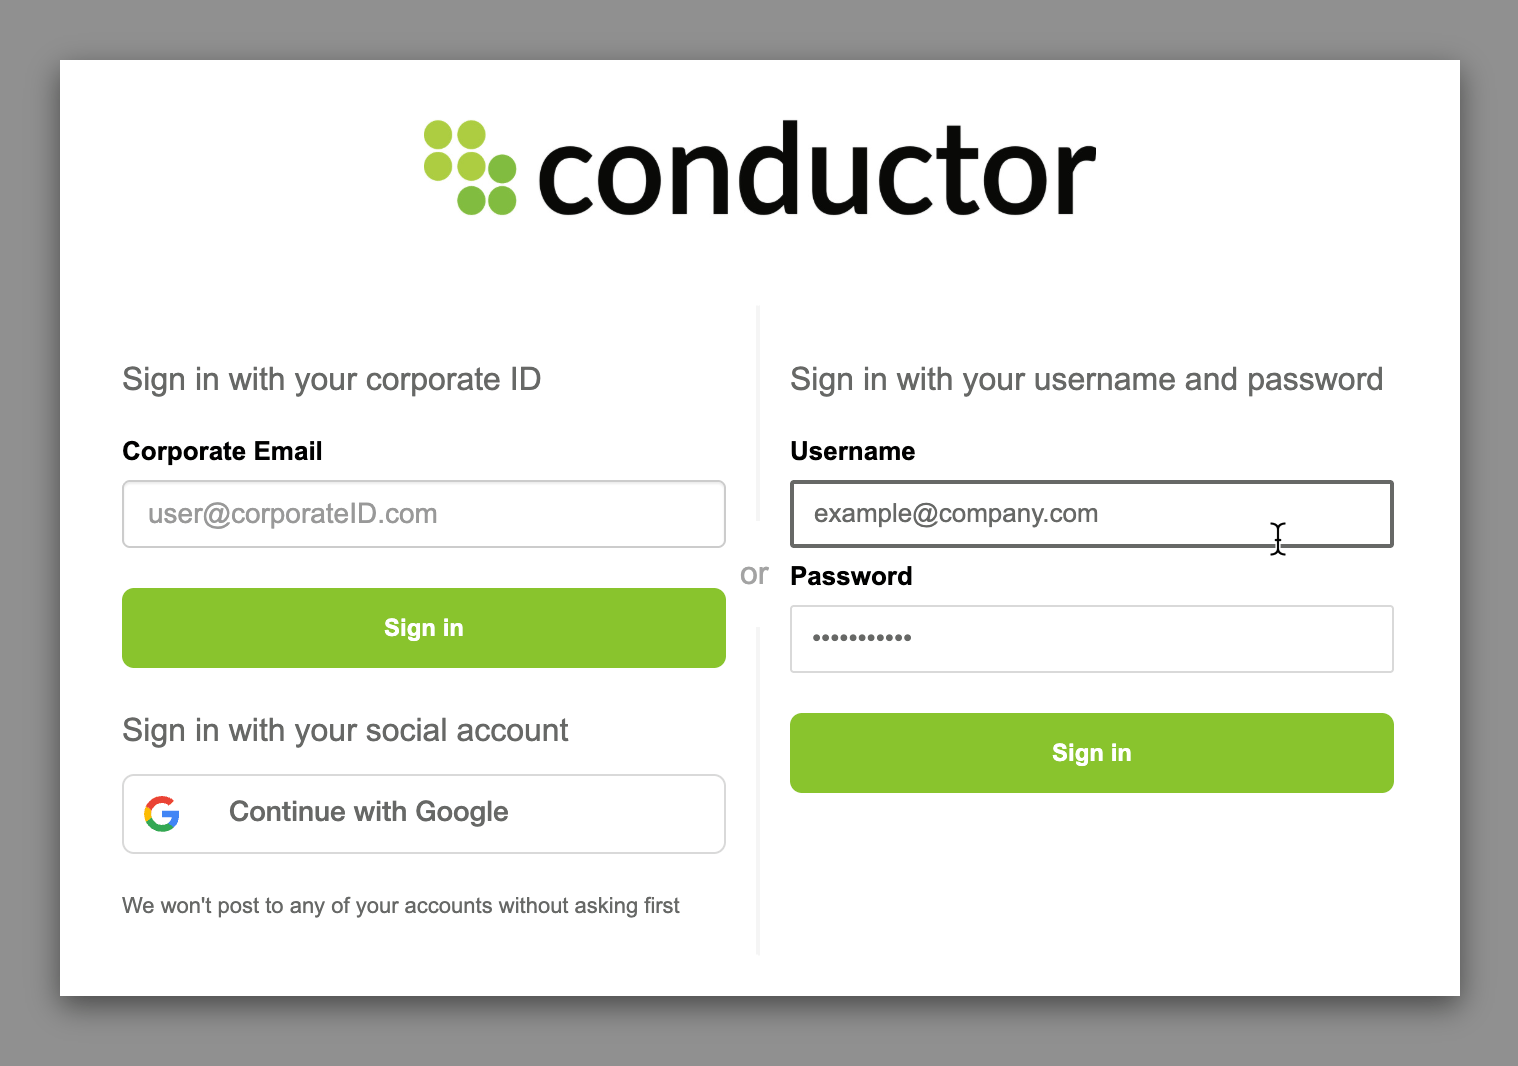
Versions and available tools
Conductor now provides access to its version 4 MCP. Review the tabs below to learn what tools are available in each version. To learn about each tool’s capabilities, refer to the MCP Tool Reference.- v4
- v3
- v2
- v1
Connector URL
https://mcp-universal.conductor.com/mcp/v4Available tools
add_knowledge_sourceai_brand_insightsai_citation_insightsai_query_fan_out_insightscreate_content_briefcreate_content_profilegenerate_draft_contentget_content_brief_insightsget_content_profileget_content_scoreget_draftget_draft_progress
get_knowledge_sourcekeyword_insightslist_content_profileslist_draftslist_knowledge_sourcessuggest_internal_linkssuggest_title_and_meta_descriptionstracked_configsupdate_content_brief_insightsupdate_content_profileupdate_draft_contentupdate_draft_internal_links
Connecting Conductor to our supported LLMs
Conductor publishes native connectors for ChatGPT, Claude, and Copilot. Where a native connector exists it’s the faster setup, so reach for a custom connection when you want Conductor’s newest tool set ahead of the platform’s review cycle—or when the platform has no native listing at all. Perplexity is custom-only. Each platform’s tool list, native setup, and querying instructions stay on its own page: ChatGPT & Codex, Claude, and Copilot. Perplexity is documented entirely below.Connect Claude with Conductor
Connect Claude with Conductor
Custom connectors work across Claude, Claude Cowork, and Claude Code. To register the server from the terminal instead, see Connect the Claude Code CLI with Conductor.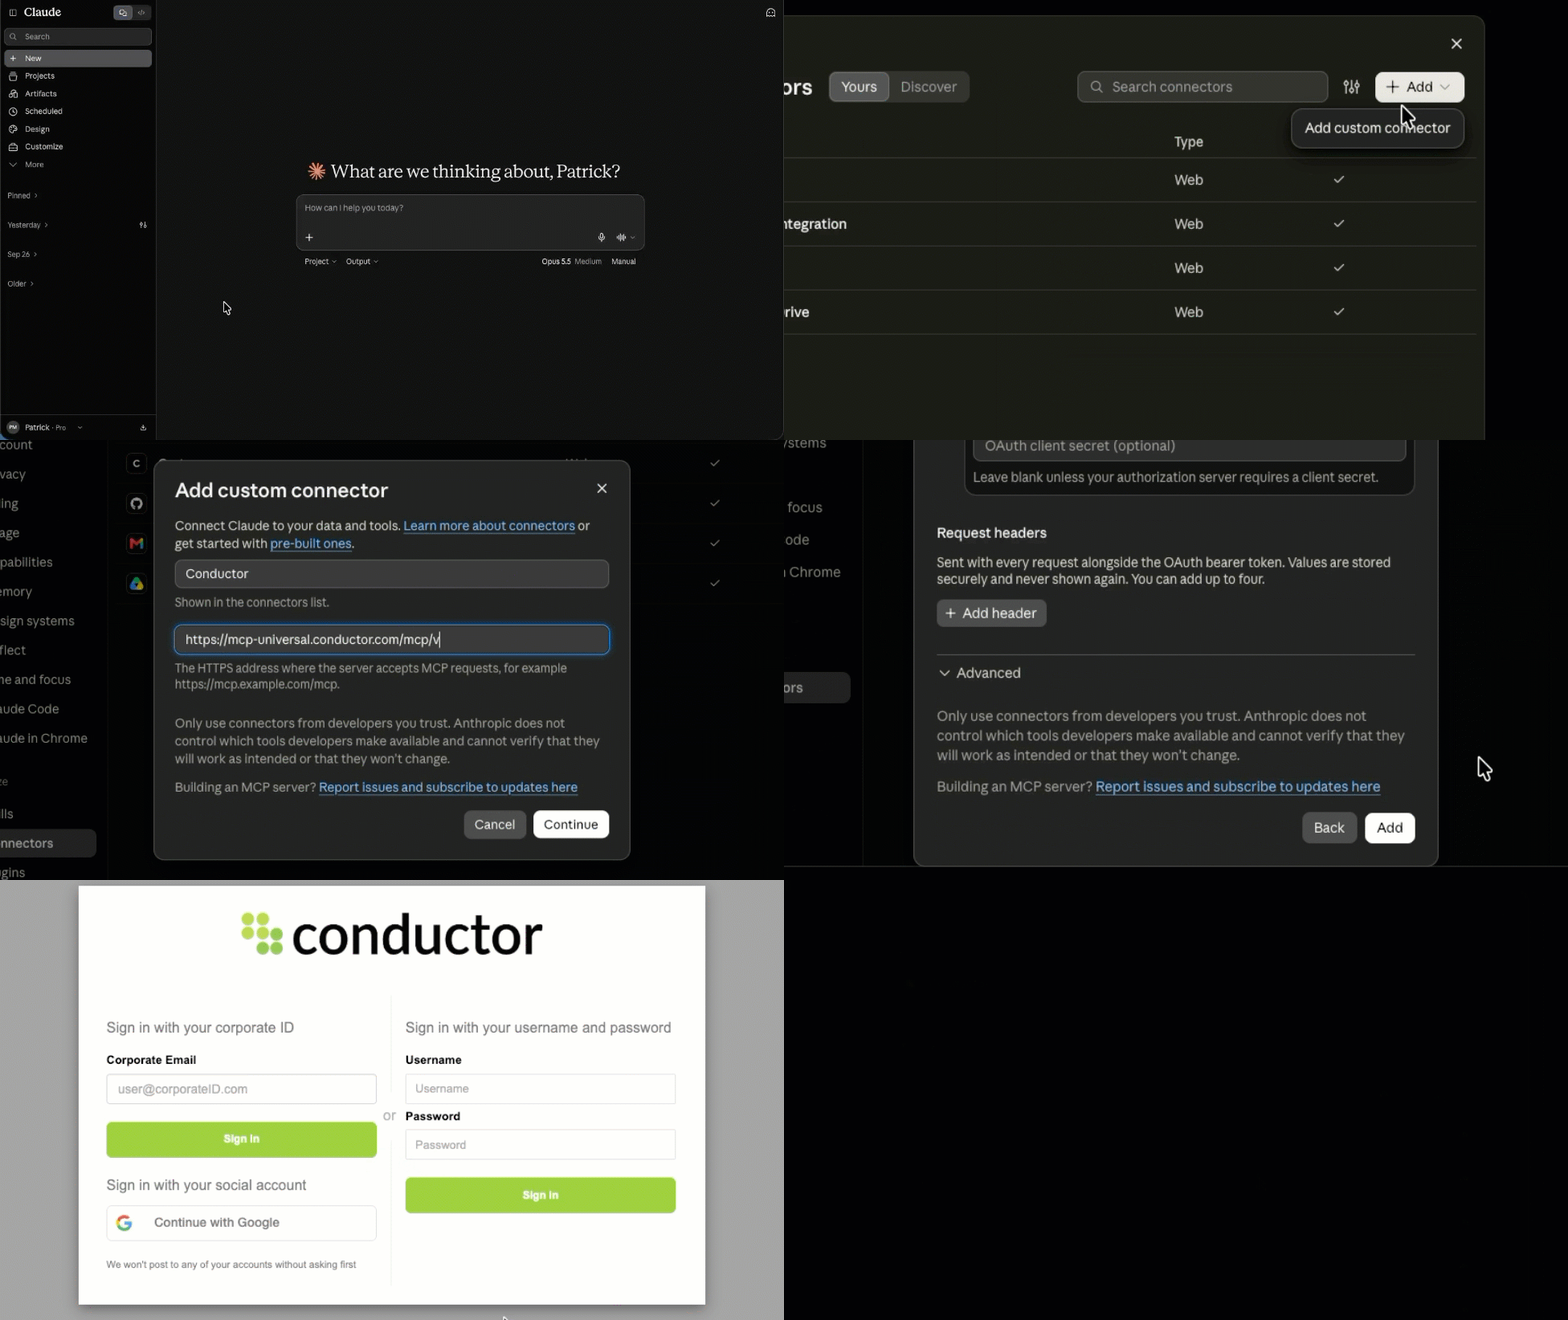
Verify your Claude plan and permissions
Custom connectors using remote MCP are available on Claude, Cowork, and Claude Code for users on Pro, Max, Team, and Enterprise plans.(Anthropic’s documentation indicates that Free users can add custom connections, but are limited to one custom connector. However, Conductor did not find that this was possible.)From Anthropic:While anyone can build and host connectors using remote MCP, only Owners can add them to Team and Enterprise plans. Once a connector has been added to a Team or Enterprise organization, users individually connect to and enable that connector. This ensures that Claude can only access tools and data that the individual user has access to.
Configure your custom connector
For more context, you can review Anthropic’s article about configuring custom connectors. However, we will provide all necessary instructions here:For Team and Enterprise plans
Prerequisite steps for ownersBefore members of Team and Enterprise plans can configure custom connectors, an Owner or Primary Owner needs to perform the following steps to add a custom connector to your organization.- Go to Claude.
- Go to Organization settings > Connectors.
- Click Add.
- Hover over Custom, then select Web.
- Complete the form as follows:
- Name:
Conductor - Remote MCP server URL:
https://mcp-universal.conductor.com/mcp/v4
- Name:
- Click Advanced settings and complete:
- OAuth Client ID:
4fhi7qah4mg0fane9gp9s3i6i5 - OAuth Client Secret: [leave blank]
- OAuth Client ID:
- Click Add. Anthropic will process your information, and you will be redirected to a Conductor authentication screen.
- Authenticate using your Conductor credentials.
- Go to Claude.
- Go to Customize > Connectors.
- Find the Conductor connector your Owner added in the list. It carries a Custom label.
- Click Connect. You will be redirected to a Conductor authentication screen.
- Authenticate using your Conductor credentials.
For Pro and Max plans
- Go to Claude.
- Go to Customize > Connectors.
- In the top-right of the Connectors window, click the Add, and then select Add custom connector.
- Complete the form as follows:
- Name:
Conductor - Remote MCP server URL:
https://mcp-universal.conductor.com/mcp/v4
- Name:
- Click Continue.
- In the OAuth client section, complete these fields:
- OAuth Client ID:
4fhi7qah4mg0fane9gp9s3i6i5 - OAuth Client Secret: [leave blank]
- OAuth Client ID:
- Click Add. Anthropic will process your information, and you will be redirected to a Conductor authentication screen.
- Authenticate using your Conductor credentials.
Connect the Claude Code CLI with Conductor
Connect the Claude Code CLI with Conductor
If you can’t—or would rather not—connect Conductor through the Claude apps, you can install Anthropic’s Claude Code command-line interface, and register Conductor’s MCP server yourself. This is the path to use when your organization has disabled the Claude web and desktop apps, or when you simply prefer to work in a terminal.You authenticate the same way as any other Claude surface: with your Conductor credentials, through Conductor’s OAuth flow.Authorization still fails on port 8080 or 8081. Check your Claude Code version:Conductor recognizes the callback address only as
Install Claude Code
Follow Anthropic’s Claude Code quickstart to install the CLI and log in to your Claude account. Anthropic’s advanced setup guide lists system requirements and platform-specific installers, and its installation troubleshooting coverscommand not found and sign-in errors.When claude --version returns a version number, you’re ready to add Conductor.Add Conductor’s MCP server
Run the following from your terminal—not from inside aclaude session:-
--client-idis Conductor’s OAuth client ID—the same one the custom connector uses. There’s no client secret to provide. -
--callback-portmust be8080or8081. Use8081if another program on your machine is already listening on8080. -
--scope userregisters Conductor once for every project on your machine. Omit it to register Conductor only for the directory you’re currently in.
Authorize Conductor
- Start a session with
claude. - Run
/mcpand select conductor. - Claude Code opens Conductor’s authentication screen in your browser. Authenticate using your Conductor credentials.
- Return to your terminal. Conductor’s tools are available in the session.
claude mcp list. Conductor appears in the list with its connection status.Troubleshoot the connection
The browser showsredirect_mismatch. The URL reads https://auth.conductor.com/error?error=redirect_mismatch. Claude Code used a callback port Conductor doesn’t recognize—usually because the server was added without --callback-port. Remove the server, then add it again with the port pinned:localhost. Claude Code versions before 2.1.231 send 127.0.0.1 instead, which doesn’t match. Run claude update to move to a current version, then authorize again.Connect ChatGPT and Codex with Conductor
Connect ChatGPT and Codex with Conductor
A single custom connection covers both ChatGPT and Codex—you don’t need to configure each one separately.Configuring a custom connection currently requires you to: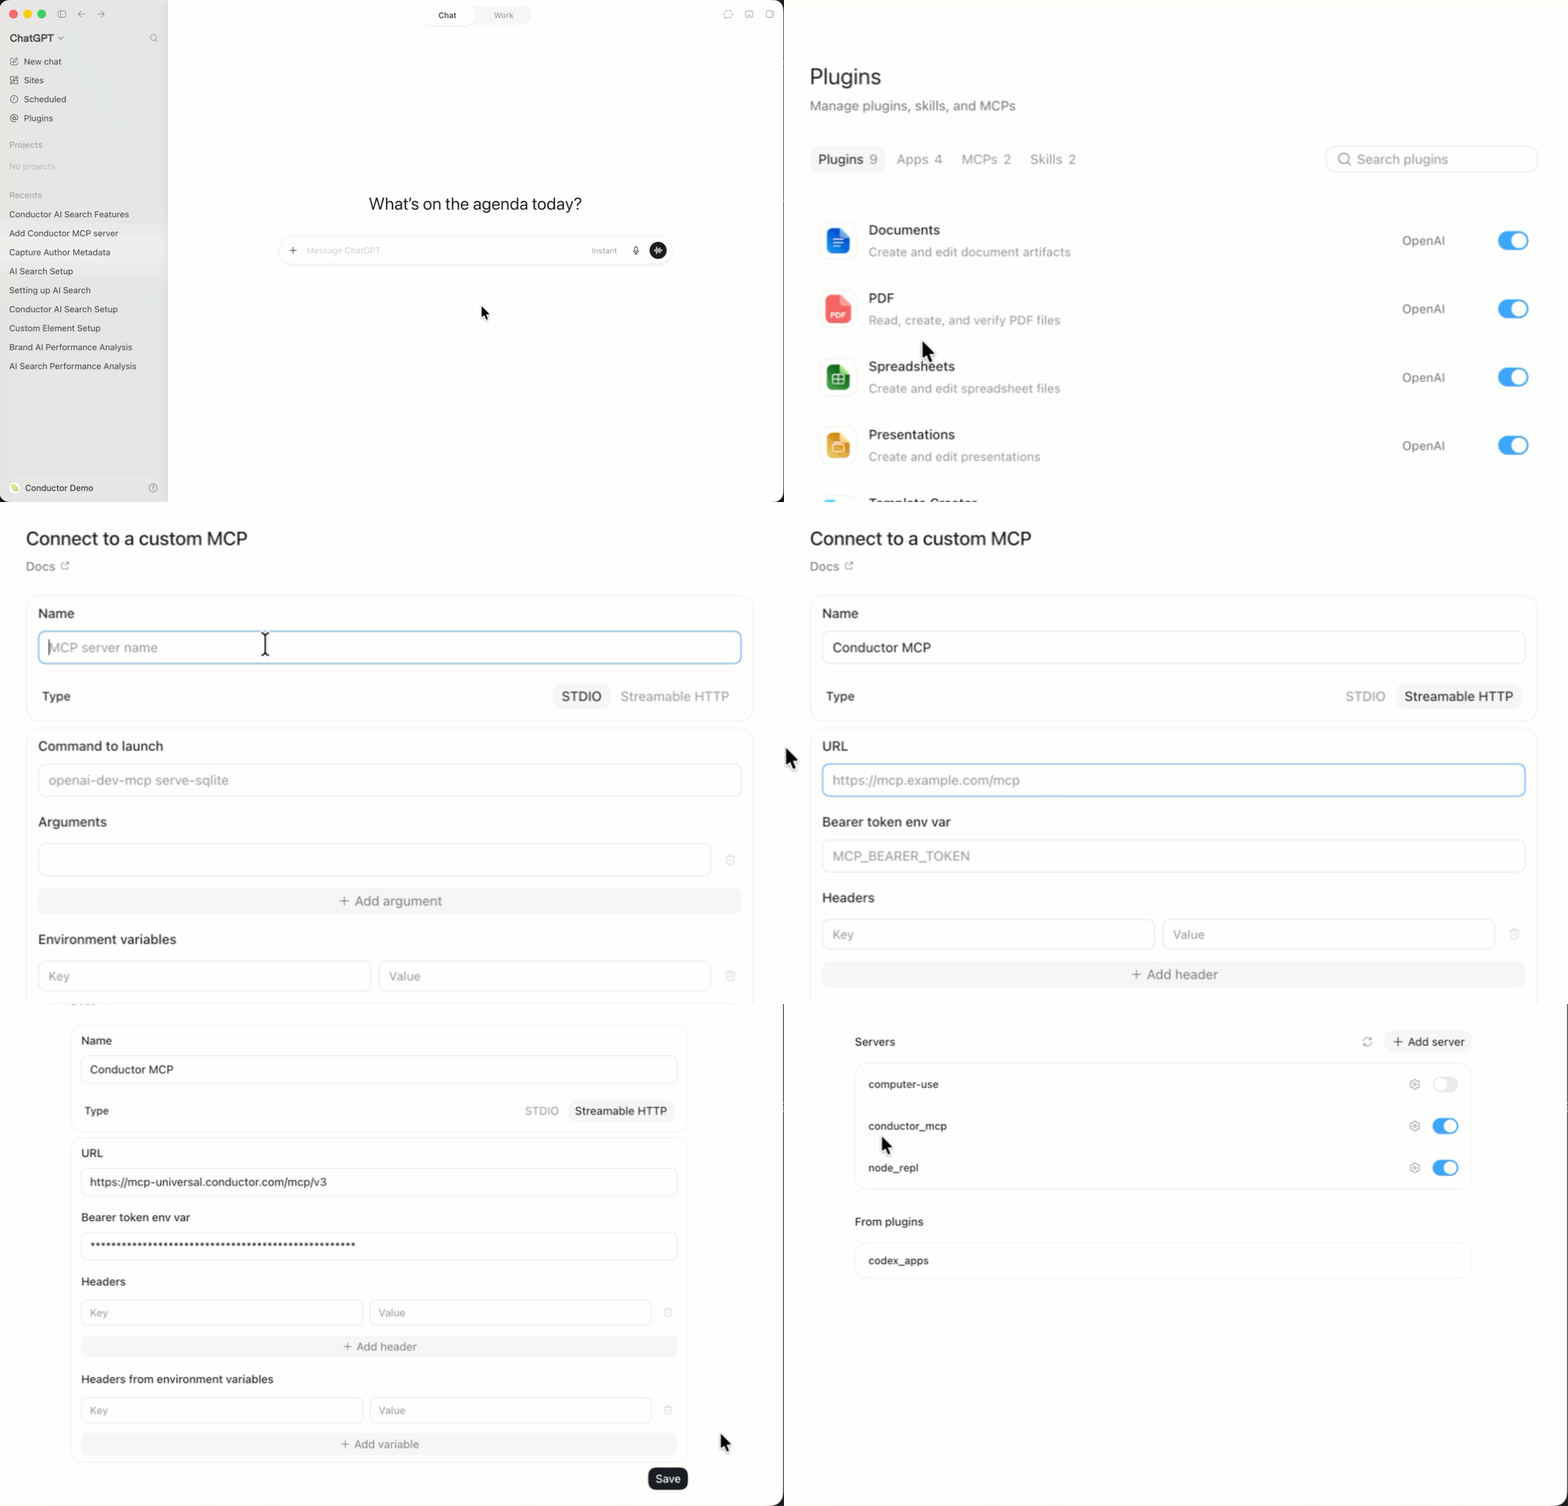
- Create an API token in the Conductor platform. Learn how: Authenticating custom connections
- Add the custom MCP connection in your OpenAI account settings.
Verify your ChatGPT plan and permissions
To set up this connection, you will need to have the ability to create plugins. Doing so requires:- Any of ChatGPT’s paid plans: Pro, Plus, Business, Enterprise, and Education.
- Admin access.
Configure your custom connection
Before members of Business, Enterprise, and Education plans can use a custom plugin, an Admin user needs to perform the following steps to add the plugin to your organization’s Workspace. (If your organization uses multiple ChatGPT Workspaces, this configuration would have to be done in each.)- Go to ChatGPT.
- If you are not already, sign into the paid account you want to use to configure this integration. Be sure to use the correct account (likely an account belonging to your organization and not your personal ChatGPT account).
- From the navigation on the left, click your profile and select Settings.
- On the left, click Security and login.
- Scroll to the Developer mode section and enable Developer mode if not already enabled.
- On the left, click Plugins, then click Browse plugins.
- In the top-right, click the Plus (+) icon.
- In the New Plugin form, complete the following:
- Name:
Conductor - Connection:
- Toggle above field:
Streamable HTTP - Field:
https://mcp-universal.conductor.com/mcp/v4
- Toggle above field:
- Authentication:
Access token / API key - Header scheme:
Bearer
- Name:
- Select the I understand and want to continue checkbox.
- Click Create. OpenAI will process your information.
- In the authentication form that appears, enter the API token you generated above and click Connect.
Connect Perplexity with Conductor
Connect Perplexity with Conductor
Verify your Perplexity plan and permissions
Custom connectors using remote MCP are available for users on individual Pro plans and Enterprise plans.From Perplexity:Organization members can add custom remote connectors if admins enable them for the organization. How you add a remote connector depends on whether an admin adds it for the entire organization or a user (including admins) adds it for their own account. In both cases, the steps are largely the same. The main difference is that only admins can share connectors with the entire organization.
Configure your custom connector
For more context, you can review Perplexity’s article about configuring custom connectors. However, we will provide all necessary instructions here:For Enterprise plans
Prerequisite steps for adminsBefore Organization members of Enterprise plans can add custom connectors from the Connectors screen, an admin needs to perform the following steps to add a custom connector to your organization.- Go to Perplexity.
- In your Enterprise settings, click Connectors.
- Click the toggle to Allow members to add custom connectors.
- In the Access section, click + Custom connector.
- Complete the Add custom remote connector form as follows (you’ll need to click the drop-down to see Advanced settings):
- Name:
Conductor - MCP server URL:
https://mcp-universal.conductor.com/mcp/v4 - Authentication:
OAuth - Client ID:
5pa2l8d0uckl8ddqmr0dhnit0u - Client Secret: [Conductor will provide this value separately]
- Name:
- Select the I understand custom connectors can introduce risks check box.
- Click Add. The connector appears on the Connectors screen in your Account settings.
- In the Access section below, find the Conductor connector and enable the toggle to allow users to add the connector.

- Open your Account settings, click Connectors.
- Find and click the Conductor custom connector your admin added under the Custom section. You will be redirected to a Conductor authentication screen.
- Authenticate using your Conductor credentials.

For individual Pro plans
- Go to Perplexity.
- Go to your Account settings and select All settings.
- Click + Custom connector in the top-right corner.
- Select Remote.
- Complete the Add custom remote connector form as follows (you’ll need to click the drop-down to see Advanced settings):
- Name:
Conductor - MCP server URL:
https://mcp-universal.conductor.com/mcp/v4 - Authentication:
OAuth - Client ID:
5pa2l8d0uckl8ddqmr0dhnit0u - Client Secret: [Conductor will provide this value separately]
- Name:
- Click Add. The connector appears on the Connectors screen in your Account settings.
- Click the connector card. Perplexity will process your information, and you will be redirected to a Conductor authentication screen.
- Authenticate using your Conductor credentials.
Query your data
To access your data from the Perplexity interface:- Click the + icon.
- In the Connectors and sources menu, confirm that the check box for the Conductor connector is selected. If not, select it.
- Enter a query.

Examples for connecting Conductor’s MCP to other platforms
The examples below show how to connect each platform to Conductor’s MCP server. Each uses the MCP server URLhttps://mcp-universal.conductor.com/mcp/v4 and the authentication method that platform supports—for most, the API token generated above.
These directions describe the general approach for each platform. The exact labels and menu locations may change as these third-party tools evolve—consult each platform’s own documentation to be sure.
Connect Abacus with Conductor
Connect Abacus with Conductor
Abacus.AI’s ChatLLM lets you register remote MCP servers from its agent settings.
- In Abacus.AI, open Agent Settings and select MCP Server Config from the sidebar.
-
Add a JSON entry for Conductor that includes the server URL and an
Authorizationheader carrying your API token: - Save the configuration. Abacus queries the server and lists Conductor’s available tools.
Connect Google Gemini Enterprise with Conductor
Connect Google Gemini Enterprise with Conductor
Gemini Enterprise connects to Conductor through a Custom MCP Server data store. Unlike the other platforms on this page, Gemini Enterprise offers only No authentication or OAuth 2.0—there’s no field for a Bearer token or a custom header—so this connection uses OAuth rather than your Conductor API token.
Get your client secret from Conductor
The client secret for the Gemini Enterprise OAuth client isn’t published on this page. Contact Conductor to request it before you start—you’ll enter it when you create the data store.Prerequisites
Gemini Enterprise blocks custom MCP data stores by default. Before you begin, a Google Cloud administrator must:- Set the Disable custom MCP server connector for Gemini Enterprise organization policy constraint to Off (Not enforced). This requires an Organization Policy Administrator.
- Add all three of Conductor’s hosts to the
allowedEgressFqdnsparameter in your egress domain policy:mcp-universal.conductor.com,auth.conductor.com, andprod-conductor.auth.us-east-1.amazoncognito.com. Miss either of the last two and the OAuth exchange fails even though the MCP server itself is reachable. - Add
custom_mcpto the allowed data sources, if project enforcement is enabled or the project is protected by VPC Service Controls. - Grant the Discovery Engine Editor (
roles/discoveryengine.editor) role to whoever creates the data store.
Create the data store
- In the Google Cloud console, go to Gemini Enterprise.
- In the navigation menu, click Data stores, then click Create data store.
- On the Select a data source page, enter
Custom MCP Serverin the Search sources field, then click Add MCP server on the card that appears. - In the Authentication settings section, select OAuth 2.0 and complete the form:
- MCP Server URL:
https://mcp-universal.conductor.com/mcp/v4 - Authorization URL:
https://auth.conductor.com/oauth2/authorize - Authorization URL Parameters: leave empty. Gemini Enterprise appends the standard OAuth parameters itself.
- Token URL:
https://prod-conductor.auth.us-east-1.amazoncognito.com/oauth2/token - Client ID:
2ff2jkrpif0dmb7meqc4tc0o4d - Enable PKCE Support: on. Conductor’s authorization server supports PKCE with the
S256challenge method—turn this off only if the token exchange errors. - Client Secret: [Enter the client secret you received from Conductor]
- Scopes:
openid profile email
- MCP Server URL:
- Click Verify Auth, then click Continue.
- Select Multi-region as the location, enter a name in Your data connector name (for example,
Conductor), and click Create.
Enable Conductor’s tools
When the data store reaches Active, Gemini Enterprise imports Conductor’s tools but leaves them disabled.- Open your new Custom MCP data store.
- Click Actions > Reload custom actions to fetch the list of available tools.
- Select the tools you want, then click Enable actions. You can enable up to 100 at a time.
- Connect the data store to the app or agent that should use it. See Google’s guide to connecting a data store to an app for the steps.
- Authorize the connection: open the app, select Manage your data, click Enable actions next to the Conductor data store, and sign in with your Conductor credentials.
Connect LibreChat with Conductor
Connect LibreChat with Conductor
LibreChat connects to remote MCP servers through the
mcpServers block in your librechat.yaml file.-
Open your
librechat.yamlconfiguration file. -
Add Conductor as a
streamable-httpserver, passing your API token in theAuthorizationheader. SetrequiresOAuth: falseso LibreChat uses your header instead of attempting an OAuth flow: - Restart LibreChat so it picks up the new server, then select Conductor in the MCP menu.
Connect Lovable with Conductor
Connect Lovable with Conductor
Lovable connects to MCP servers as “chat connectors.” Custom MCP servers are available on paid plans.
- In Lovable, open Connectors and go to Chat connectors.
- Click New MCP server.
- Enter a Server name (for example,
Conductor) and set the Server URL tohttps://mcp-universal.conductor.com/mcp/v4. - Under Authentication, choose Bearer token or API key and paste your Conductor API token.
- Click Add server. Conductor now appears in your list of chat connectors.
Connect n8n with Conductor
Connect n8n with Conductor
In n8n, use the MCP Client Tool node to expose Conductor’s tools to an AI agent.
- Add an MCP Client Tool node to your workflow and connect it to your AI Agent node.
- Set the SSE Endpoint (server URL) to
https://mcp-universal.conductor.com/mcp/v4. - Set Authentication to Bearer Auth, then create a credential whose token is your Conductor API token. If you prefer to send the token yourself, choose Header Auth and add an
Authorizationheader with the valueBearer YOUR_CONDUCTOR_API_TOKEN. - Save and execute the workflow. The agent can now call Conductor’s tools.
Connect Notion with Conductor
Connect Notion with Conductor
Notion supports custom MCP servers for Custom Agents once an admin enables the feature.
- A workspace admin enables custom connections in Settings > Notion AI > AI connectors > Enable Custom MCP servers.
- Open your Custom Agent’s Settings and go to Tools & Access.
- Click Add connection > Custom MCP server.
- Enter the MCP server URL
https://mcp-universal.conductor.com/mcp/v4and a display name (for example,Conductor). - When prompted for authentication, choose header-based auth and add an
Authorizationheader with the valueBearer YOUR_CONDUCTOR_API_TOKEN. - Click Save. Conductor’s tools become available to the agent.
Connect Replit with Conductor
Connect Replit with Conductor
Replit Agent can connect to any MCP server you add by URL.
- In Replit, open the MCP Servers settings pane and click Add MCP server.
- Paste the server URL
https://mcp-universal.conductor.com/mcp/v4. - Open Advanced settings and add a custom header:
- Key:
Authorization - Value:
Bearer YOUR_CONDUCTOR_API_TOKEN
- Key:
- Click Test & save. Once the connection succeeds, Conductor appears under MCP Servers and its tools are available to Agent.
Connect Writer with Conductor
Connect Writer with Conductor
Writer supports custom MCP servers as connectors you create in AI Studio.
- In Writer’s AI Studio, open Connectors & Tools and select Create custom connector.
- Choose MCP server as the connector type.
- Enter the MCP server URL
https://mcp-universal.conductor.com/mcp/v4, give the connector a name (for example,Conductor), and describe it under About this connector. Click Next. - Keep the default Profile name or update it, then choose whether the connector is available to all teams or to specific teams.
- For the authentication method, select API key and enter your Conductor API token. Conductor supports this connection as Bearer token auth, so use
Authorizationas the key name andBeareras the key prefix. Don’t choose No auth or OAuth—neither is supported for this connection. - Complete the connection flow. Conductor appears in your connected integrations, and its tools become available to authorized users in Writer Agent.
Change Log
- 2026-09-23 · Added — Conductor’s MCP is now available in a version 4 connector, which adds the Content tools. Point a custom connection at the v4 connector URL to get tools for briefs, drafts, Content Profiles, Knowledge Sources, editorial suggestions, and content scoring, alongside the existing AI Search and traditional search tools. Conductor continues to support pre-existing connections to v1, v2, and v3—you don’t need to reconnect.
- 2026-09-17 · Added — Google Gemini Enterprise can now connect to Conductor’s MCP as a Custom MCP Server data store. Gemini Enterprise supports only OAuth 2.0, not Bearer or Header auth, so it uses OAuth client credentials issued by Conductor rather than an API token.